
Roofing Slate Installation Guide
Natural roofing slate is one of the world’s most durable and prestigious roofing materials, but achieving its exceptional lifespan depends on proper installation. Every stage—from roof preparation and underlayment to batten spacing, headlap, slate fixing, and flashing—plays a vital role in creating a weatherproof, long-lasting roof.
This step-by-step roofing slate installation guide covers the complete installation process, including essential tools, fixing methods, roof details, safety considerations, and maintenance tips. Whether you are a roofing contractor, builder, architect, importer, or homeowner, this guide will help you understand professional installation practices and ensure the best performance from natural roofing slate.
Roofing Slate Installation at a Glance
| Difficulty | Professional Installation Recommended |
| Expected Lifespan | 100+ Years |
| Typical Roof Pitch | 20°–90° (depending on slate type and local codes) |
| Suitable For | Residential, Commercial & Heritage Buildings |
Explore the complete installation process below and learn how to build a beautiful, durable, and long-lasting natural slate roof.
Table of Contents
Why Proper Roofing Slate Installation Matters
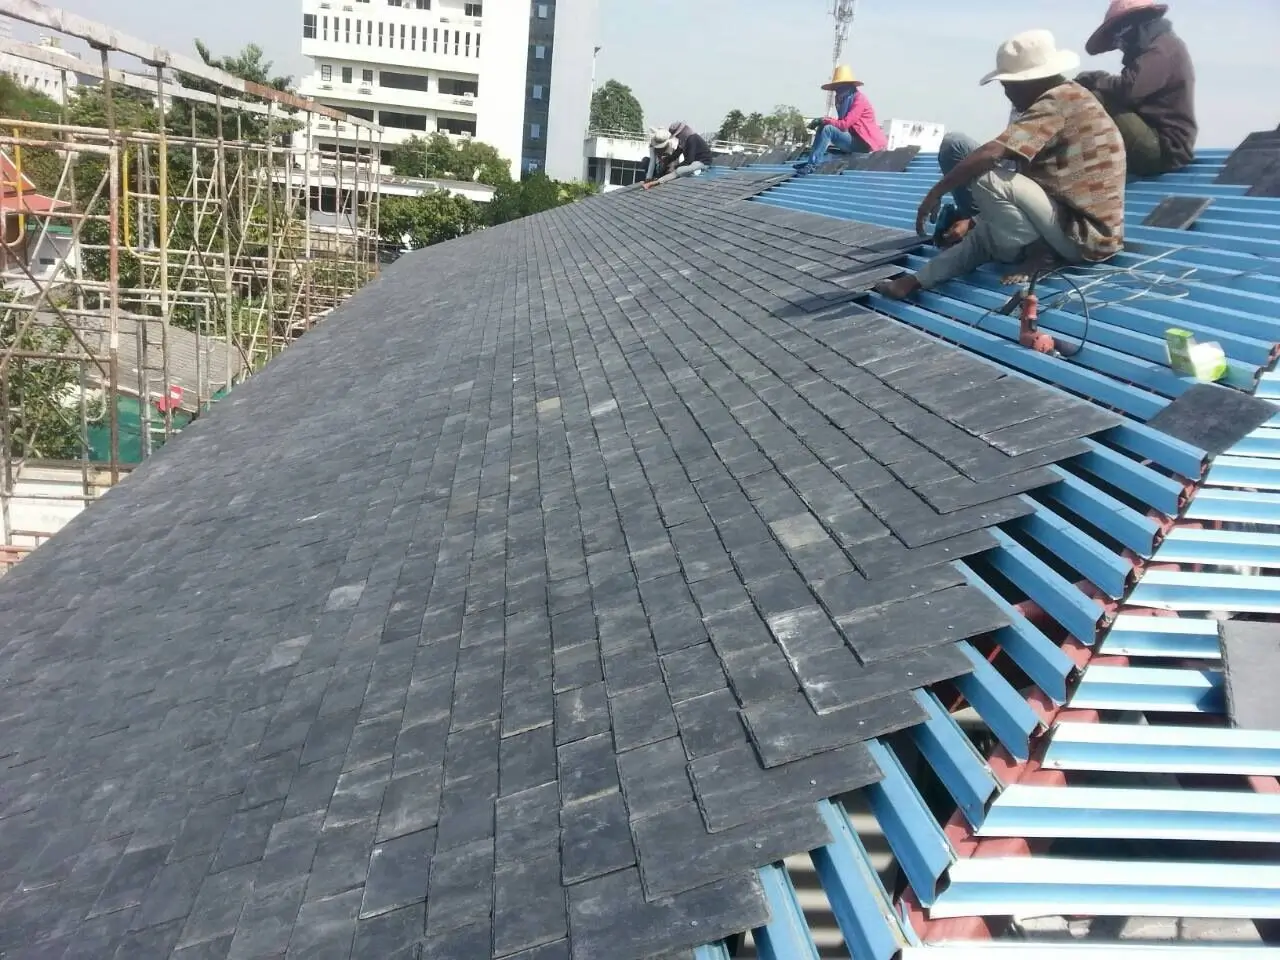
Natural roofing slate is widely recognized as one of the most durable and attractive roofing materials available. A professionally installed slate roof can last 100 years or more, offering outstanding resistance to rain, snow, wind, frost, UV exposure, and temperature changes. Its timeless appearance and exceptional durability have made slate the preferred roofing material for homes, churches, heritage buildings, and luxury properties around the world.
However, even the highest-quality roofing slate cannot perform as expected if it is installed incorrectly. Improper batten spacing, insufficient headlap, incorrect nail positioning, poor flashing details, or inadequate roof ventilation can lead to water penetration, slate breakage, loose tiles, and costly repairs. In most cases, installation quality has a greater impact on roof performance than the slate itself.
Whether you are a roofing contractor, builder, architect, distributor, or homeowner, understanding the correct installation process helps ensure a safe, weatherproof, and long-lasting roof. This guide walks you through every stage of roofing slate installation—from roof preparation and underlayment to fixing methods, valleys, ridges, and final inspection—using professional best practices that are widely accepted throughout the roofing industry.
By following the recommendations in this guide, you can reduce installation errors, improve roofing performance, extend the service life of natural slate, and achieve a roof that delivers beauty and protection for generations.
Why Correct Installation Is Essential
✔ Maximizes the lifespan of natural roofing slate
✔ Prevents water leaks and moisture damage
✔ Improves wind uplift resistance
✔ Reduces slate breakage and maintenance costs
✔ Ensures proper roof ventilation
✔ Creates a clean, professional roof appearance
✔ Protects your long-term investment
Before Installation: Essential Checks for a Successful Slate Roof
Make Sure Your Roof Is Ready Before Laying the First Slate
Proper preparation is just as important as the installation itself. Before laying the first roofing slate, every part of the roof system should be carefully inspected to ensure it is structurally sound, weather-ready, and suitable for natural slate.
Unlike lightweight roofing materials, natural roofing slate is a premium product with a long service life and greater weight. A well-designed roof structure, the correct roof pitch, quality underlayment, and favorable weather conditions all contribute to a durable, weatherproof slate roof that can last for more than a century.
Before beginning your roofing slate installation, check the following key factors.
1. Roof Pitch
Why Roof Pitch Matters
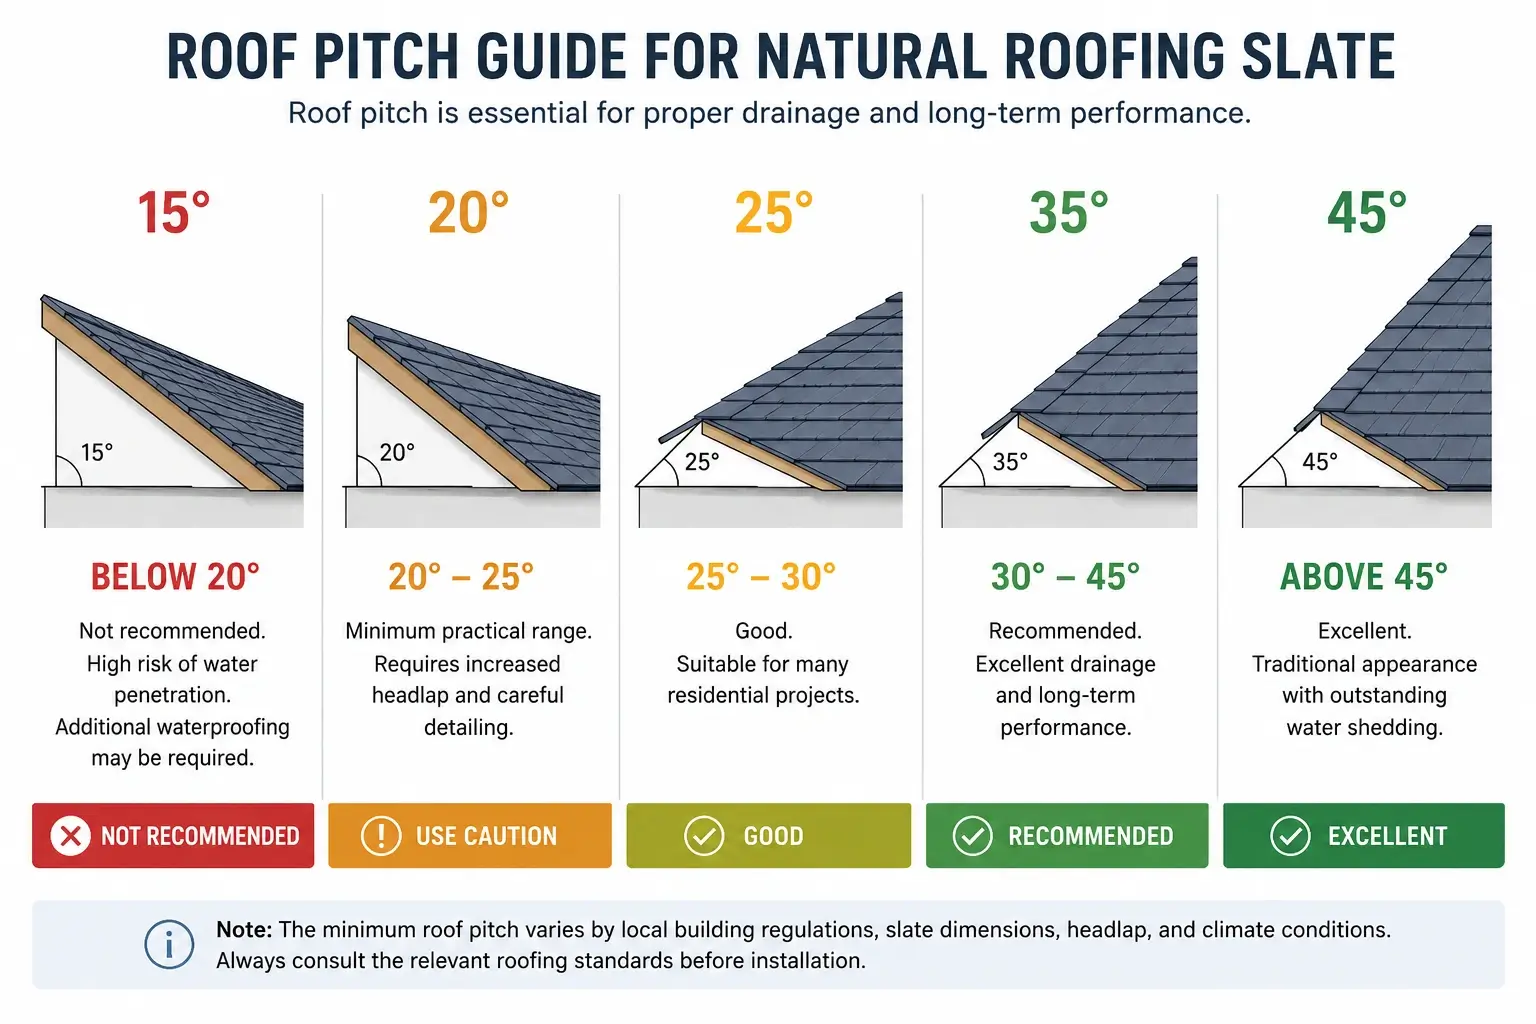
Roof pitch is one of the most critical factors in slate roof installation. A roof that is too flat cannot drain rainwater efficiently, increasing the risk of water penetration beneath the slates. A properly designed roof pitch improves water shedding, wind resistance, and the overall lifespan of the roofing system.
The minimum acceptable roof pitch depends on several factors, including:
- Slate size
- Headlap
- Local climate
- Wind exposure
- National roofing standards
As a general rule, steeper roofs provide better drainage and require less maintenance over time. However, always follow local building regulations and the recommendations of your slate supplier.
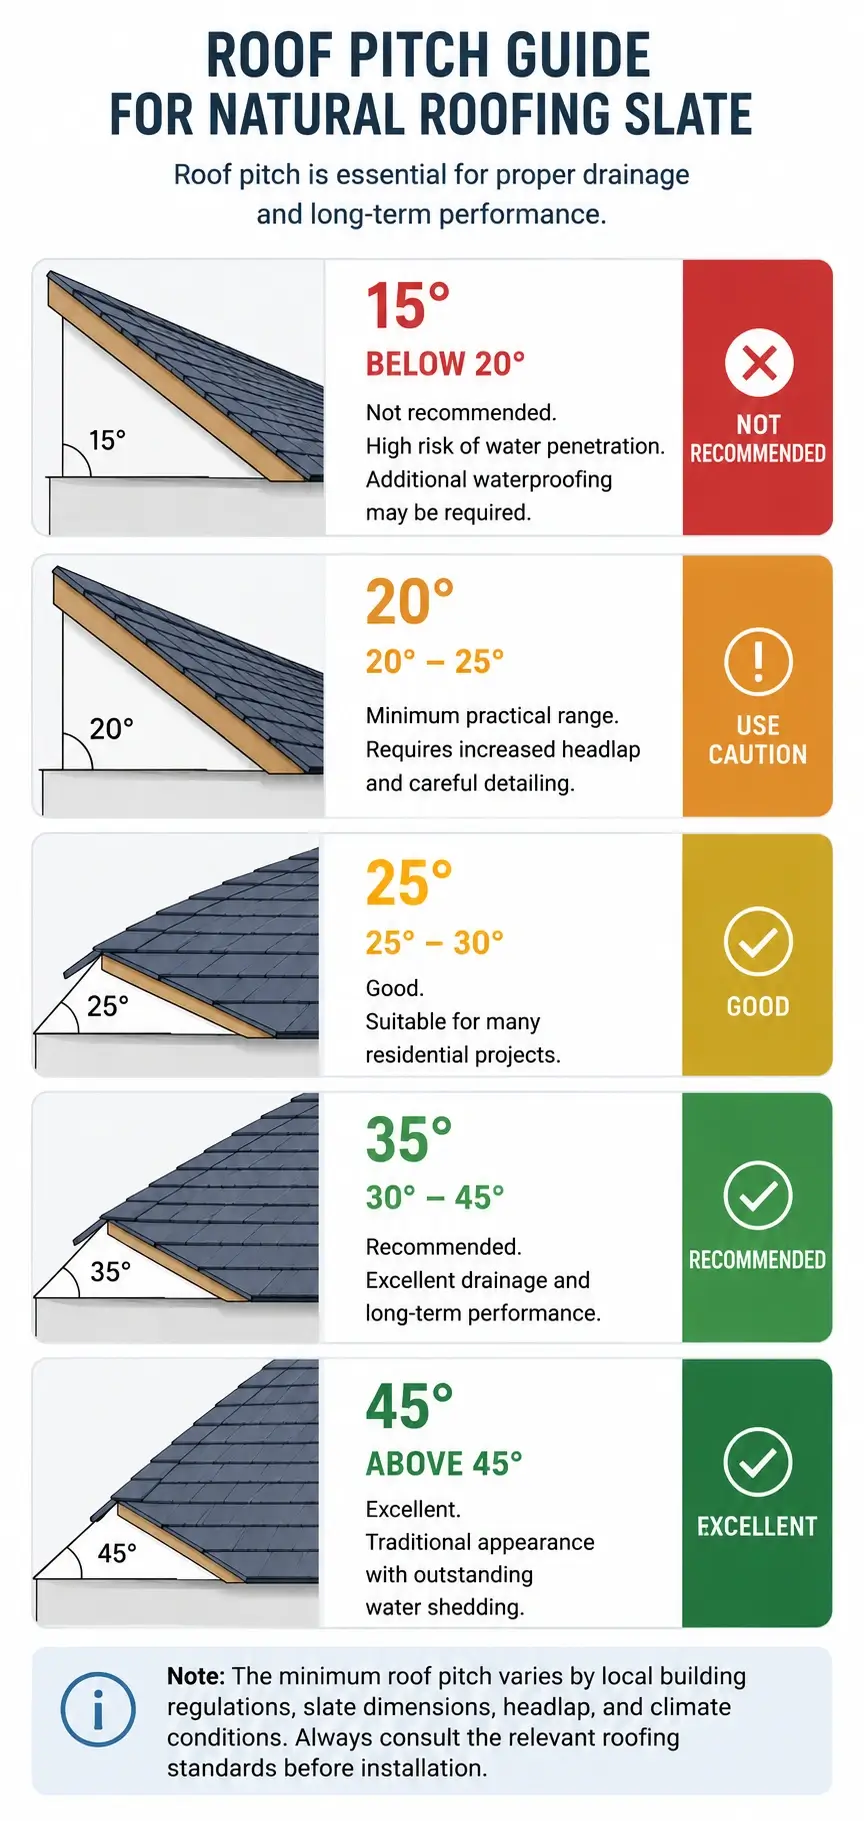
Recommended Roof Pitch for Natural Roofing Slate
| Roof Pitch | Recommendation | Typical Application |
|---|---|---|
| Below 20° | ❌ Not Recommended | Additional waterproofing required |
| 20°–25° | ⚠ Minimum Practical Range | Increased headlap and careful detailing |
| 25°–30° | ✓ Good | Suitable for many residential roofs |
| 30°–45° | ⭐ Recommended | Excellent drainage and long-term performance |
| Above 45° | ⭐ Excellent | Traditional appearance with outstanding water shedding |
Note: Minimum roof pitch requirements vary by local building codes, slate dimensions, headlap, and climate conditions.
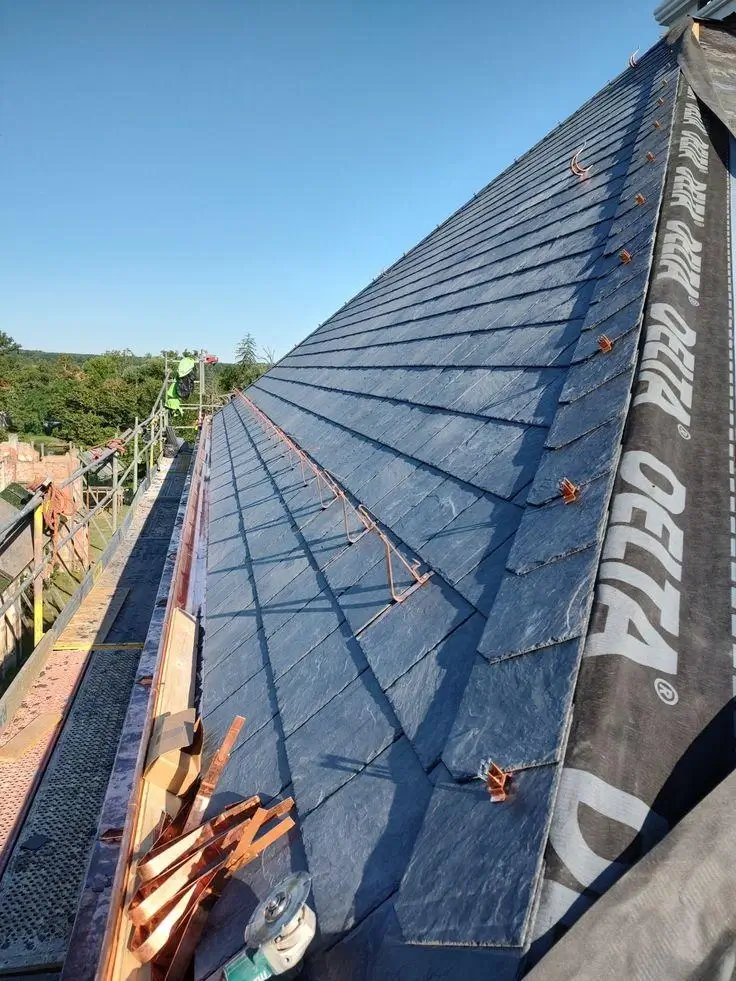
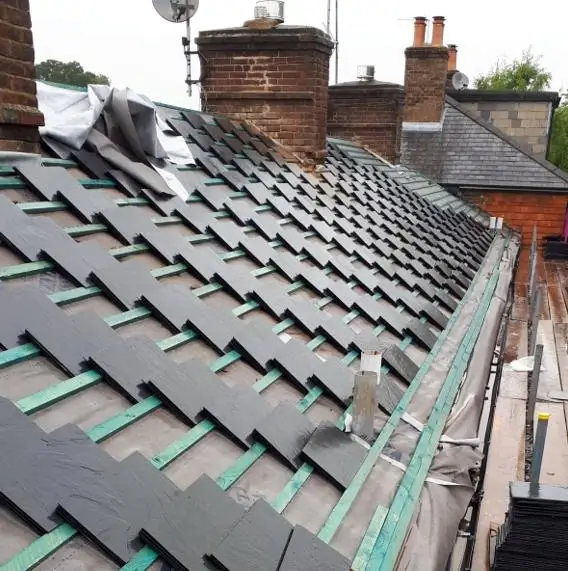
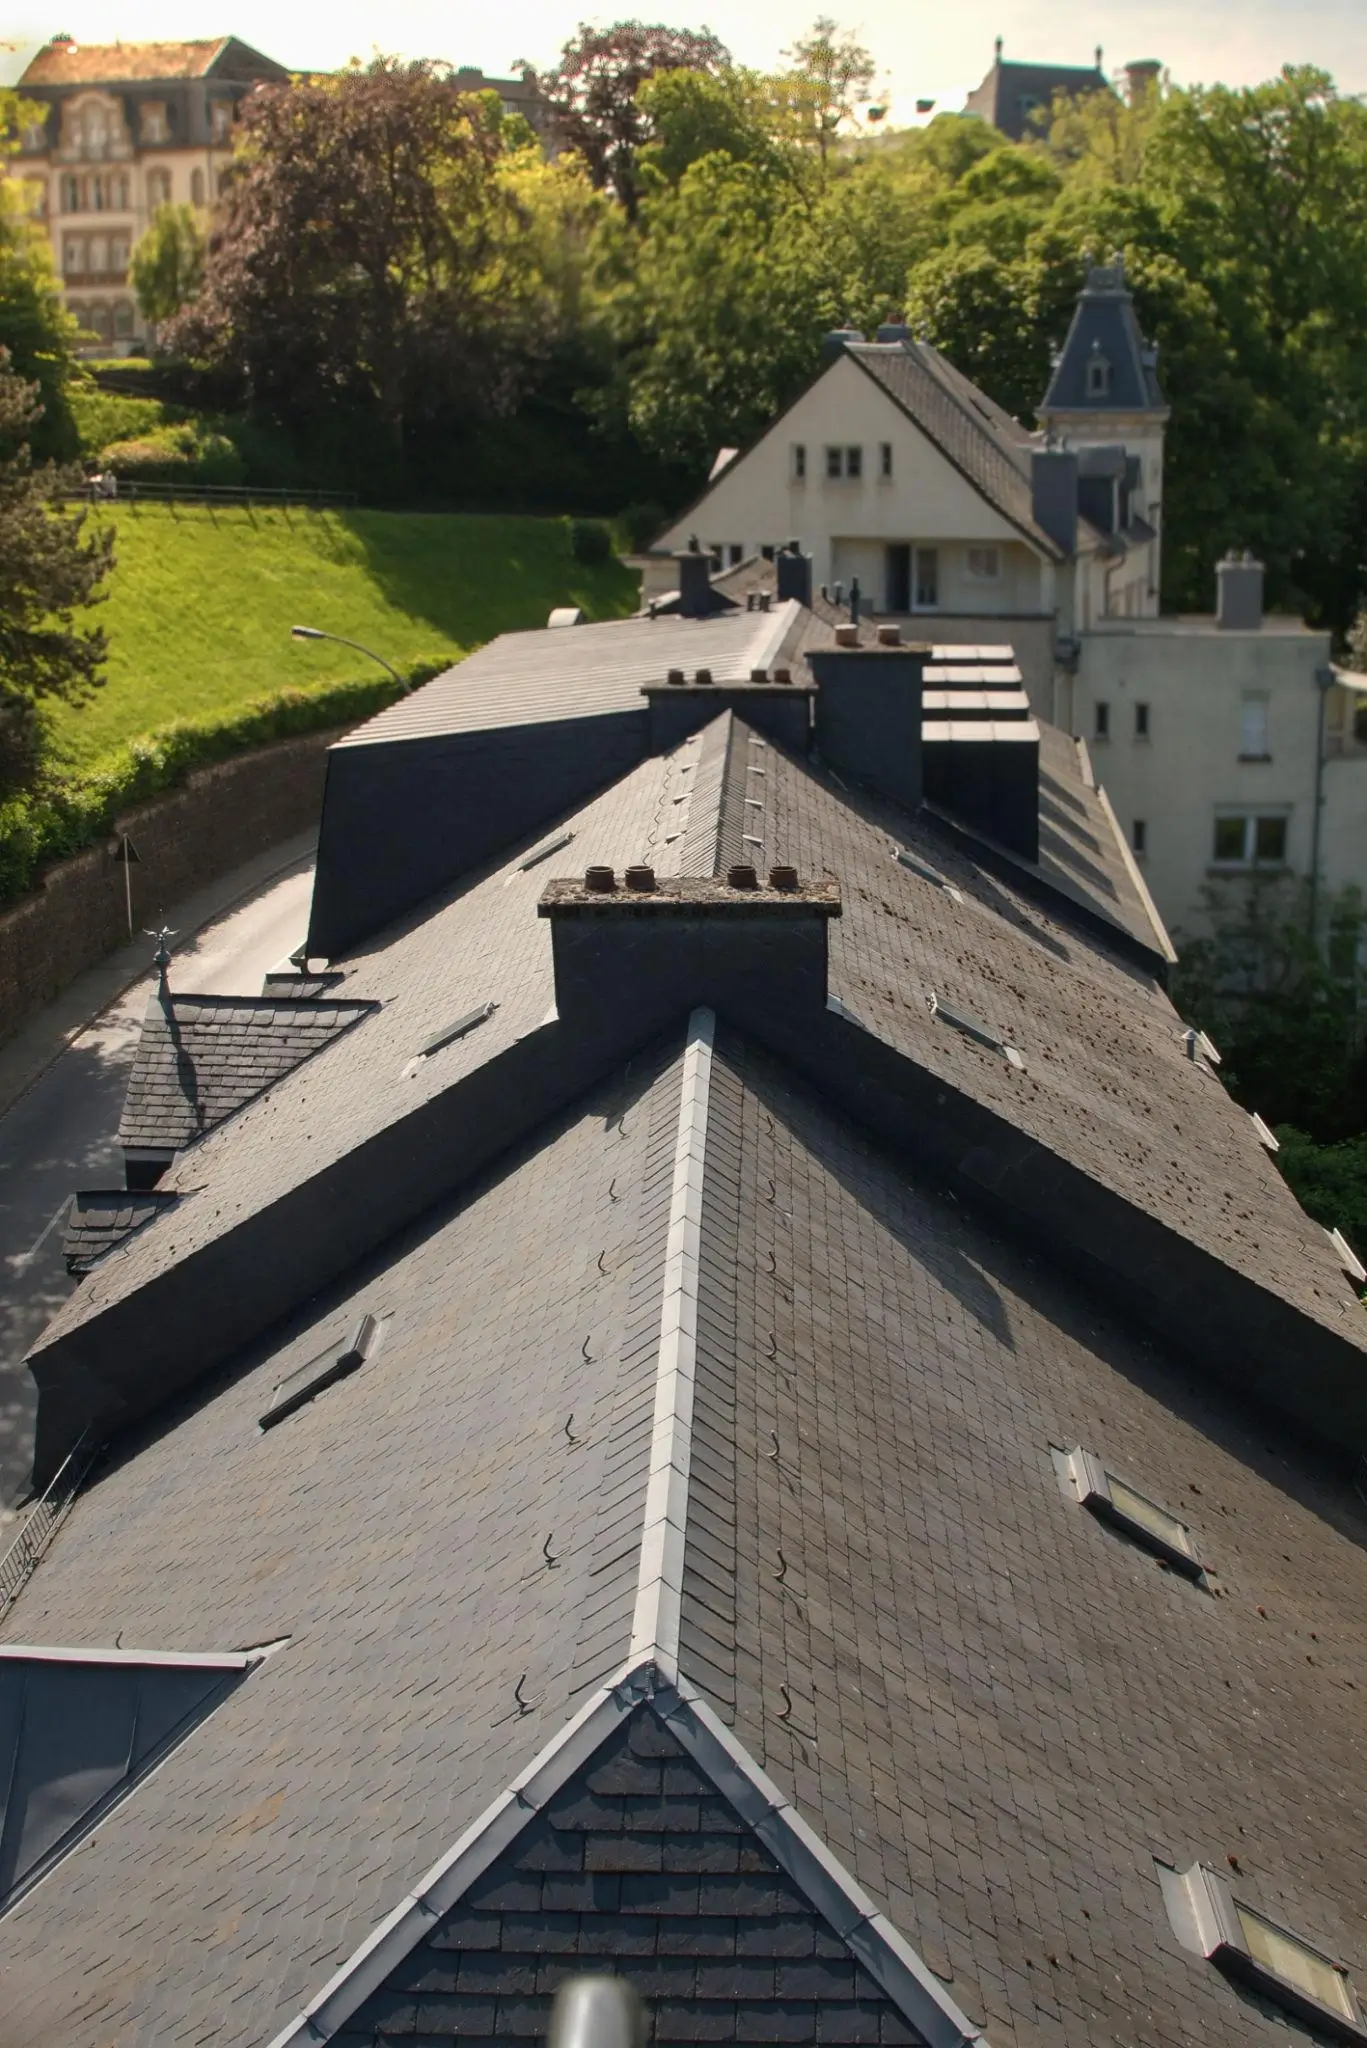
Why Roof Pitch Matters
✓ Faster rainwater drainage
✓ Better wind resistance
✓ Lower risk of leaks
✓ Longer slate lifespan
✓ Improved roof ventilation
Can roofing slate be installed on low-pitch roofs?
Natural roofing slate performs best on pitched roofs. Roofs with very low slopes generally require additional waterproofing systems or alternative roofing materials. Always check local building codes and installation guidelines before proceeding.
Pro Tip: A steeper roof is not always better. The correct roof pitch should be determined together with slate size, headlap, fixing method, local climate, and applicable roofing standards to achieve the best balance between weather resistance, appearance, and material efficiency.
2. Roof Structure
A Strong Roof Structure Is Essential
Natural roofing slate is heavier than many modern roofing materials, making a solid roof structure essential for long-term performance. Before installation, verify that the roof framing is capable of supporting the combined weight of the slate, battens, underlayment, and expected snow or wind loads where applicable.
Inspect the following structural components before installation.
Rafters
Rafters form the primary load-bearing framework of the roof. They should be straight, securely fixed, and capable of supporting the additional weight of natural slate without excessive deflection.
Decking
The roof decking provides the base for the underlayment and battens. It should be flat, dry, clean, and free from rot or structural damage. Any weak or uneven decking should be repaired before installation begins.
Battens
Roof battens support each slate tile and determine the exposure and alignment of the finished roof. Battens should be accurately spaced, securely fixed, and installed in accordance with the slate size and required headlap.
Proper batten spacing is essential for both roof appearance and weather resistance.
Roof Ventilation
Adequate roof ventilation helps prevent moisture accumulation within the roof structure. Good ventilation reduces condensation, protects timber components, and extends the lifespan of both the slate roof and the supporting structure.
Ventilation openings should comply with local building regulations.
Pro Tip
Even the highest-quality roofing slate cannot compensate for a weak roof structure. Always ensure the supporting framework is inspected before installation.
3. Weather Conditions
Choose the Right Weather for Installation
Weather conditions have a significant impact on installation safety and the quality of the finished roof. Installing roofing slate during unsuitable weather can increase the risk of accidents, poor workmanship, and water damage.
Whenever possible, schedule installation during dry, calm weather with moderate temperatures.
Avoid installing roofing slate under the following conditions:
| Weather Condition | Why It Should Be Avoided |
|---|---|
| 🌧 Heavy Rain | Wet surfaces reduce safety and may trap moisture beneath the slates. |
| ❄ Snow | Snow and ice make the roof slippery and difficult to work on. |
| 🧊 Frozen Roof | Frozen battens and decking may affect fixing accuracy and increase breakage risk. |
| 🌬 Strong Wind | High winds make handling slate dangerous and can affect alignment during installation. |
| ⛈ Severe Storms | Installation should always be postponed until safe weather returns. |
Best Installation Conditions
For the best results, install natural roofing slate when:
- The roof surface is clean and dry.
- Weather conditions are stable.
- Temperatures are above freezing.
- Wind speeds are low.
- Materials have been stored in dry conditions before installation.
Installation Checklist
Before You Start
☐ Roof pitch verified
☐ Roof structure inspected
☐ Decking is flat and sound
☐ Battens installed correctly
☐ Underlayment completed
☐ Ventilation provided
☐ Weather forecast checked
☐ Roofing slates and fixings prepared
Essential Roofing Slate Tools & Materials
Everything You Need Before Installing Natural Roofing Slate
Using the right tools and materials is essential for achieving a professional-quality slate roof. Unlike asphalt shingles or metal roofing, natural roofing slate requires specialized installation tools designed to handle stone safely and accurately.
From selecting the correct roofing slate and corrosion-resistant fixings to using professional cutting and measuring tools, every component plays an important role in creating a durable, weatherproof roof.
The following checklist covers the essential tools and materials commonly used by professional slate roof installers.

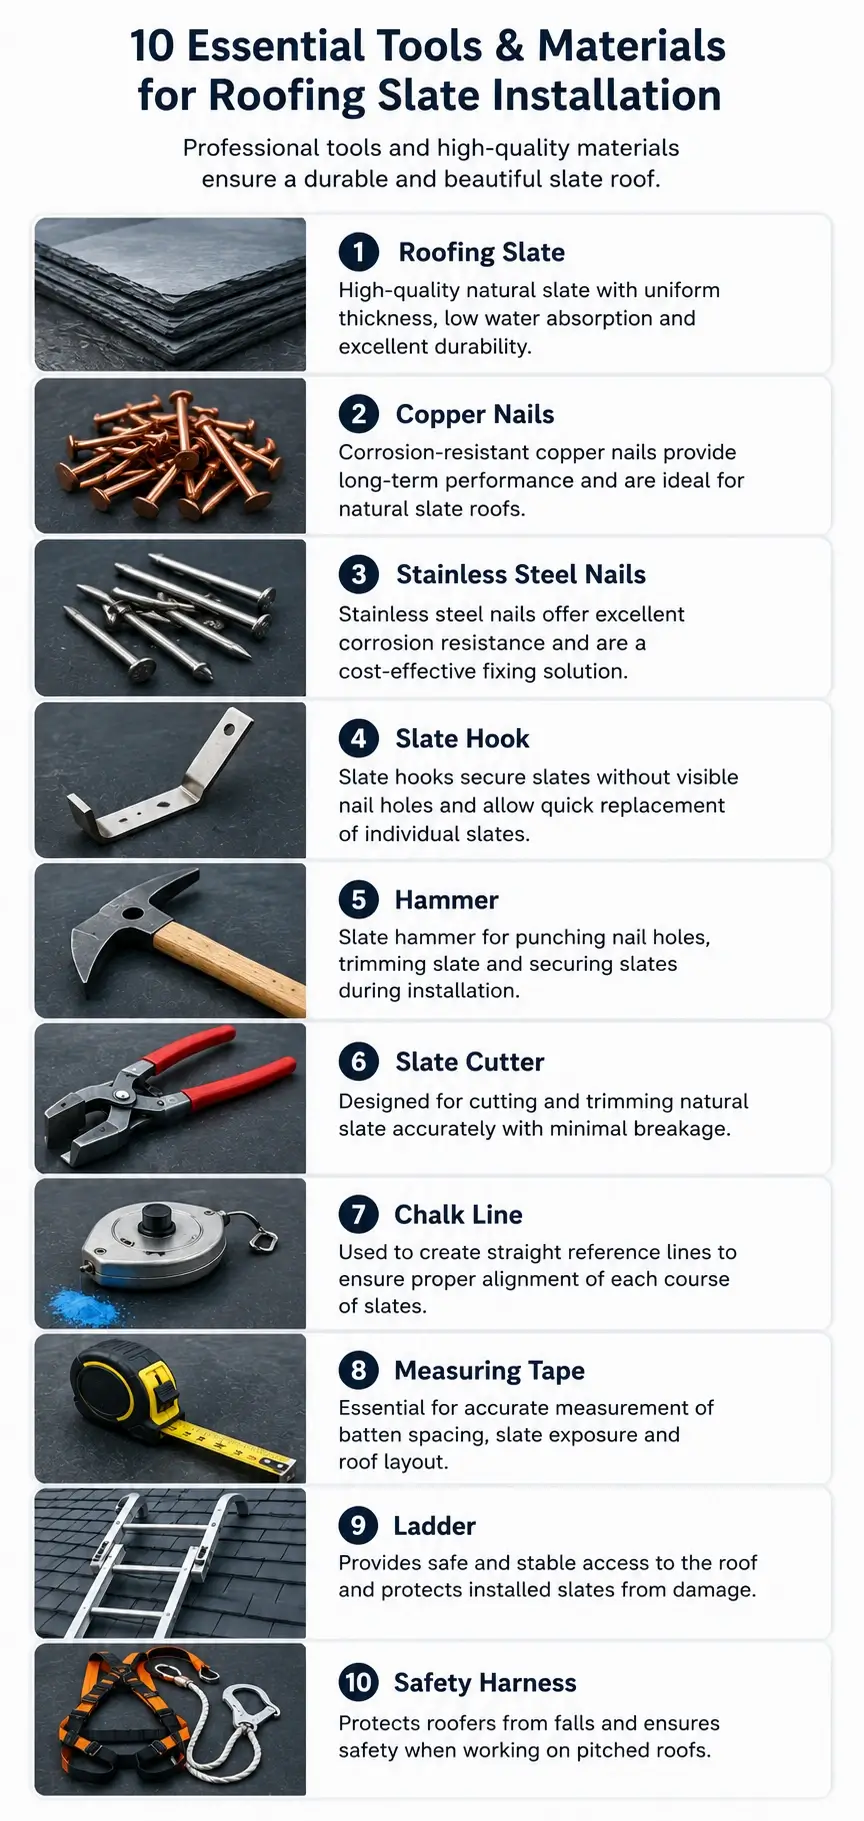
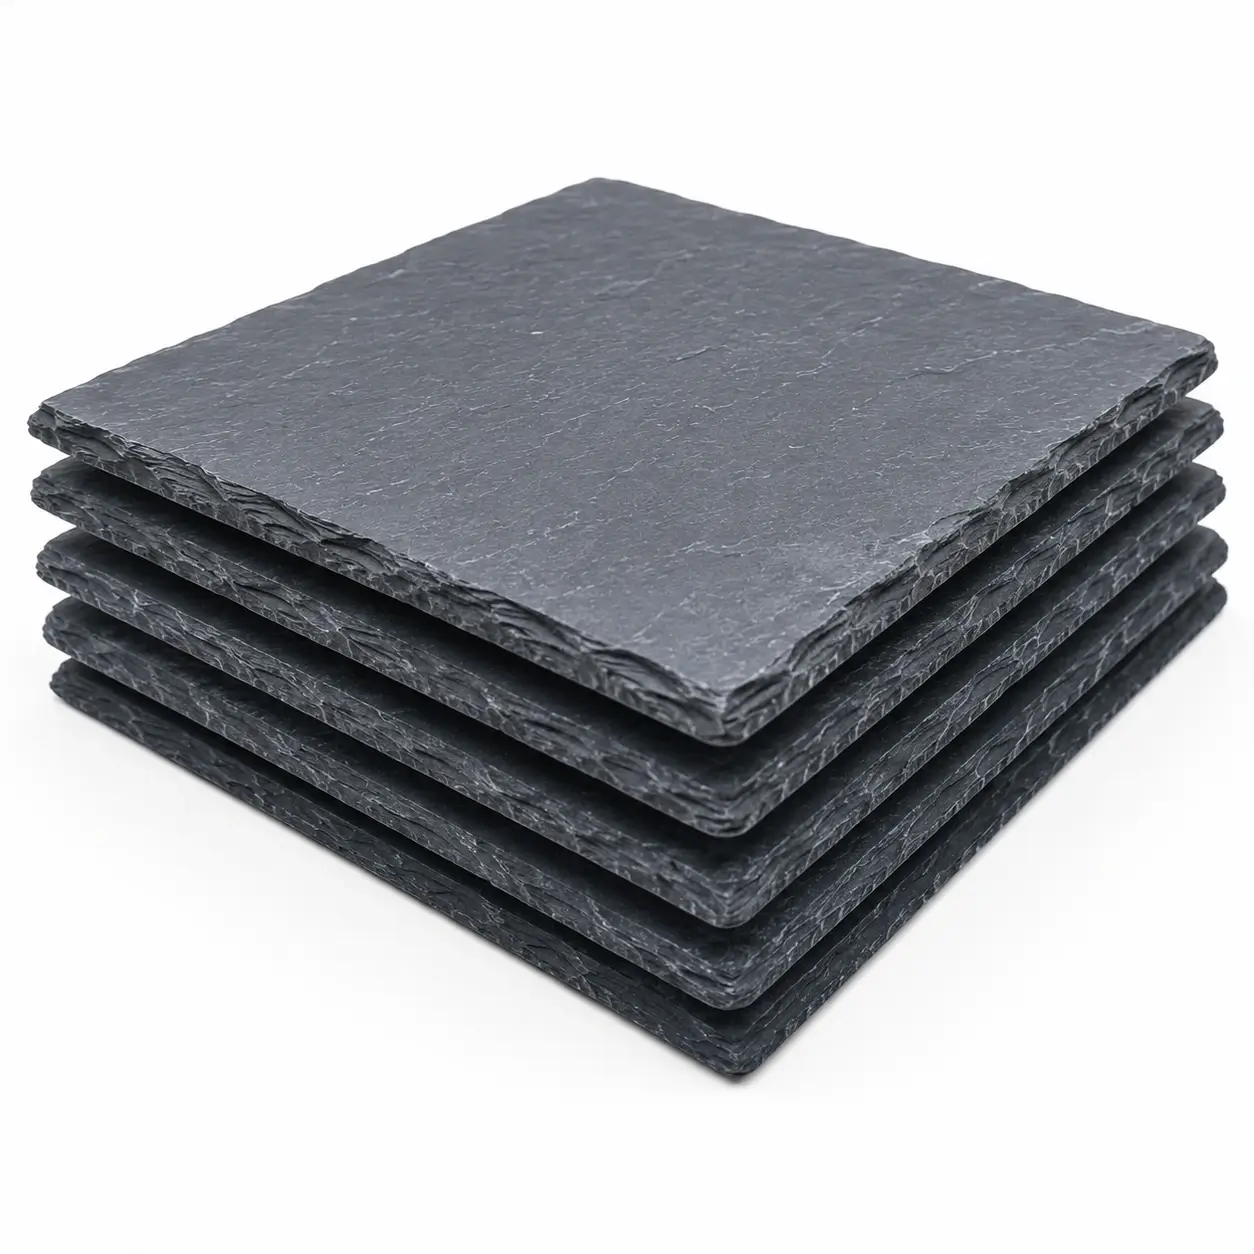
1. Natural Roofing Slate
Purpose
Natural roofing slate is the primary roofing material and the foundation of the entire roofing system.
Choose high-quality slate with consistent thickness, low water absorption, excellent frost resistance, and precise dimensions to ensure long-term performance and a clean roof appearance.
Pro Tip
Always inspect the slates before installation and separate any damaged or cracked pieces.

2. Copper Nails
Purpose
Copper nails are the traditional choice for fixing natural roofing slate because they provide outstanding corrosion resistance and an exceptionally long service life.
Copper nails are widely recommended for premium residential buildings, heritage restoration projects, and coastal environments.
Best For
- Heritage buildings
- Luxury homes
- Coastal climates

3. Stainless Steel Nails
Purpose
Stainless steel nails offer excellent corrosion resistance while providing a cost-effective alternative to copper.
High-quality stainless steel nails are commonly used in modern slate roofing projects throughout Europe and North America.
Recommended Grade
304 Stainless Steel
316 Stainless Steel (marine environments)
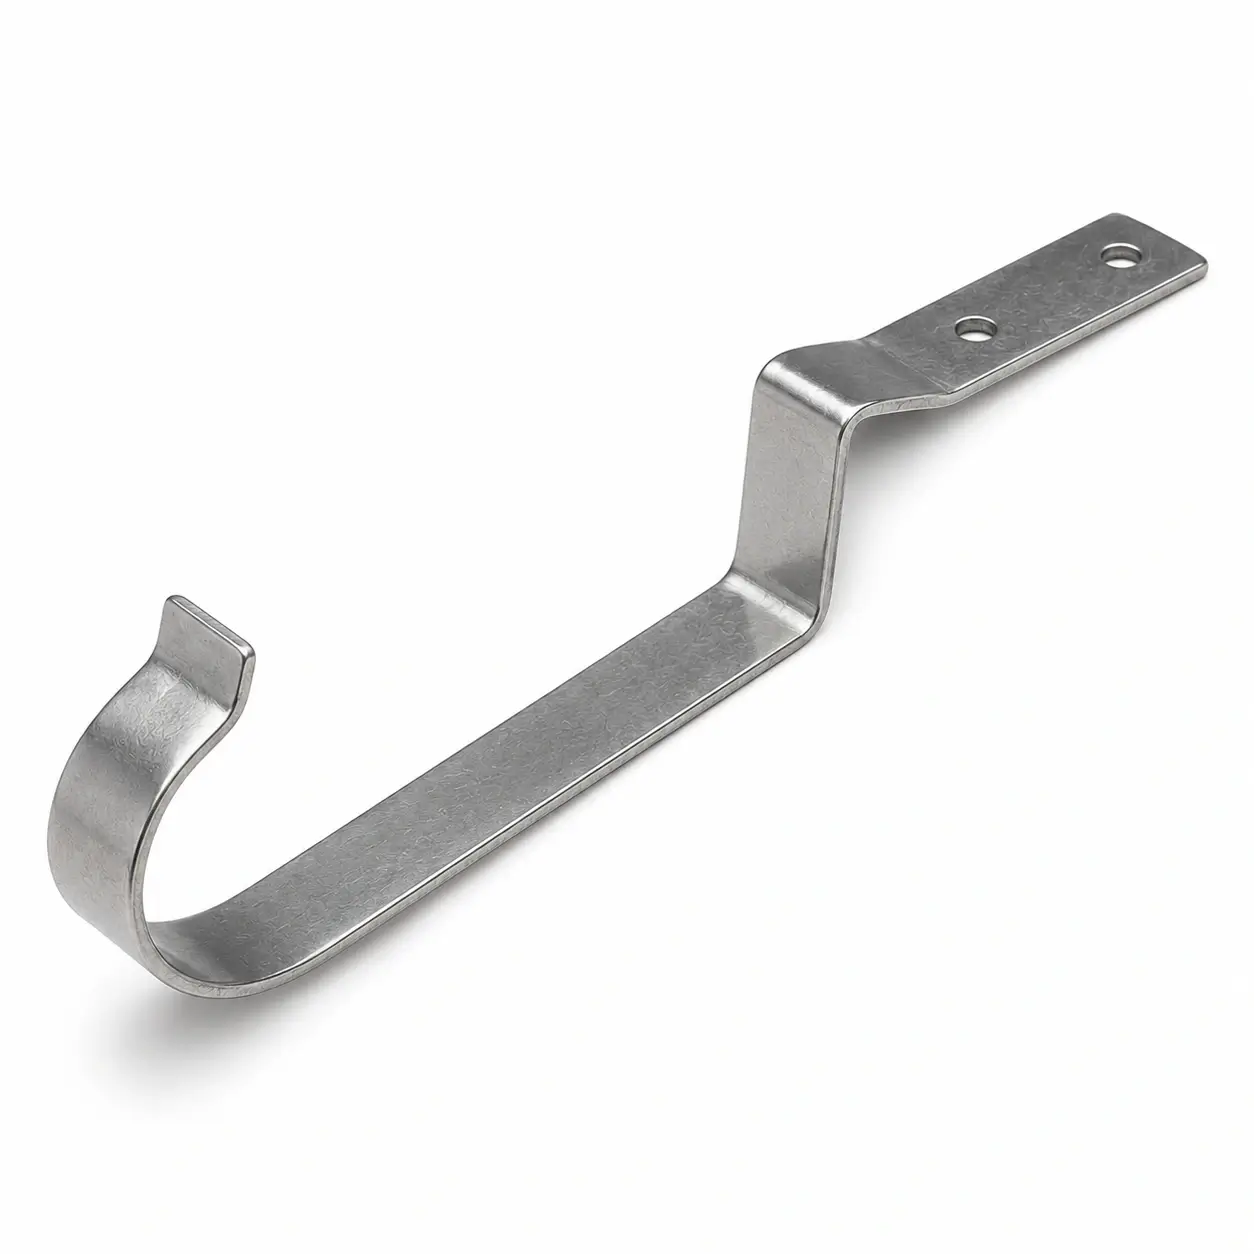
4. Slate Hooks
Purpose
Slate hooks secure each slate mechanically without visible nail holes.
They are widely used in France, Germany, Belgium, and many European roofing systems because damaged slates can be replaced quickly without disturbing surrounding tiles.
Advantages
✓ Easy replacement
✓ Faster maintenance
✓ Excellent durability

5. Slate Hammer
Purpose
A slate roofing hammer is specially designed for trimming slate, punching nail holes, and fixing slate tiles during installation.
Unlike ordinary hammers, a slate hammer combines cutting, punching, and fixing functions into a single professional tool.

6. Slate Cutter
Purpose
Slate cutters produce clean, accurate cuts while minimizing breakage.
They are ideal for trimming slates around chimneys, roof valleys, skylights, dormers, and roof edges.

7. Chalk Line
Purpose
A chalk line creates straight reference lines to ensure each course of slate remains perfectly aligned throughout installation.
Even slight alignment errors become highly visible after several rows.

8. Measuring Tape
Purpose
Accurate measurement is essential for determining:
- Batten spacing
- Slate exposure
- Headlap
- Roof layout
Professional installers measure every section before laying the first slate.
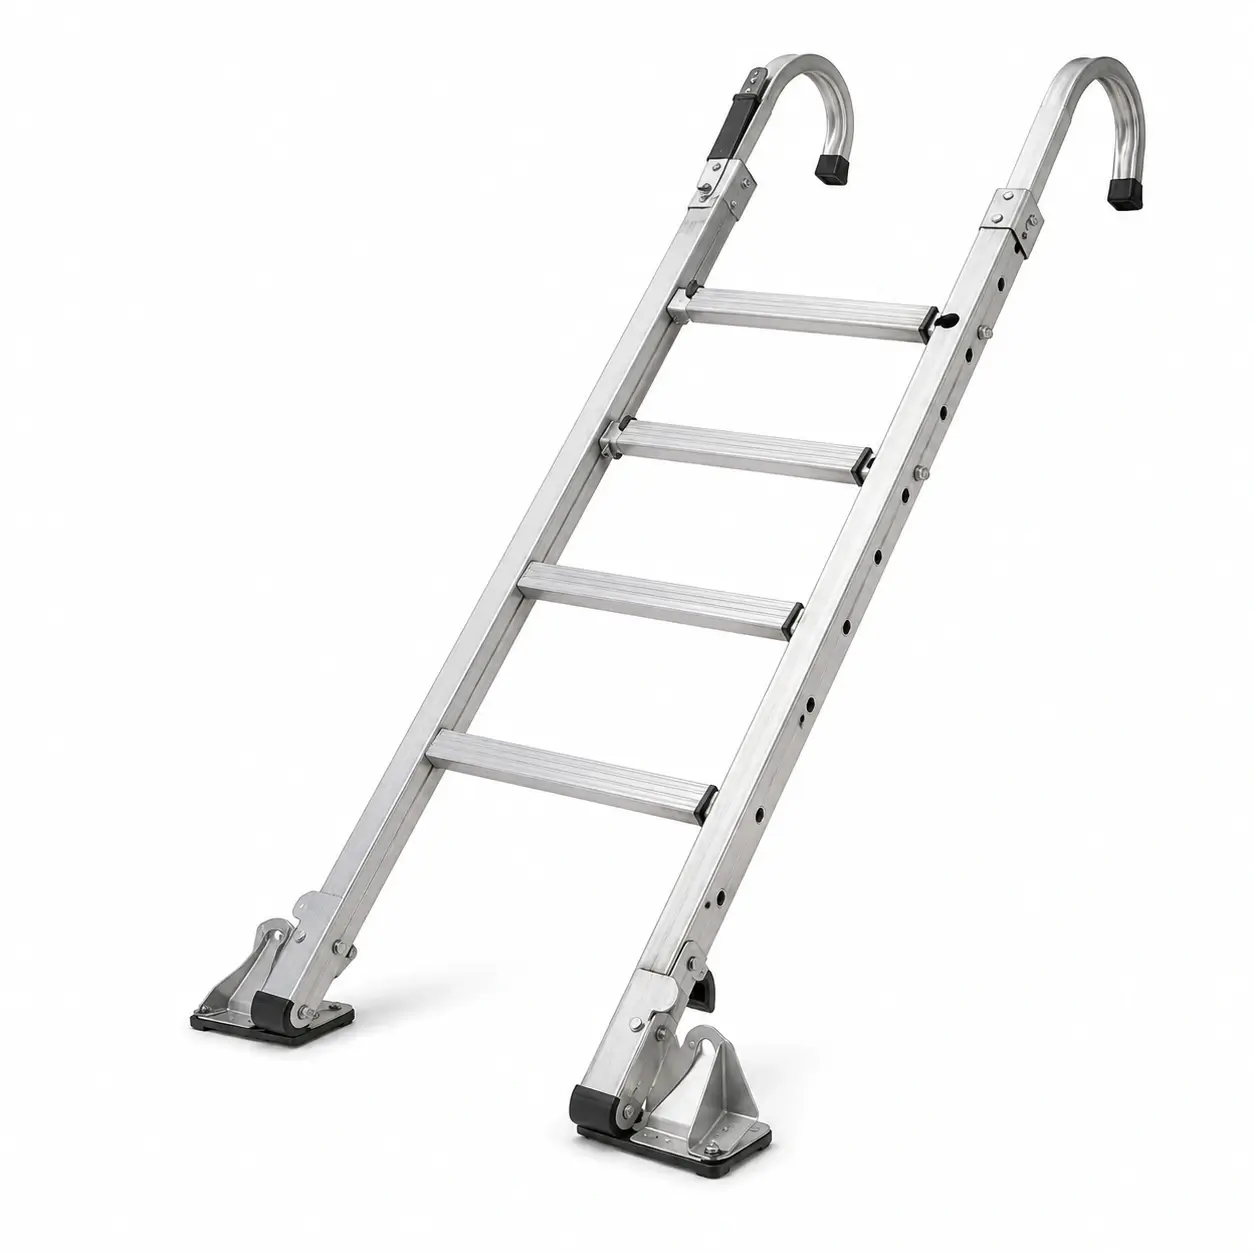
9. Roof Ladder
Purpose
A roof ladder provides stable access and protects installed slates from unnecessary damage during installation.
Walking directly on newly installed slates should always be avoided.

10. Safety Harness
Purpose
Working on pitched roofs presents significant fall hazards.
A certified safety harness should always be used together with suitable anchor points and fall-protection systems.
Safety should never be compromised.
Essential Roofing Slate Installation Tools
| Tool / Material | Primary Function | Essential |
|---|---|---|
| Natural Roofing Slate | Roof covering | ⭐⭐⭐⭐⭐ |
| Copper Nails | Slate fixing | ⭐⭐⭐⭐⭐ |
| Stainless Steel Nails | Slate fixing | ⭐⭐⭐⭐⭐ |
| Slate Hooks | Hook fixing system | ⭐⭐⭐⭐ |
| Slate Hammer | Cutting & fixing | ⭐⭐⭐⭐⭐ |
| Slate Cutter | Precision cutting | ⭐⭐⭐⭐ |
| Chalk Line | Alignment | ⭐⭐⭐⭐ |
| Measuring Tape | Accurate layout | ⭐⭐⭐⭐⭐ |
| Roof Ladder | Safe roof access | ⭐⭐⭐⭐ |
| Safety Harness | Fall protection | ⭐⭐⭐⭐⭐ |
Professional Tips
✔ Always use corrosion-resistant fixings.
✔ Match nail length to slate thickness and batten size.
✔ Never use ordinary steel nails.
✔ Keep cutting tools sharp to reduce slate breakage.
✔ Replace worn tools regularly to improve installation accuracy.
What tools do I need to install a slate roof?
Professional slate roofing typically requires natural roofing slate, copper or stainless steel nails, slate hooks, a slate hammer, slate cutter, chalk line, measuring tape, roof ladder, and appropriate fall-protection equipment.
Step-by-Step Roofing Slate Installation
Follow the Professional Installation Process for a Durable Slate Roof Introduction
Installing natural roofing slate is a precise process that requires careful planning, accurate measurements, and attention to detail. Every stage—from preparing the roof deck to installing the ridge and valleys—contributes to the roof’s long-term weather resistance, structural integrity, and appearance.
The following step-by-step guide outlines the standard installation sequence used by professional slate roof installers. While local building regulations and roofing practices may vary, these principles are widely accepted and provide a solid foundation for achieving a durable, high-quality slate roof.
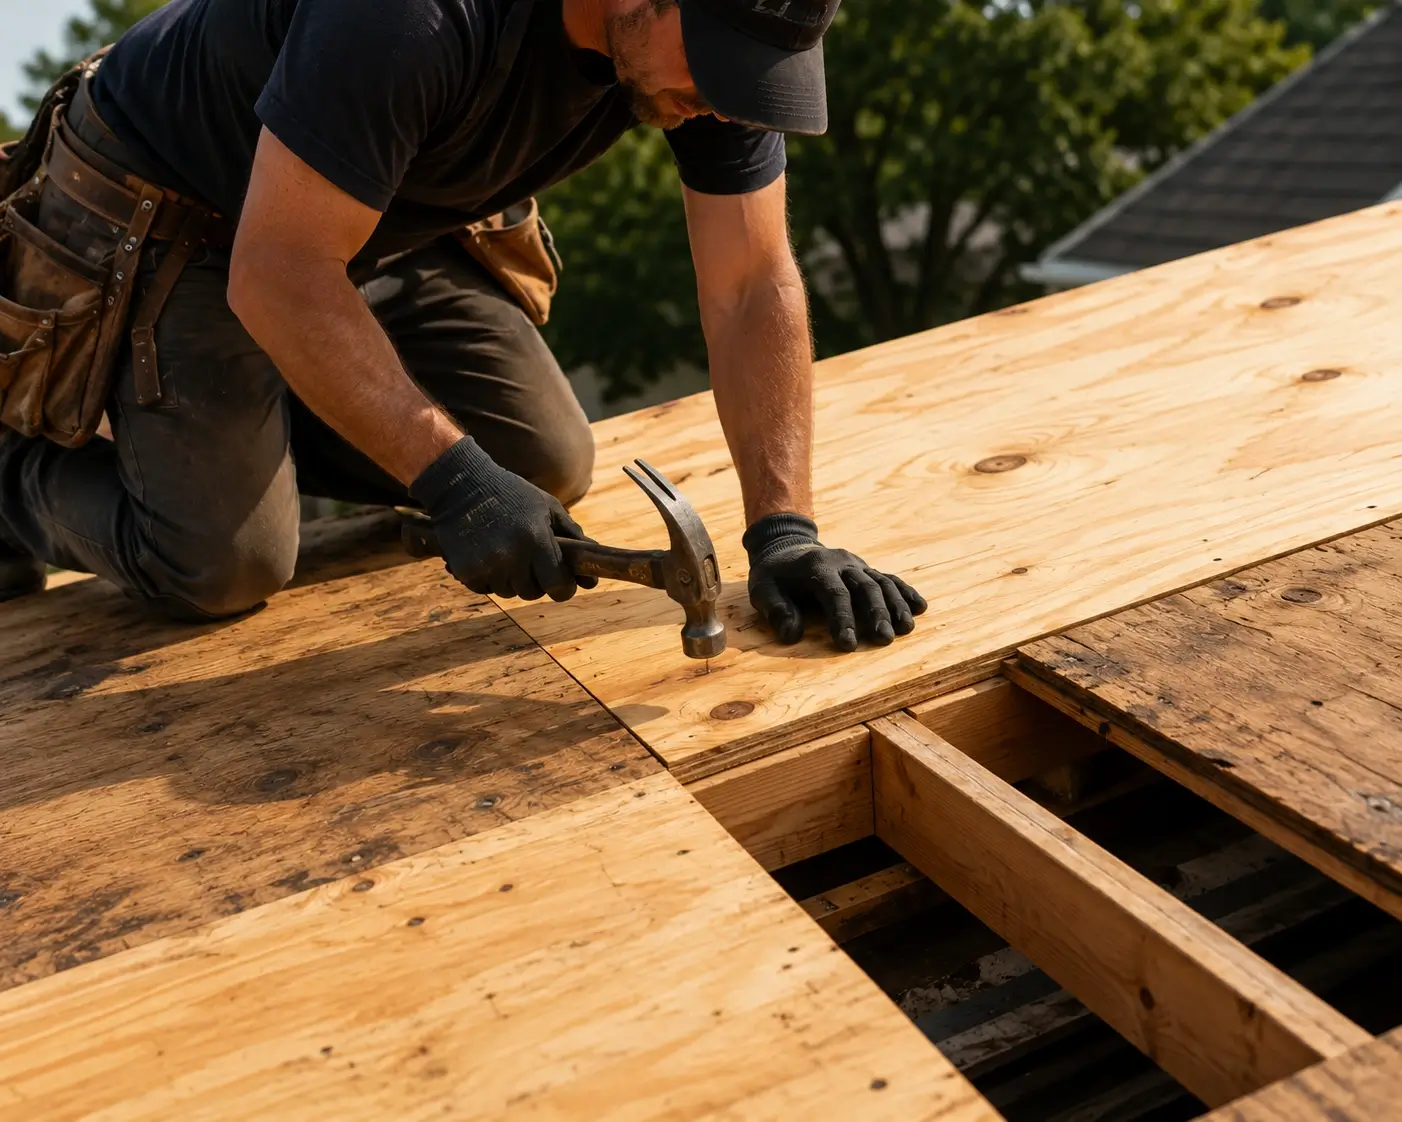
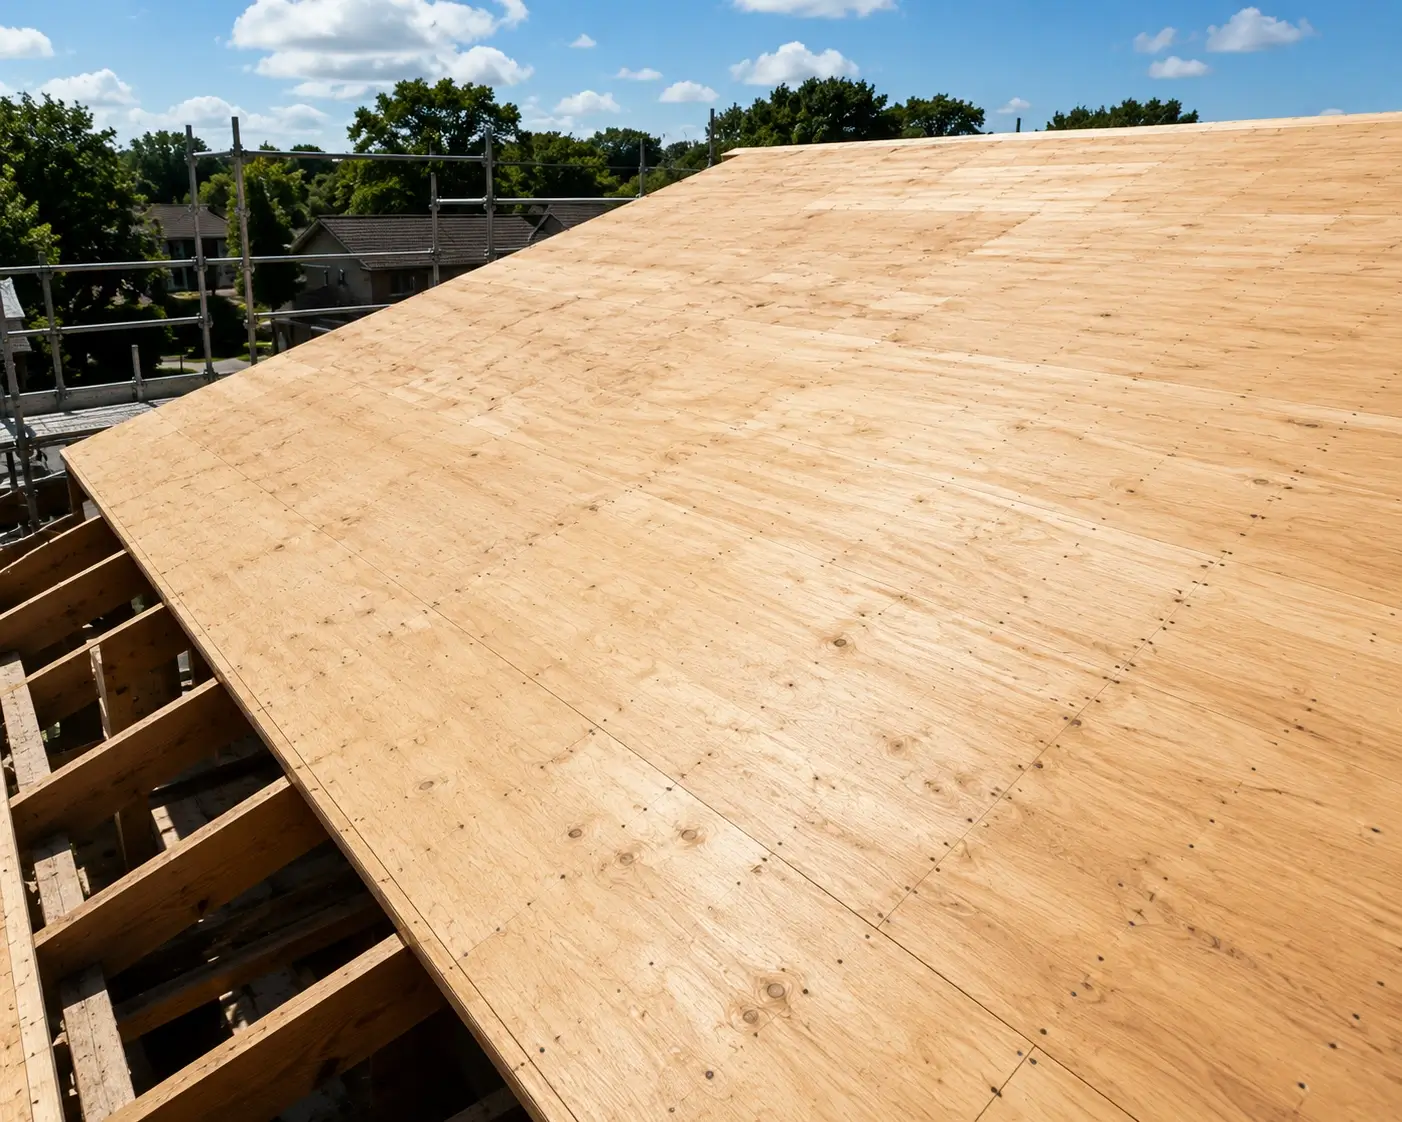
Step 1:Prepare the Roof Deck
Why It Matters
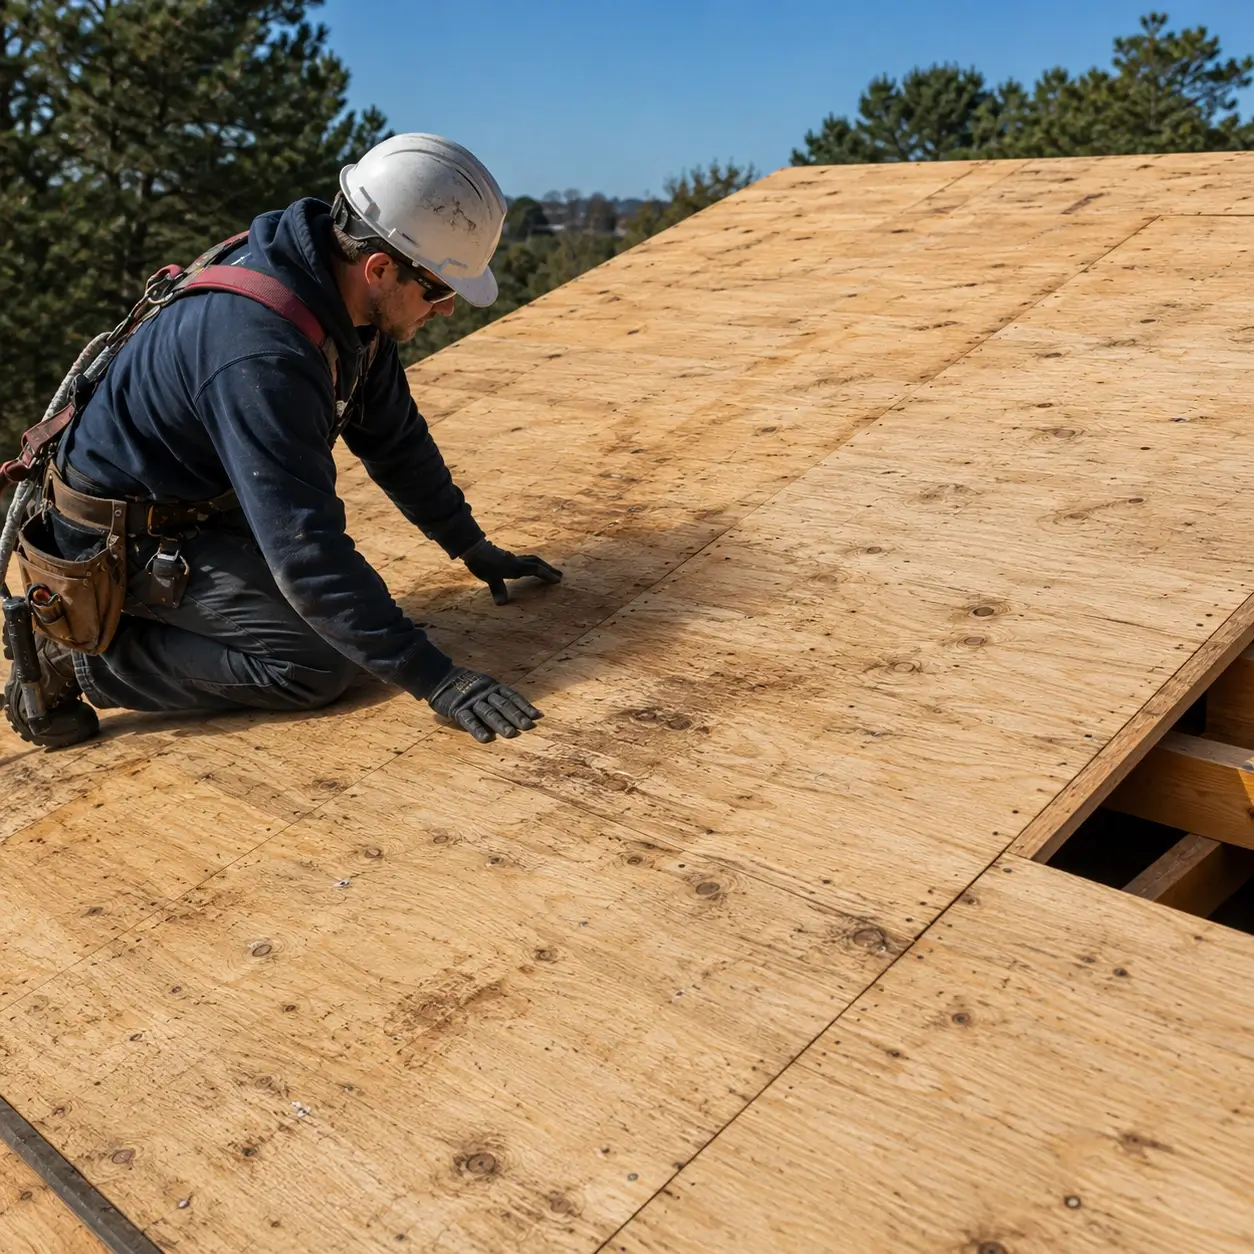
A durable slate roof starts with a solid foundation. Before any underlayment or roofing slate is installed, the roof deck must be carefully inspected to ensure it is clean, flat, dry, and structurally sound.
Even the highest-quality natural roofing slate cannot compensate for a weak or uneven roof deck. Any defects left uncorrected may affect slate alignment, reduce weather resistance, or shorten the lifespan of the roof.
Key Tasks
- Inspect the roof deck for damage, rot, or loose panels.
- Repair or replace any deteriorated decking.
- Ensure the roof surface is flat and level.
- Remove dust, debris, nails, or protrusions.
- Verify that the roof structure can safely support the weight of natural slate.
Checklist
✔ Roof deck is structurally sound
✔ Surface is flat and clean
✔ No moisture damage or decay
✔ Loose panels repaired
✔ Roof is ready for underlayment installation
Common Mistakes to Avoid
❌ Installing slate over damaged decking
❌ Ignoring uneven roof surfaces
❌ Failing to repair rotten timber
❌ Leaving protruding fasteners on the deck
Pro Tip
Spend extra time preparing the roof deck. A stable, level foundation makes every subsequent installation step easier and significantly improves the finished appearance of the slate roof.
Step 2:Install Underlayment
Why It Matters
Although natural roofing slate provides excellent weather resistance, it is not the primary waterproof barrier of the roof. Wind-driven rain, melting snow, or condensation can occasionally penetrate beneath the slates. A properly installed underlayment acts as the secondary line of defense, protecting the roof deck from moisture and extending the overall lifespan of the roofing system.
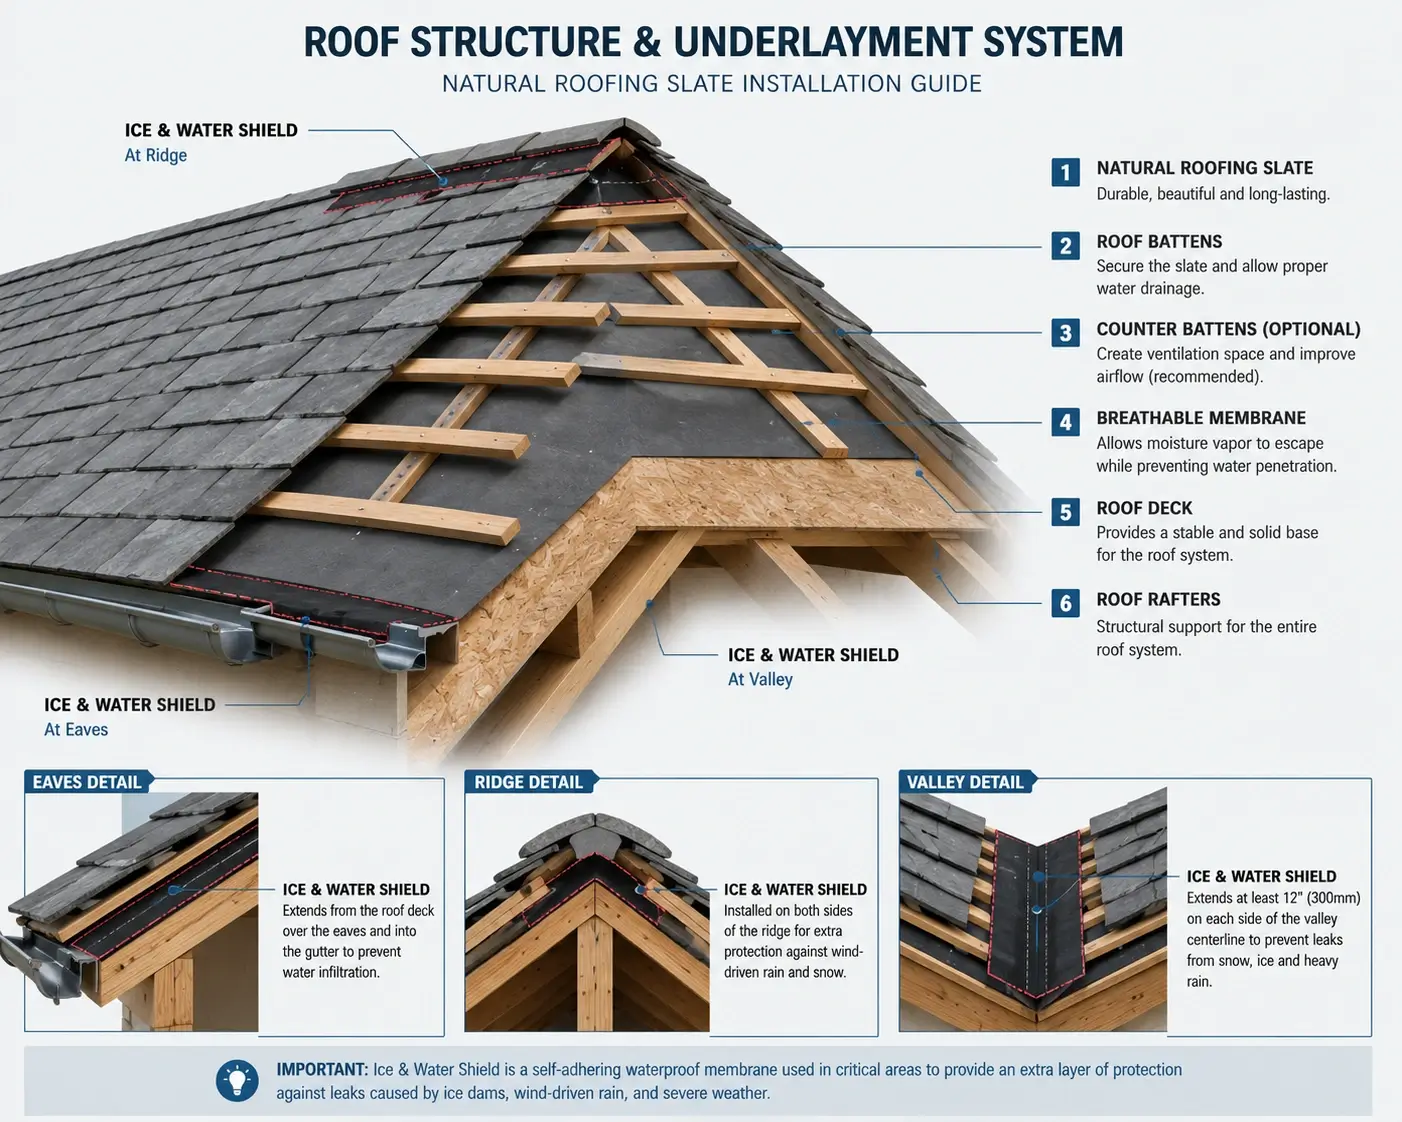
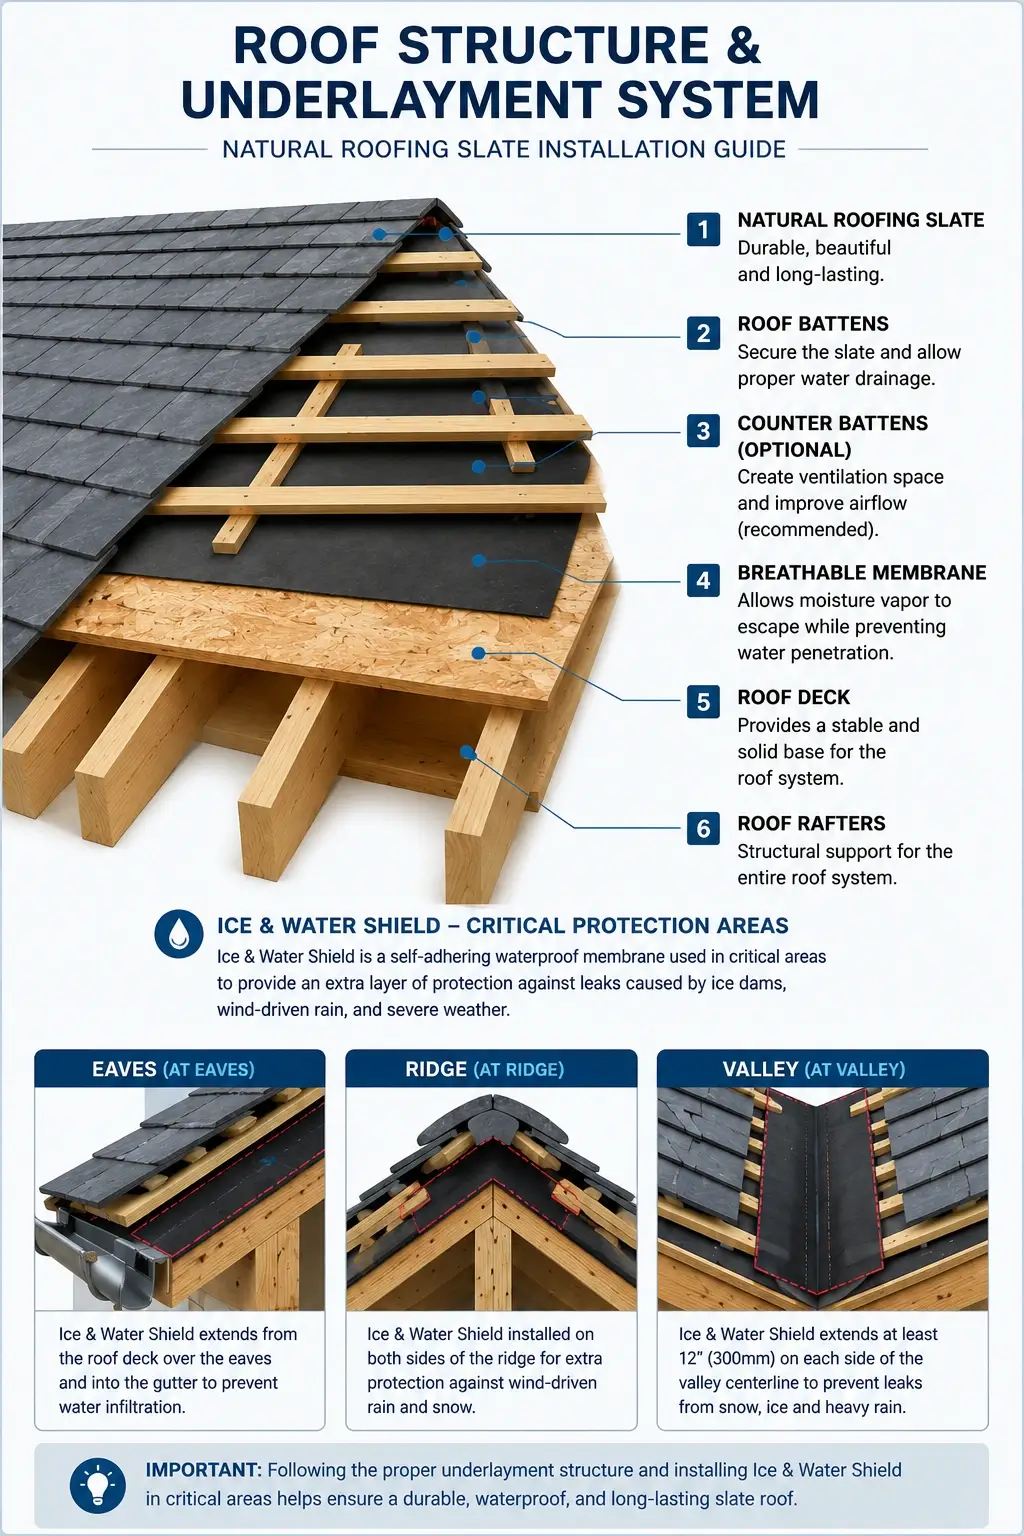
Modern slate roofing systems typically use a combination of breathable roofing membranes and ice & water shield in vulnerable areas. Selecting the appropriate underlayment helps improve moisture management, reduces the risk of leaks, and enhances the long-term performance of the slate roof.
Types of Underlayment
Breathable Membrane
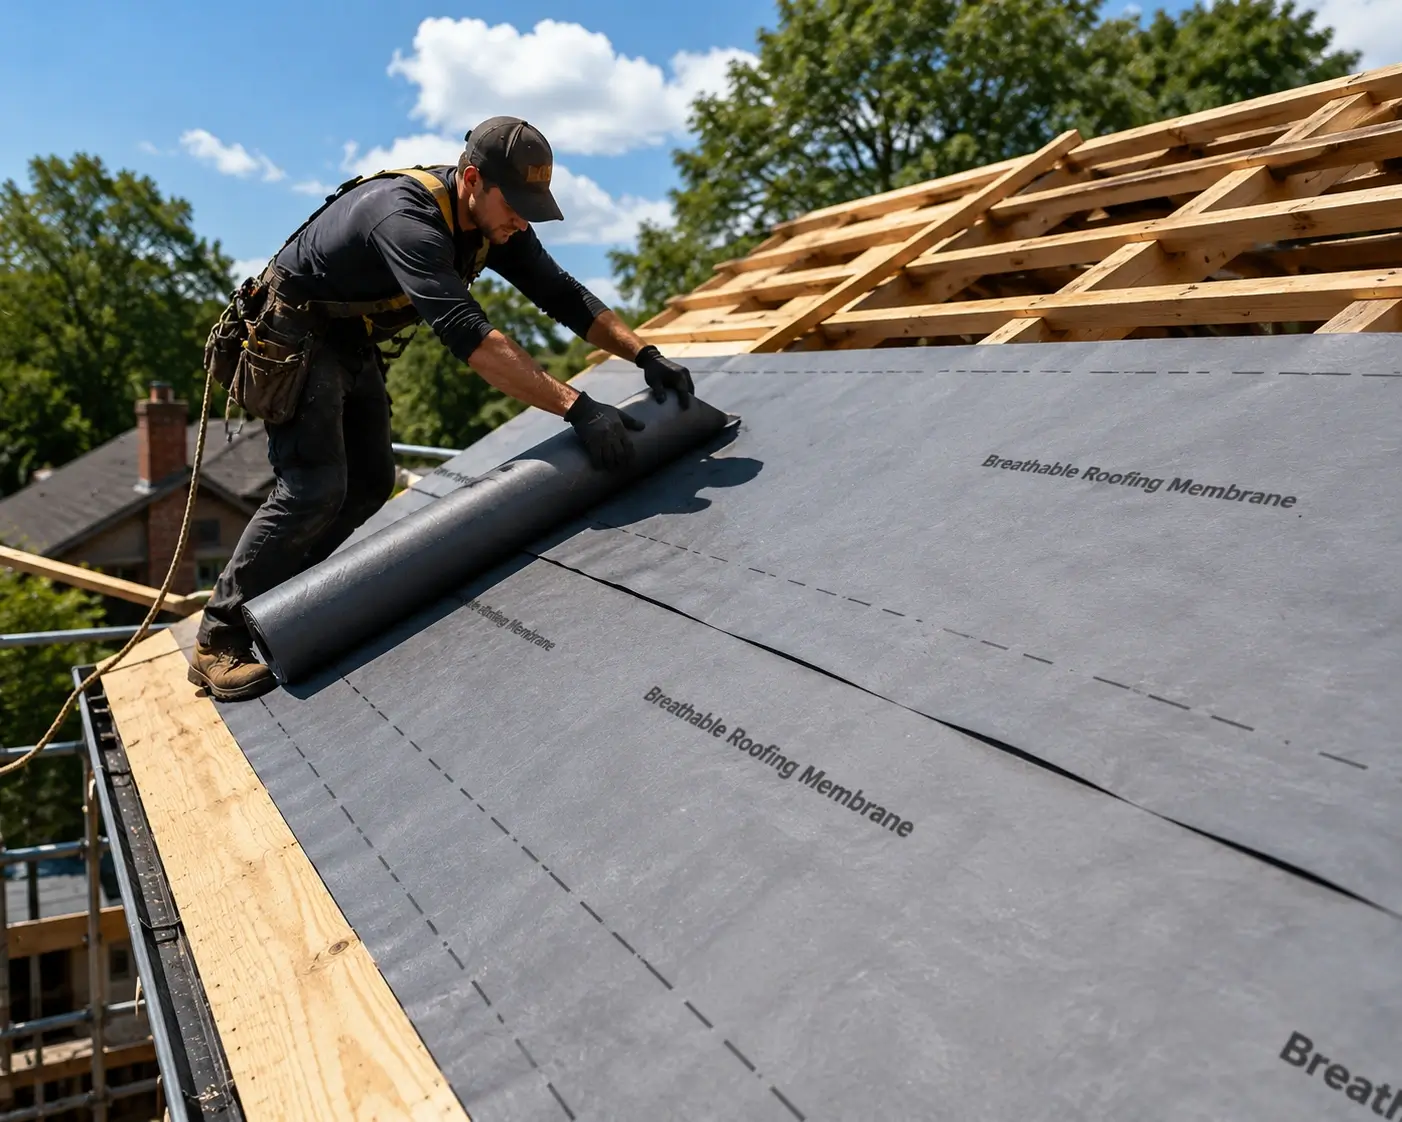
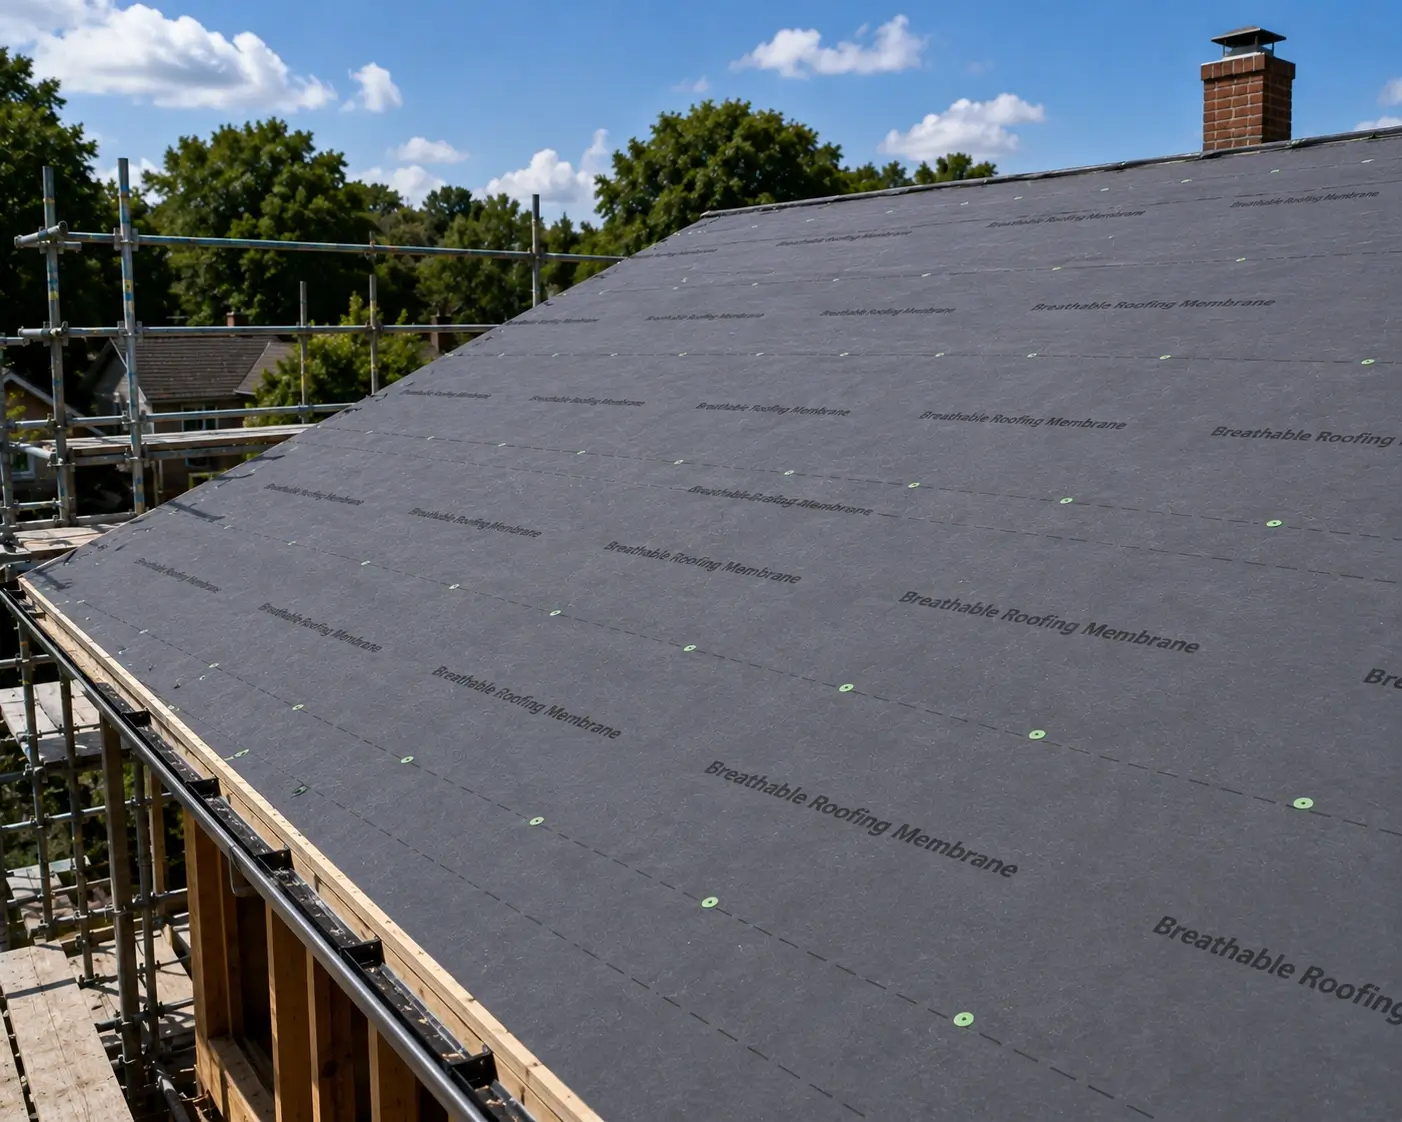
A breathable membrane is the most commonly used underlayment for modern slate roofs. It prevents rainwater from reaching the roof deck while allowing water vapor to escape from inside the roof structure.
Benefits
- Excellent water resistance
- Allows moisture to escape
- Reduces condensation
- Improves roof ventilation
- Extends timber lifespan
Best Used For
- Most residential slate roofs
- Ventilated roof systems
- New construction projects
Ice & Water Shield
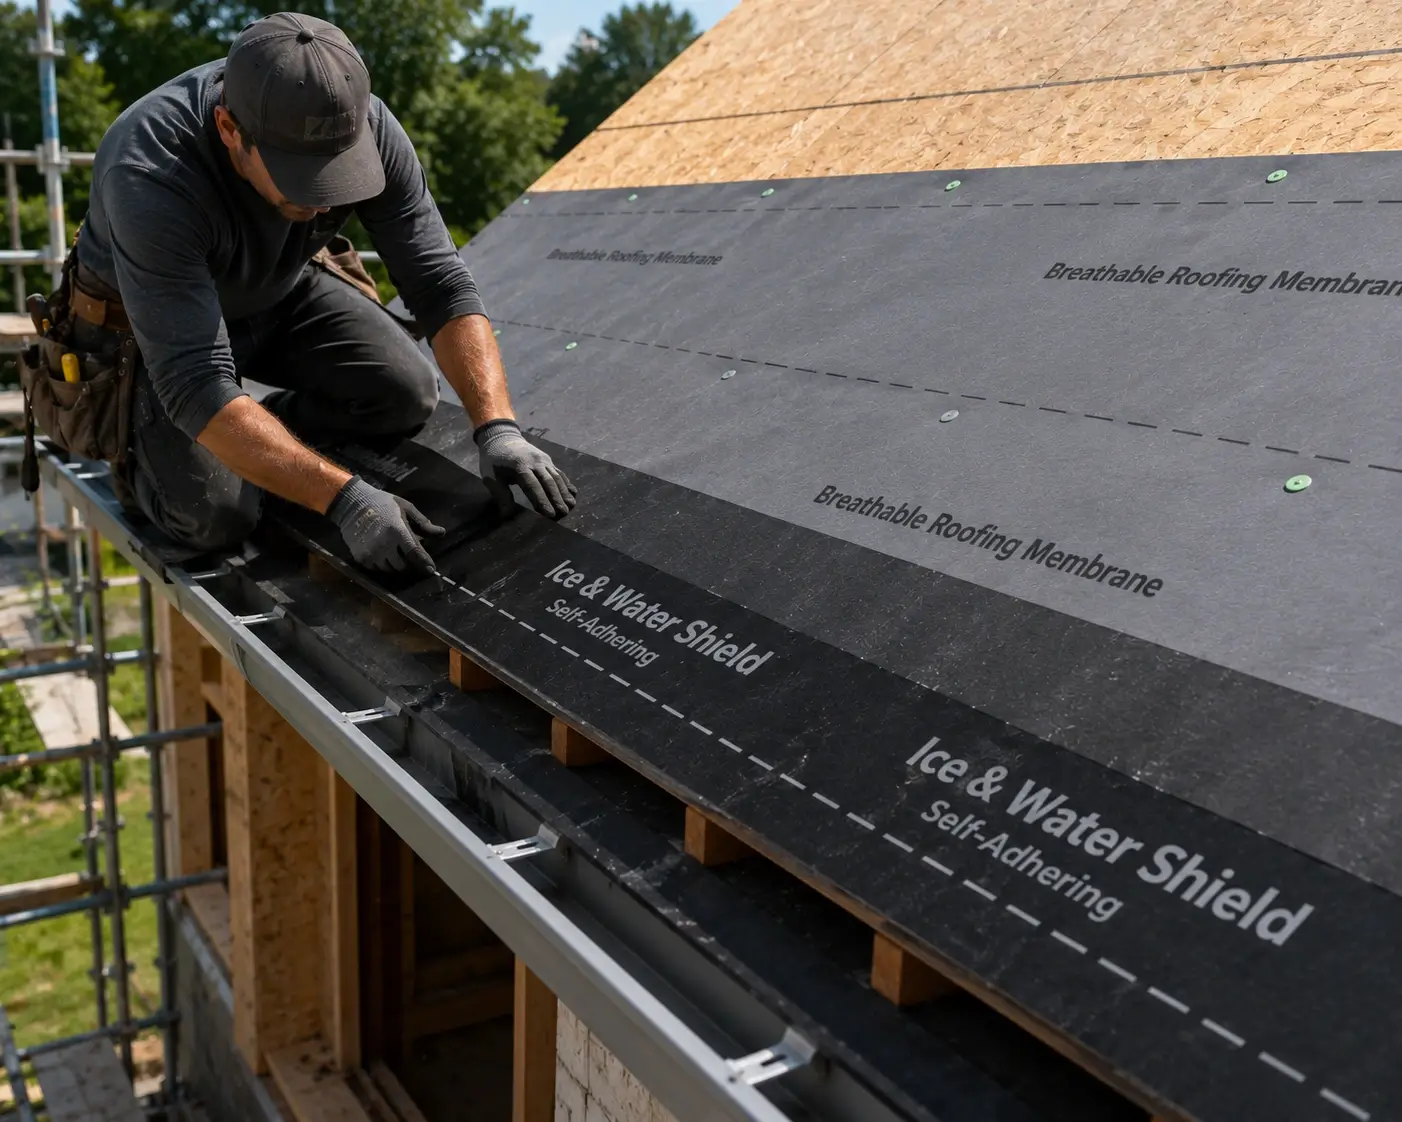
Ice & Water Shield is a self-adhesive waterproof membrane designed for areas with the highest risk of water infiltration.
It is typically installed around:
- Roof eaves
- Roof valleys
- Chimneys
- Skylights
- Dormers
- Roof penetrations
These areas are especially vulnerable to ice dams, wind-driven rain, and standing water.
Benefits
- Self-sealing around nails
- Excellent waterproof protection
- Prevents leaks caused by ice dams
- Provides additional protection in critical areas
Key Tasks
- Inspect the roof deck before installing the underlayment.
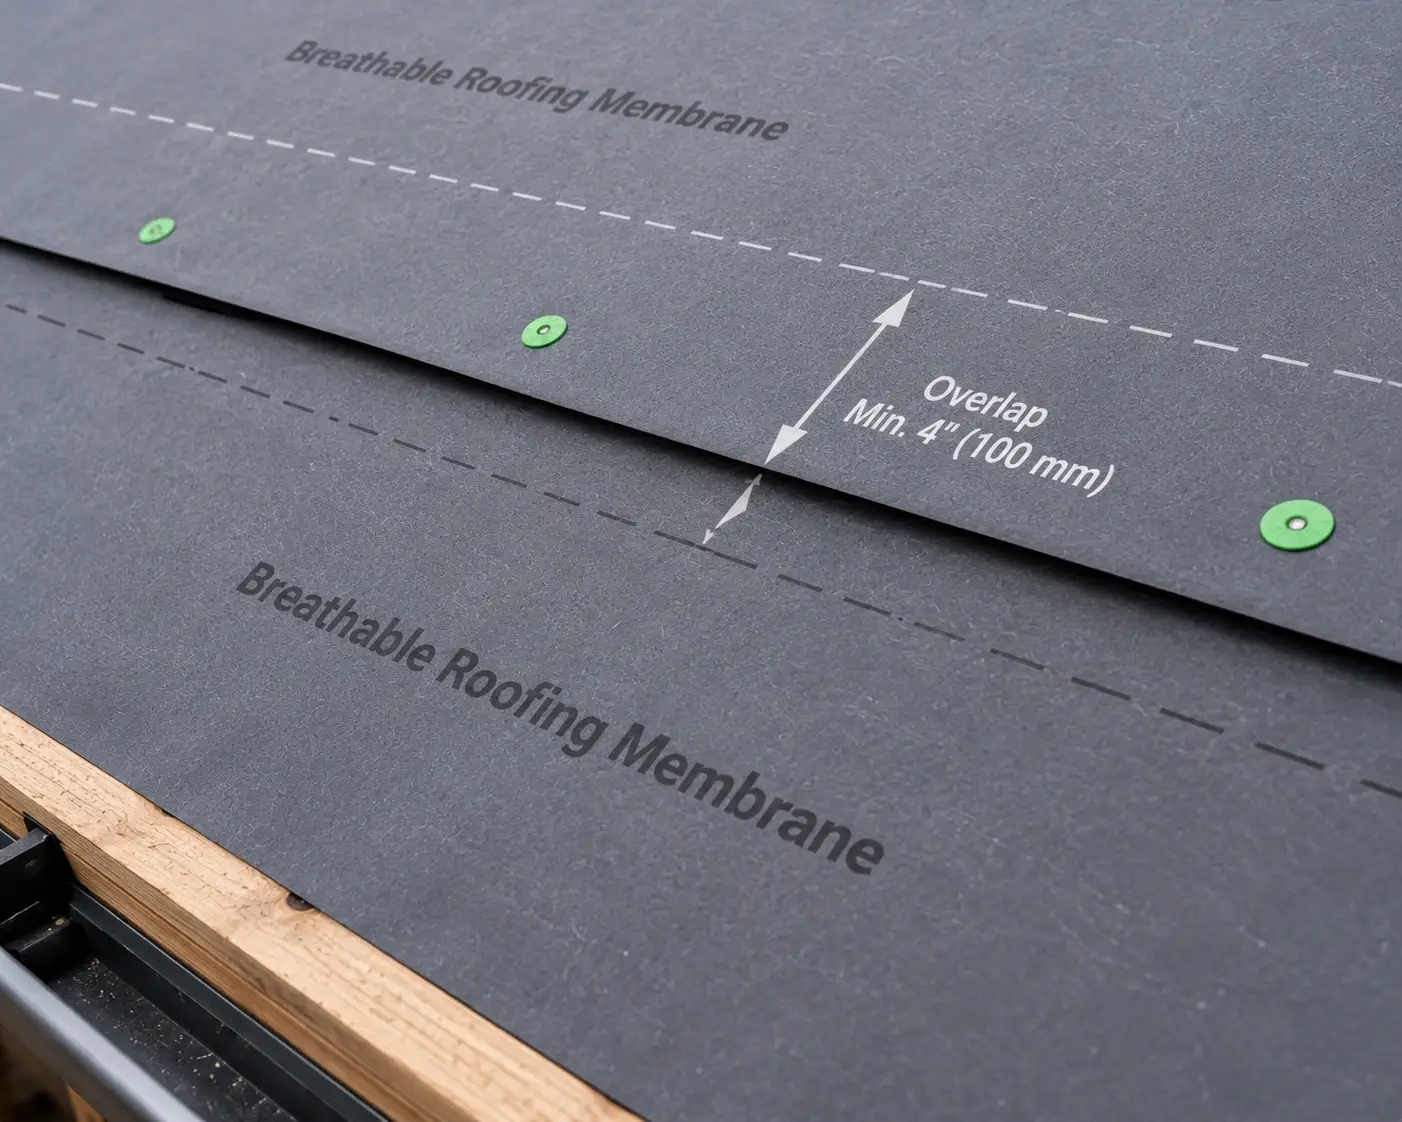
- Roll out the breathable membrane horizontally from the eaves upward.
- Maintain the manufacturer’s recommended overlap between adjacent courses.
- Keep the membrane smooth without wrinkles or trapped air.
- Secure the membrane with approved fasteners.
- Install Ice & Water Shield at eaves, valleys, chimneys, skylights, and other vulnerable areas.
- Seal all joints and penetrations where required.
Checklist
✔ Roof deck is clean and dry
✔ Breathable membrane installed correctly
✔ Proper overlaps maintained
✔ No wrinkles or tears
✔ Ice & Water Shield installed in vulnerable areas
✔ Flashing details integrated correctly
✔ Roof is ready for batten installation
Common Mistakes to Avoid
❌ Installing the membrane over a wet roof deck
❌ Insufficient overlap between membrane courses
❌ Leaving wrinkles or air pockets
❌ Omitting Ice & Water Shield in valleys or eaves
❌ Damaging the membrane during installation
❌ Using incompatible fasteners or adhesives
Pro Tip
Think of the underlayment as your roof’s hidden waterproof backup. Even though it will never be seen after the slates are installed, a high-quality membrane and proper detailing provide essential protection against wind-driven rain, snow, and unexpected moisture, helping your natural slate roof perform reliably for decades.
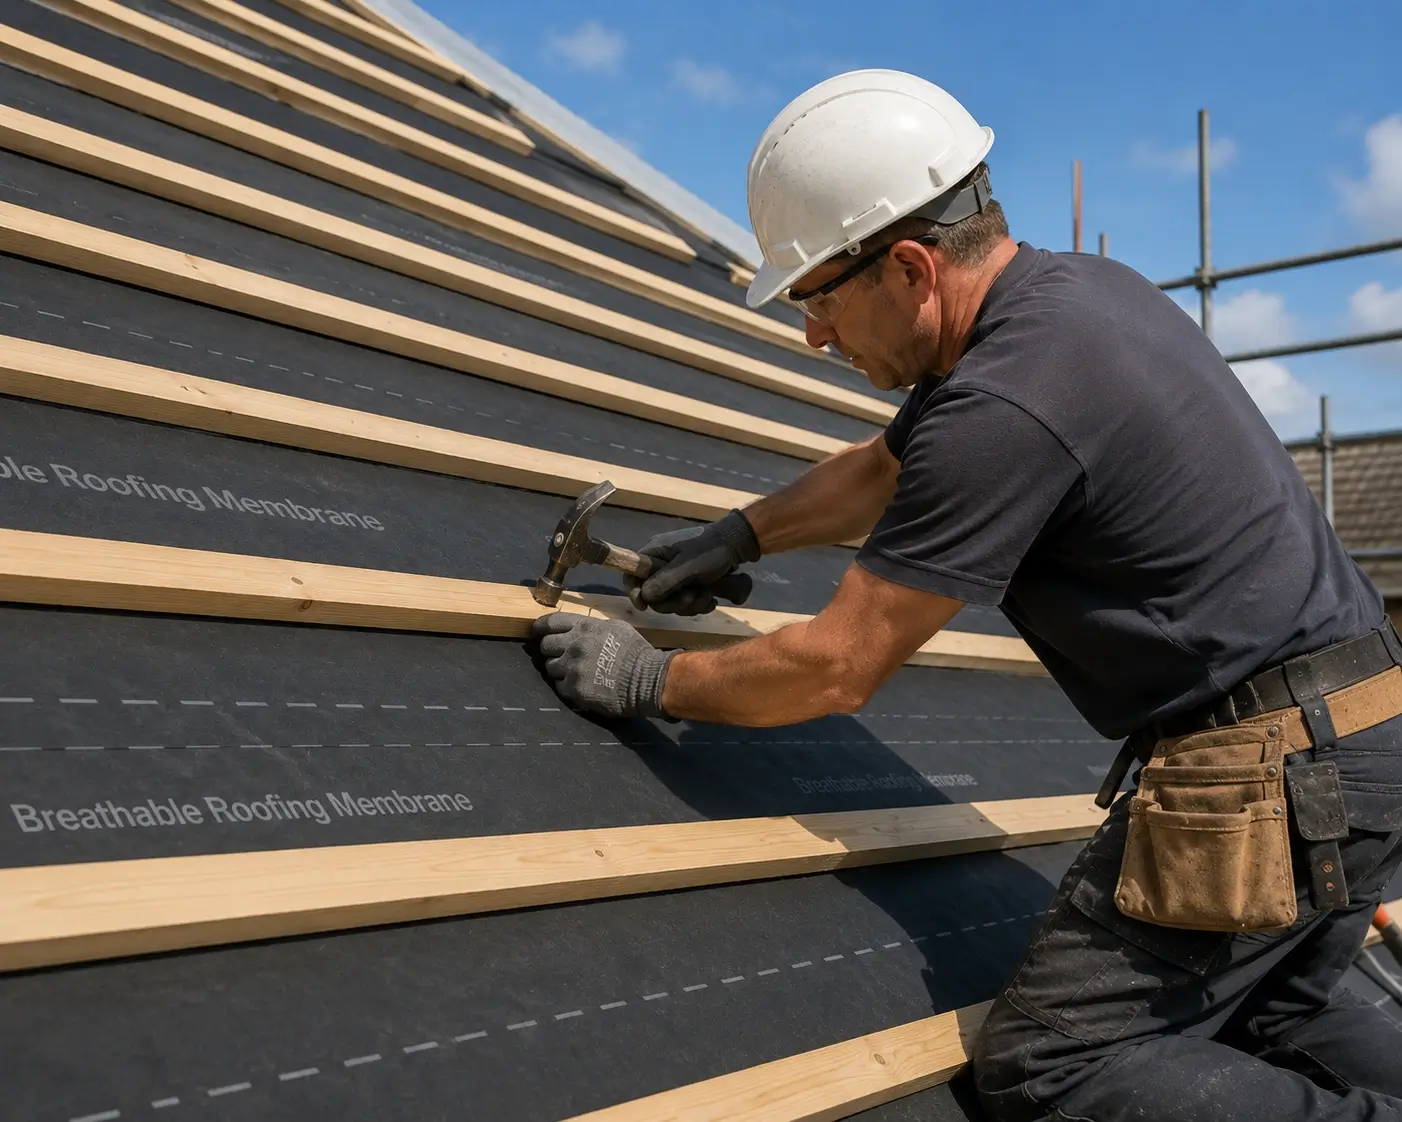
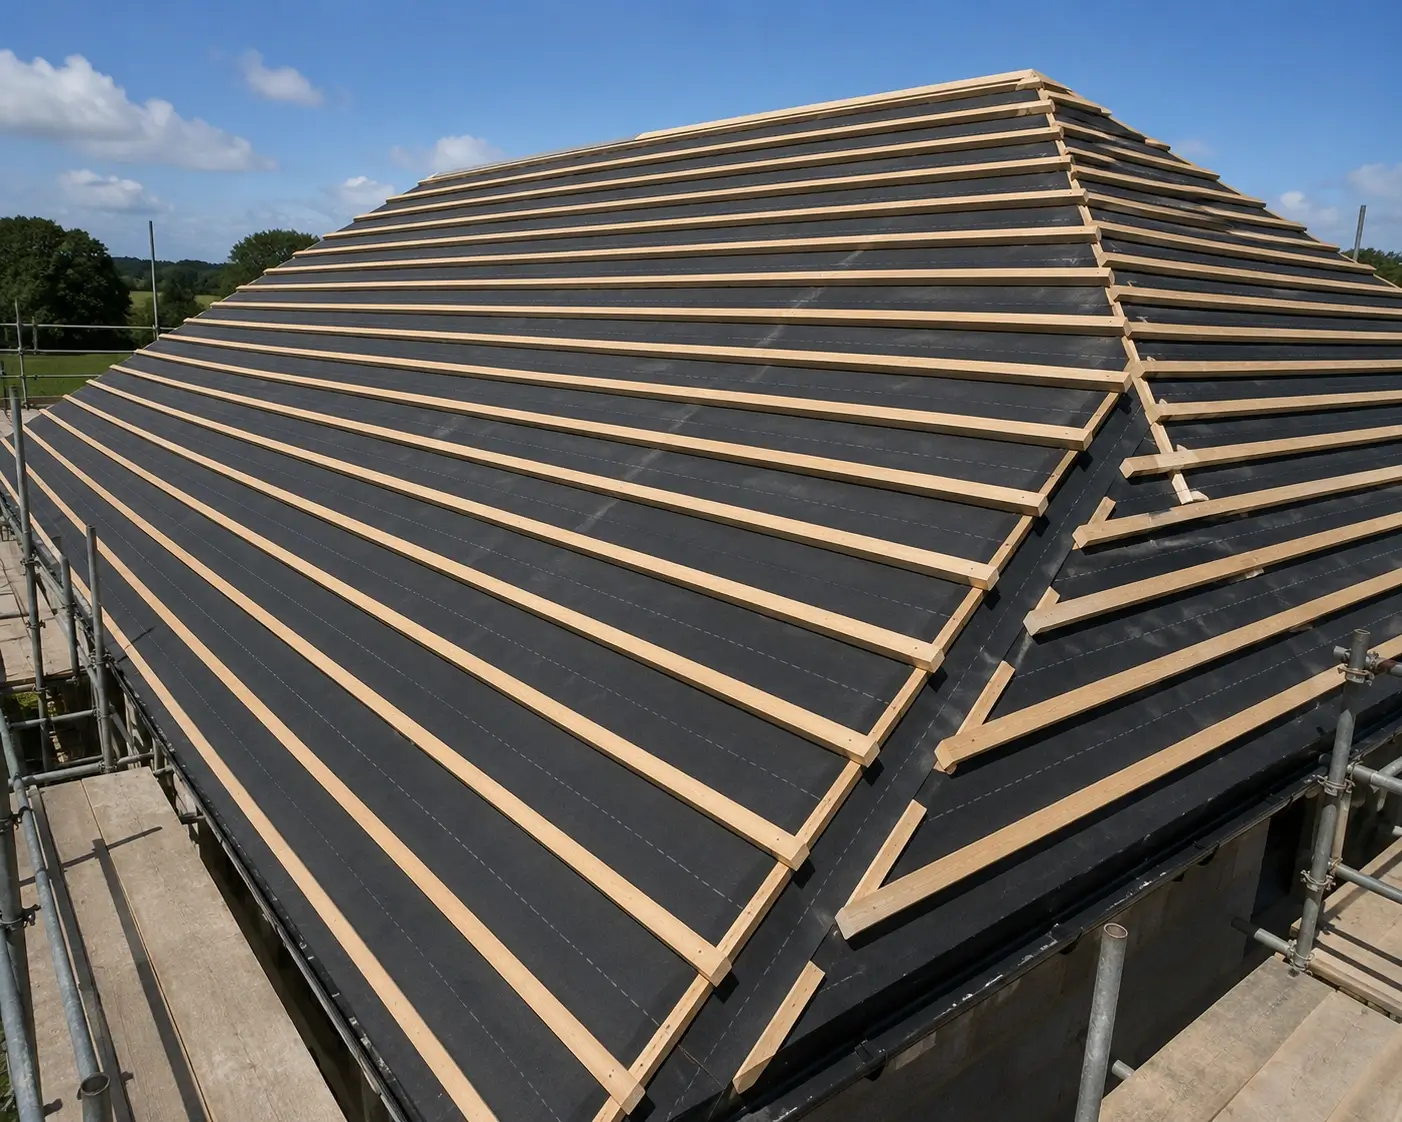
Step 3:Install Roof Battens
Why It Matters
Roof battens provide the structural fixing points for every slate tile. They ensure each slate is securely supported, correctly aligned, and evenly spaced across the roof.
Perhaps more importantly, batten spacing directly determines the slate exposure (gauge). Incorrect spacing can affect headlap, weather resistance, roof appearance, and even invalidate manufacturer installation recommendations.
Accurately installed battens help create a straight, durable, and visually consistent slate roof that performs reliably for decades.
What Are Roof Battens?
Roof battens are treated timber strips fixed horizontally across the roof, usually over a breathable membrane.
They serve several essential functions:
- Support each roofing slate
- Provide fixing points for nails or slate hooks
- Control the exposure (gauge) of each course
- Maintain straight installation lines
- Help distribute roof loads evenly
Where ventilation is required, counter battens may be installed beneath the roof battens to create a continuous drainage and airflow cavity.
Batten Spacing
Why Correct Batten Spacing Matters
Batten spacing (also called gauge) is the distance between the top edges of adjacent battens.
It must be calculated according to:
- Slate length
- Required headlap
- Roof pitch
- Local building regulations
- Manufacturer recommendations
Even a small error in batten spacing can cause misaligned courses, insufficient overlap, water penetration, or unnecessary material waste.
Factors Affecting Batten Spacing
| Factor | Influence |
|---|---|
| Slate Length | Longer slates generally allow larger batten spacing. |
| Roof Pitch | Lower roof pitches require greater headlap and therefore smaller batten spacing. |
| Headlap | Larger headlap reduces batten spacing to improve waterproofing. |
| Local Climate | Areas with heavy rain, snow, or strong winds often require increased headlap. |
| Installation Standards | Always follow local building codes and slate manufacturer recommendations. |
Batten Layout
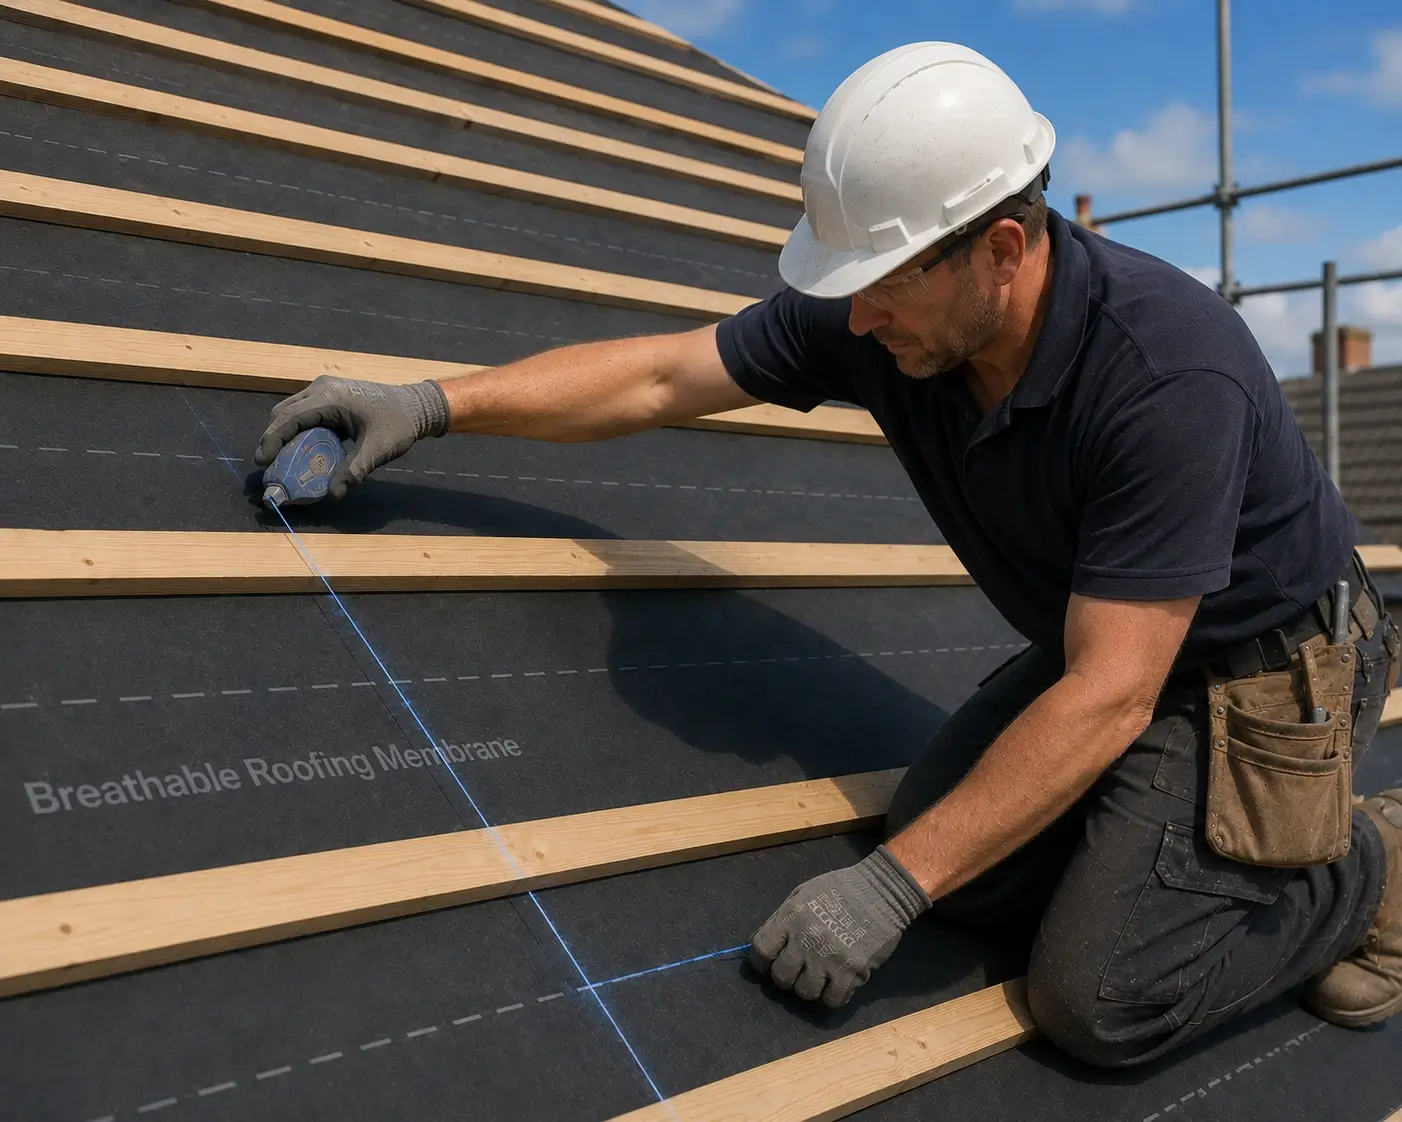
Before fixing battens, carefully mark the layout across the roof.
Professional Installation Tips
- Begin from the eaves and work upward.
- Mark all batten positions using a chalk line.
- Check spacing regularly with a measuring tape.
- Keep battens perfectly horizontal.
- Ensure all battens are securely fixed to the rafters.
- Replace any warped or damaged timber.
Proper layout improves installation speed while producing straight slate courses and a consistent finished appearance.
Key Tasks
- Install treated timber battens over the breathable membrane.
- Calculate batten spacing based on slate size and headlap.
- Mark each batten position accurately.
- Keep battens level and parallel.
- Secure battens firmly to the roof structure.
- Recheck measurements before laying the first slate course.
Checklist
✔ Roof battens securely fixed
✔ Correct batten spacing maintained
✔ Battens perfectly level
✔ Straight layout lines marked
✔ Battens fixed into rafters
✔ Roof ready for slate installation
Common Mistakes to Avoid
❌ Guessing batten spacing instead of calculating it
❌ Ignoring the required headlap
❌ Uneven or warped battens
❌ Battens not fixed into rafters
❌ Inconsistent spacing across the roof
❌ Skipping layout lines before installation
Pro Tip
Never choose batten spacing by estimation. Calculate it using the slate length and required headlap before installation begins. Accurate spacing ensures consistent slate exposure, improves weather resistance, reduces material waste, and gives the finished roof a clean, professional appearance.
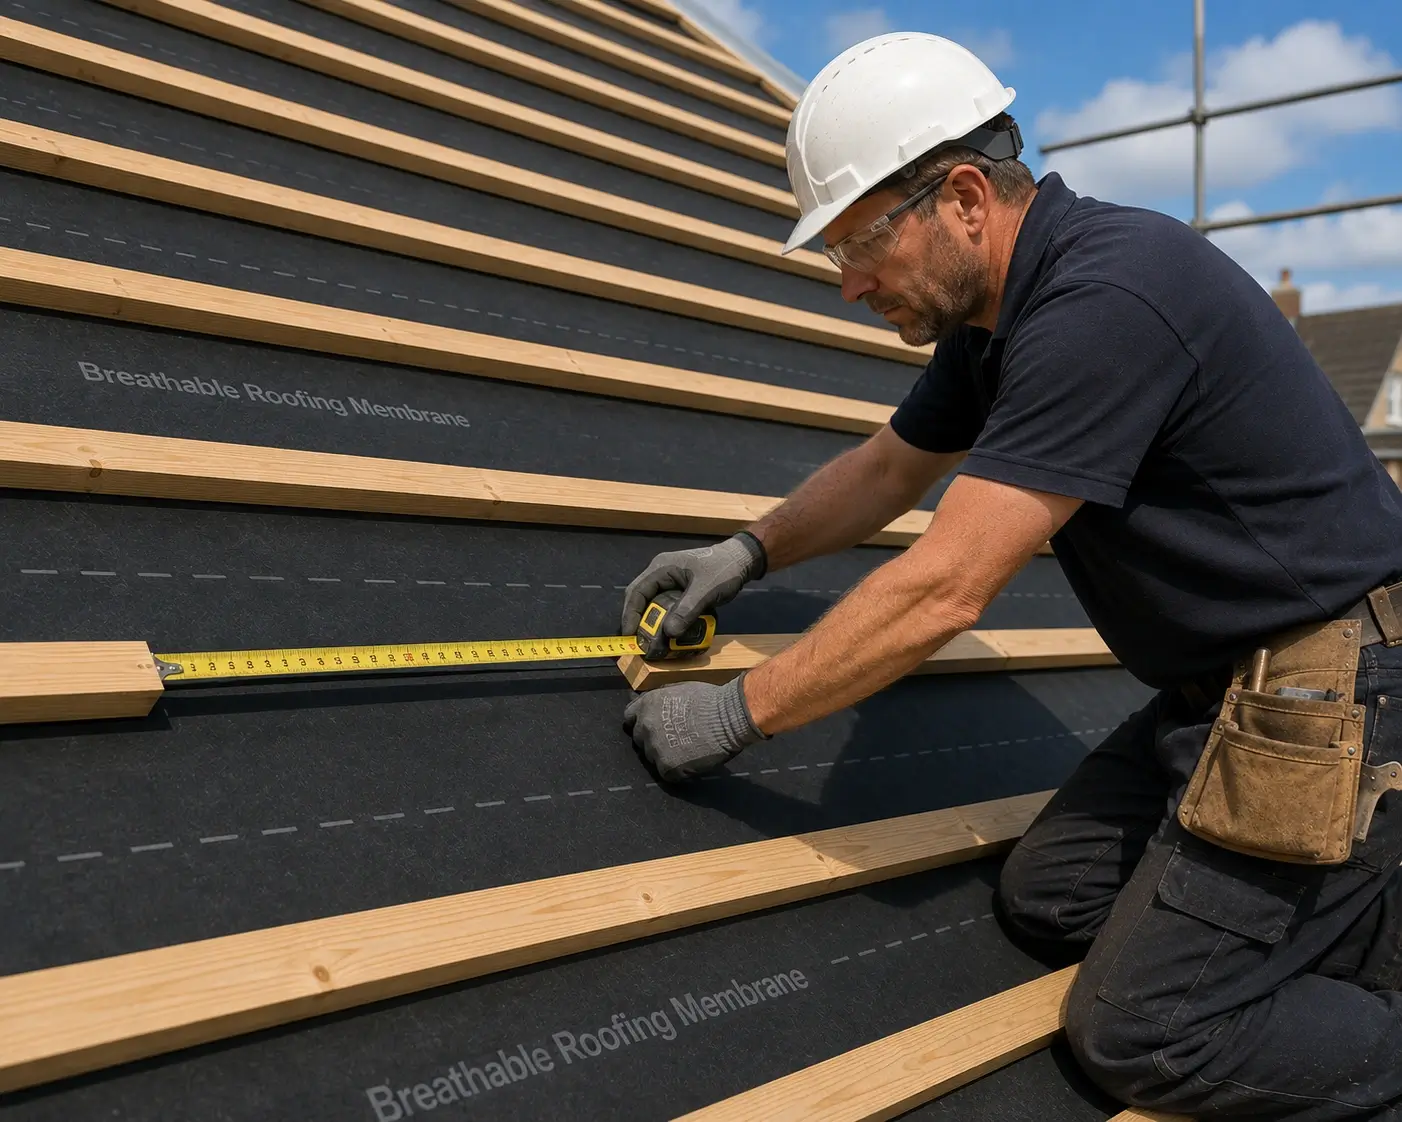
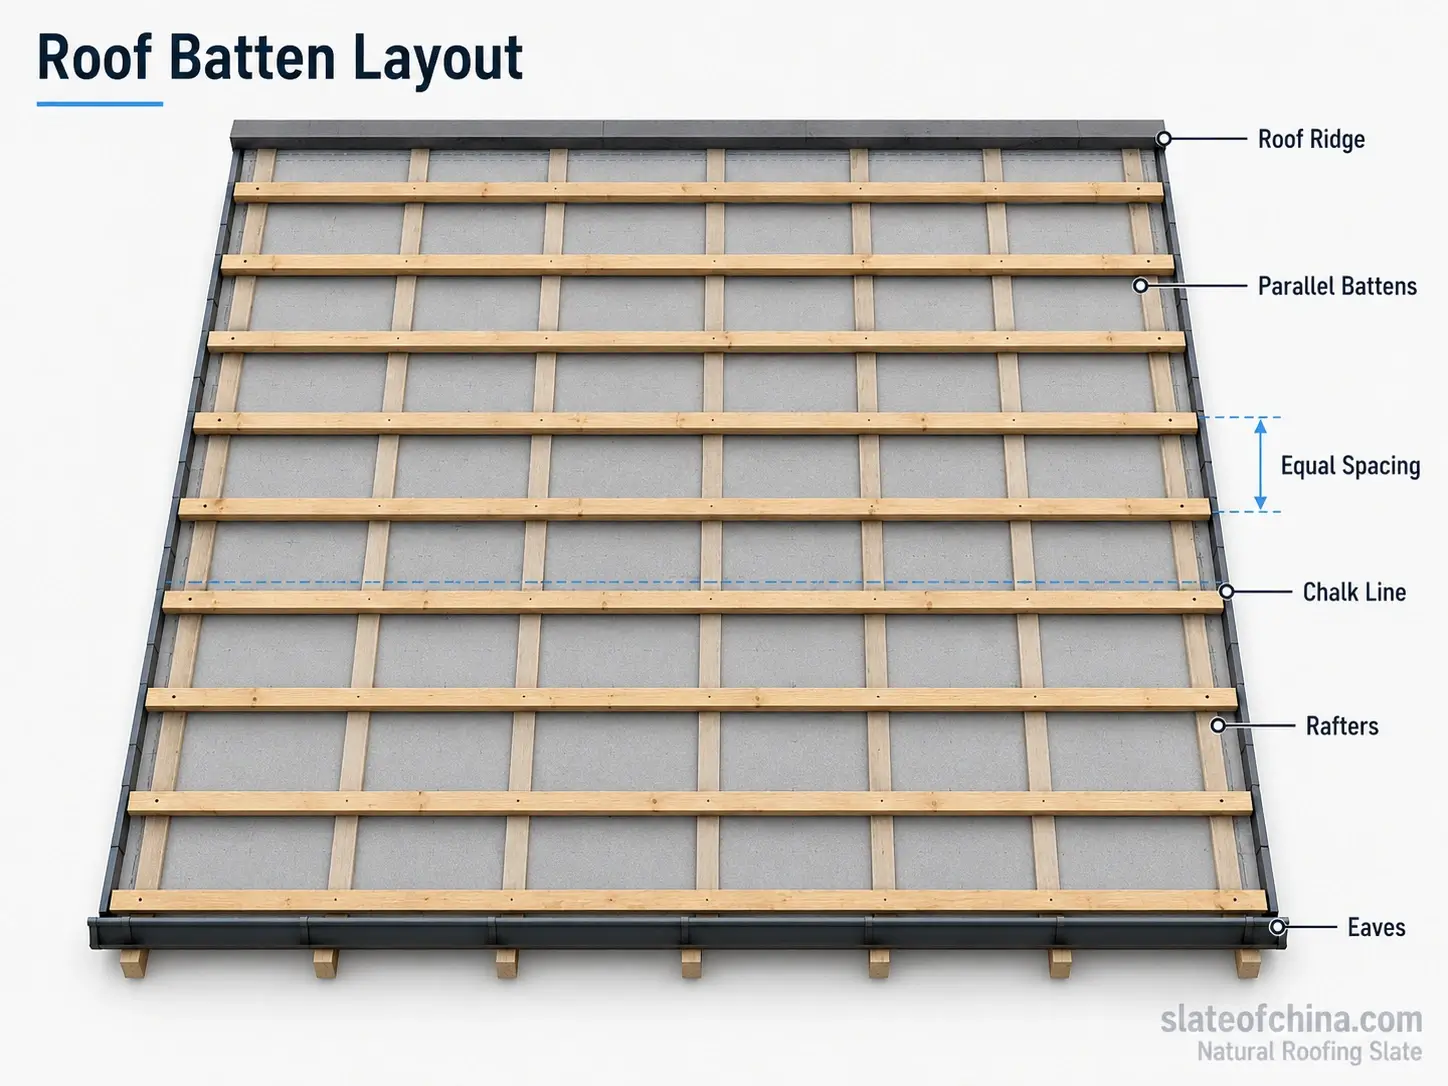
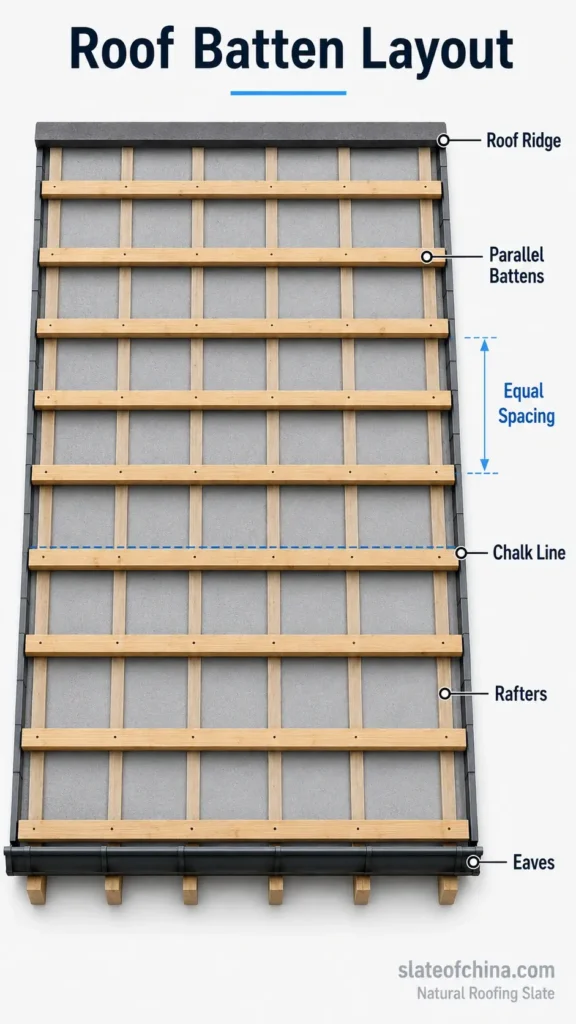
Once the roof battens are securely installed, the next critical step is determining the correct slate exposure and headlap. Accurate exposure calculations ensure proper overlap, effective drainage, and a long-lasting natural slate roof.
Step 4:Measure the Slate Exposure
Why It Matters
Correct slate exposure is one of the most important measurements in natural roofing slate installation. Exposure refers to the visible part of each slate after installation. It is determined by the slate length, required headlap, and batten spacing, also known as the gauge.
If the exposure is too large, the headlap may be insufficient, increasing the risk of water penetration during heavy rain, snow, or wind-driven weather. If the exposure is too small, the roof may use more slates than necessary, increasing material cost and installation time.
Accurate exposure measurement ensures each slate course overlaps correctly, drains water efficiently, and creates a clean, consistent roof appearance.
What Is Slate Exposure?
Slate exposure is the portion of the slate that remains visible after the next course of slates is installed above it.
In simple terms:
Exposure = the visible area of each slate on the finished roof.
A properly calculated exposure helps control:
- Slate overlap
- Headlap
- Batten spacing
- Roof appearance
- Water-shedding performance
- Material quantity
For natural roofing slate, exposure should never be guessed. It must be calculated before installation begins and checked regularly during installation.
Key Terms You Need to Know
Exposure
Exposure is the visible length of the slate once it is installed on the roof. It is the part of the slate that can still be seen after the next slate course overlaps it.
Correct exposure provides a balanced appearance and ensures the slate roof sheds water properly.
Headlap
Headlap is the vertical overlap between one slate and the slate two courses above it.
Headlap is critical because it prevents water from reaching nail holes and penetrating the roof system. Lower roof pitches, harsher climates, or areas exposed to heavy rain and snow usually require greater headlap.
Gauge
Gauge is another term commonly used for batten spacing. It refers to the distance between battens, usually measured from the top edge of one batten to the top edge of the next batten, depending on local practice.
In slate roofing, gauge is directly related to exposure. If the gauge is wrong, the exposure and headlap will also be wrong.
Overlap
Overlap refers to the area where one slate covers another. Proper overlap is essential for waterproofing, wind resistance, and long-term roof durability.
There are two important types of overlap:
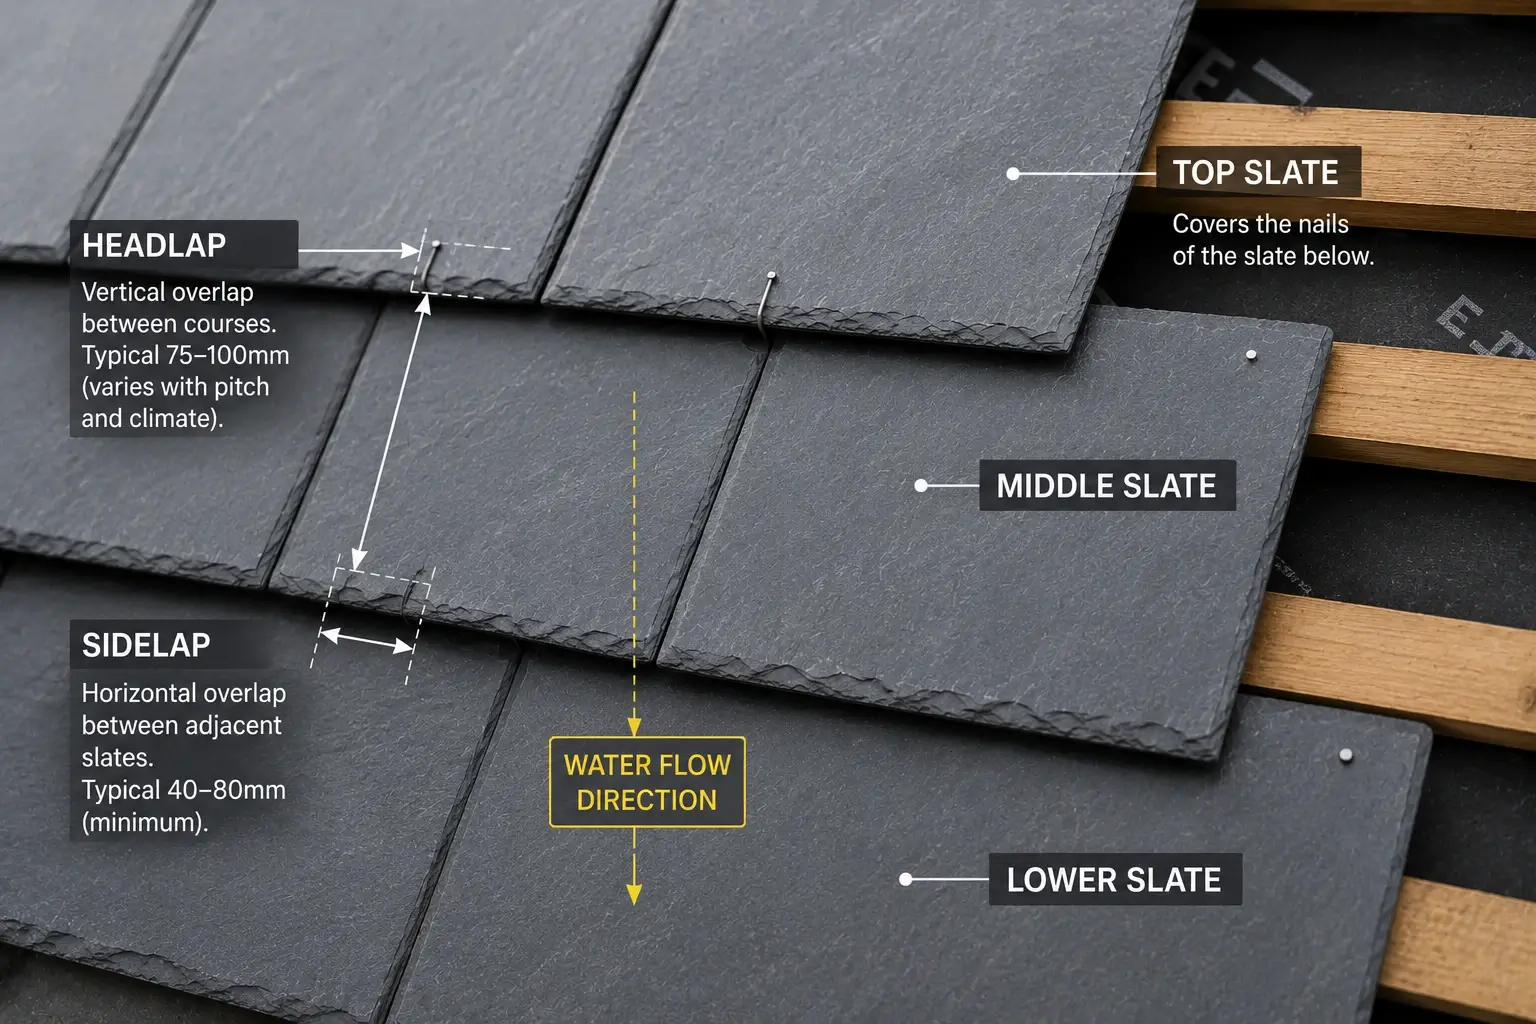
- Headlap — vertical overlap between slate courses
- Side lap — horizontal overlap between adjacent slates
Both help prevent water from entering the roof system.
How to Calculate Slate Exposure
A commonly used formula is:
Exposure = (Slate Length - Headlap) ÷ 2Slate Length: 500 mm
Required Headlap: 100 mm
Exposure = (500 - 100) ÷ 2
Exposure = 200 mmNote: Actual exposure and headlap requirements may vary depending on roof pitch, slate size, local climate, fixing method, and national roofing standards. Always follow local building codes and project specifications.
Example Exposure Calculation Table
| Slate Size | Required Headlap | Approx. Exposure / Gauge |
|---|---|---|
| 400 × 250 mm | 75 mm | 162.5 mm |
| 450 × 250 mm | 90 mm | 180 mm |
| 500 × 250 mm | 100 mm | 200 mm |
| 600 × 300 mm | 100 mm | 250 mm |
| 600 × 300 mm | 125 mm | 237.5 mm |
This table is for general reference only. Final measurements should be confirmed according to the project design, roof pitch, weather exposure, and local roofing standards.
Key Tasks
- Confirm the slate length before installation.
- Determine the required headlap based on roof pitch and local climate.
- Calculate the correct exposure using the slate length and headlap.
- Mark the batten spacing accurately across the roof.
- Check exposure regularly during installation.
- Ensure every slate course remains straight and consistent.
- Adjust layout carefully around ridges, valleys, hips, dormers, and roof penetrations.
Checklist
✔ Slate length confirmed
✔ Required headlap calculated
✔ Exposure measured accurately
✔ Gauge / batten spacing marked correctly
✔ Slate courses aligned evenly
✔ Overlap checked before fixing
✔ Roof ready for starter course installation
Common Mistakes to Avoid
❌ Guessing exposure by eye
❌ Using the same exposure for every roof pitch
❌ Ignoring required headlap
❌ Setting batten spacing too wide
❌ Forgetting to account for roof pitch and climate
❌ Inconsistent gauge across the roof
❌ Misaligned slate courses near valleys, hips, and ridges
Pro Tip
Always calculate exposure before installing the first slate. A few millimeters of error in gauge may seem small at the beginning, but over many courses it can affect alignment, headlap, waterproofing, and the finished appearance of the entire slate roof.
Why Exposure Must Be Accurate
Correct exposure helps ensure:
✔ Proper headlap
✔ Better water resistance
✔ Consistent roof appearance
✔ Accurate material calculation
✔ Reduced installation errors
✔ Longer slate roof lifespan
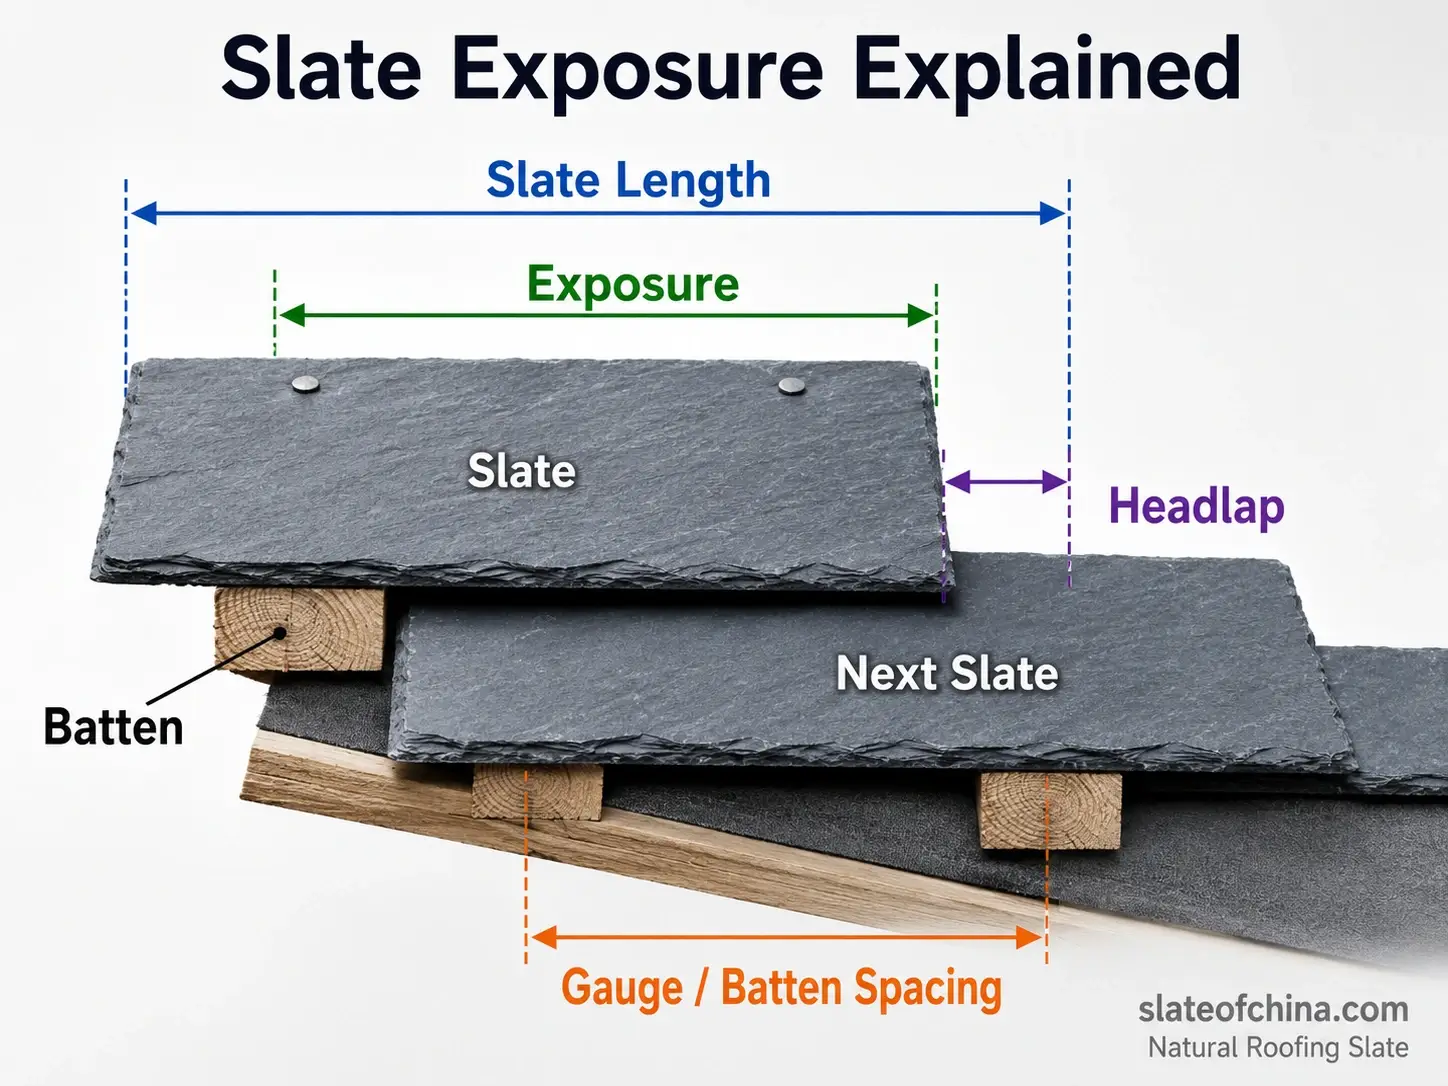
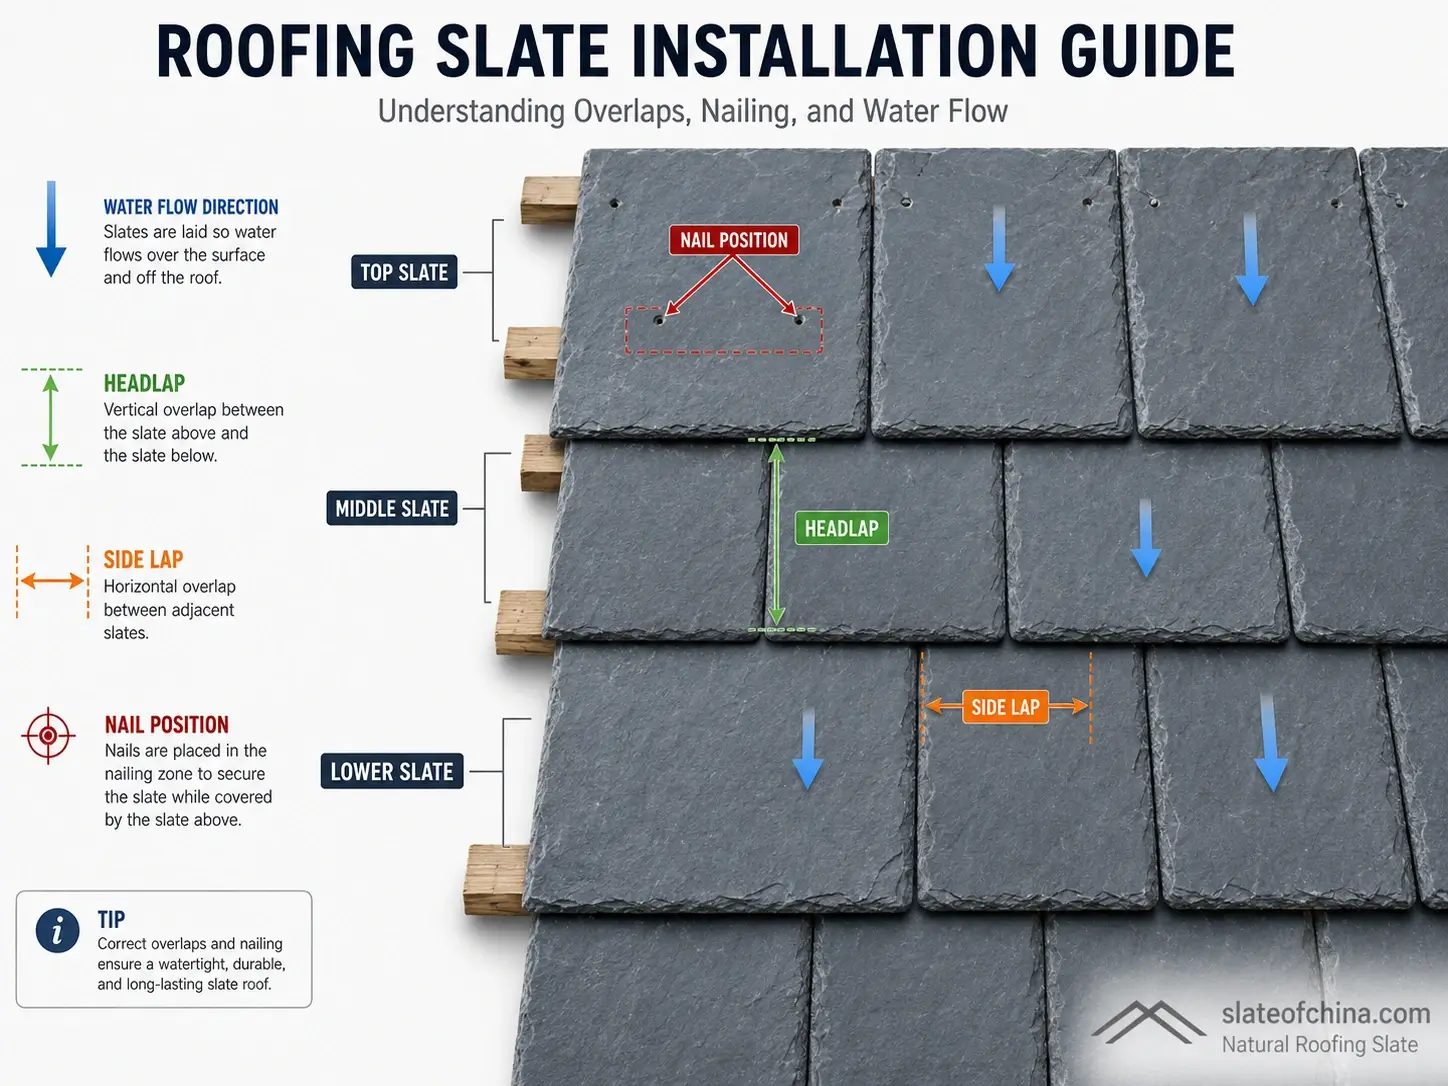
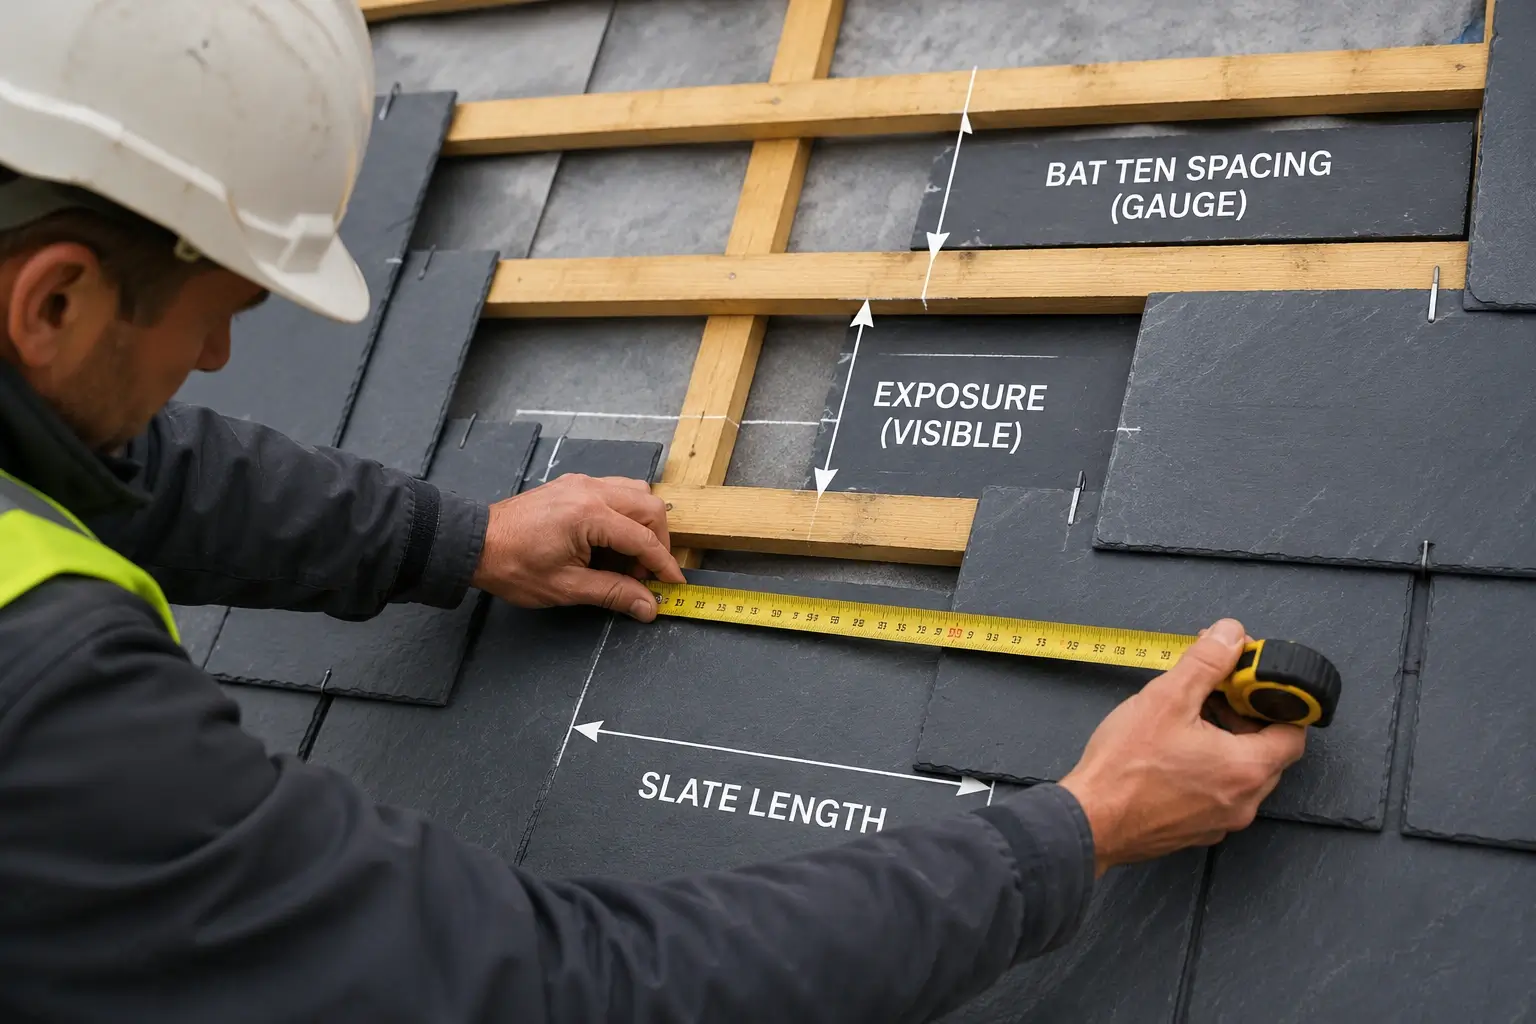
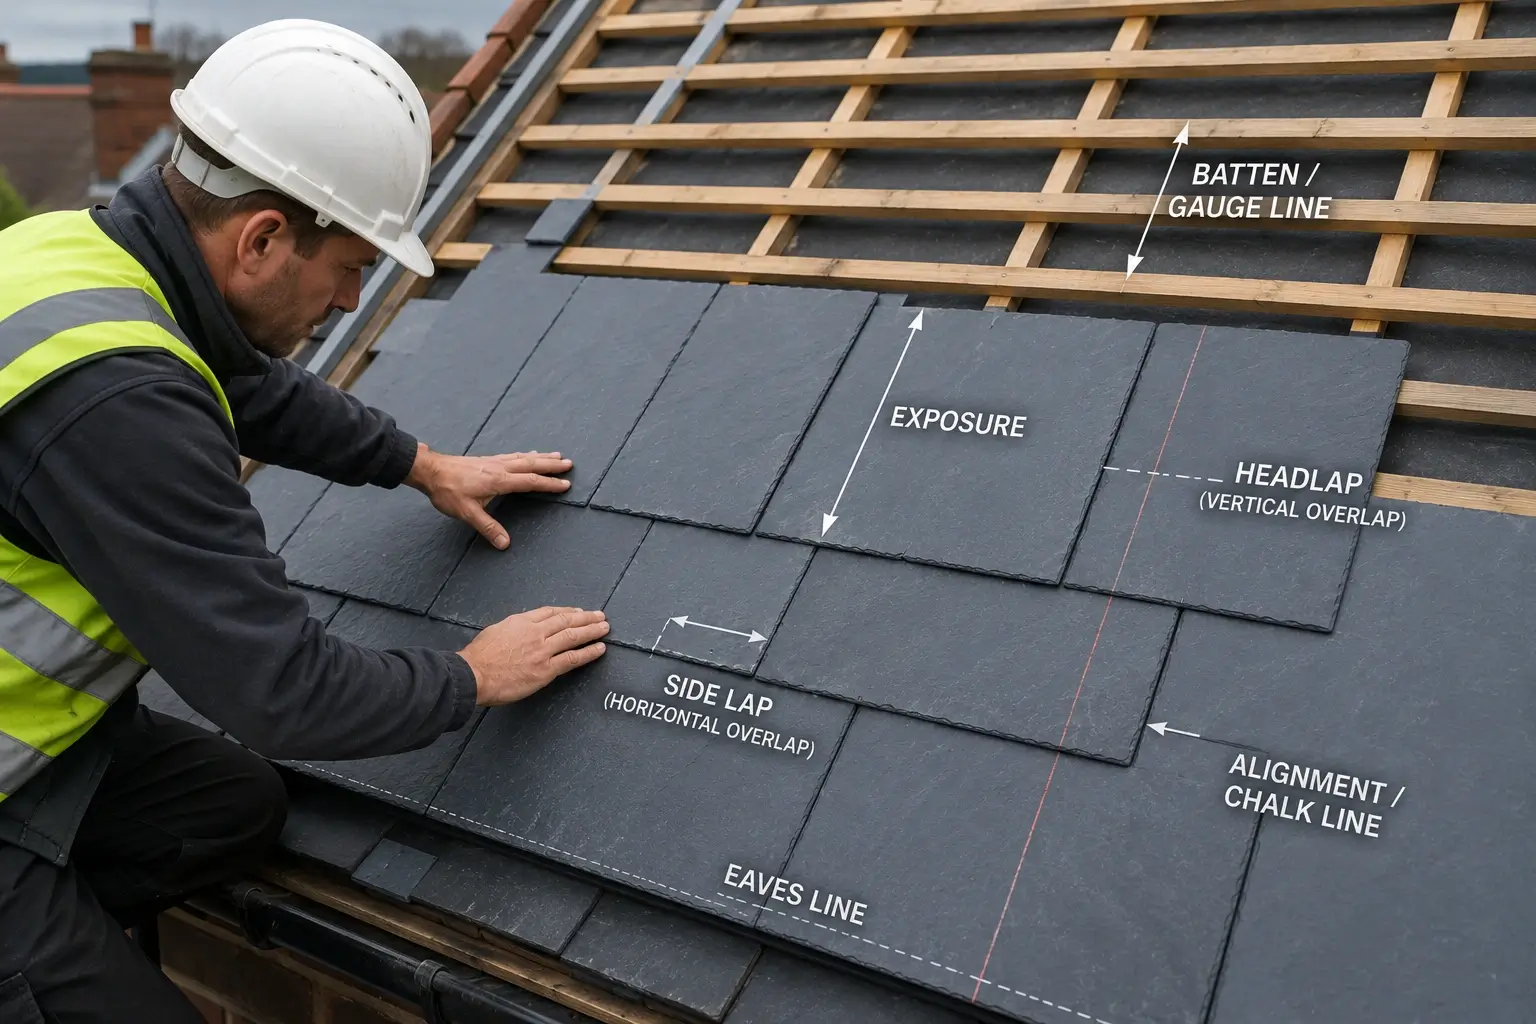
The correct exposure depends heavily on roof pitch and required headlap. For more details, see our Roofing Slate Headlap Guide and Batten Spacing Guide.
/roofing-slate/installation/headlap/
/roofing-slate/installation/batten-spacing/
/roofing-slate/installation/roof-pitch/
/roofing-slate/installation/slate-exposure/
Step 5:Install the Starter Course
Why It Matters
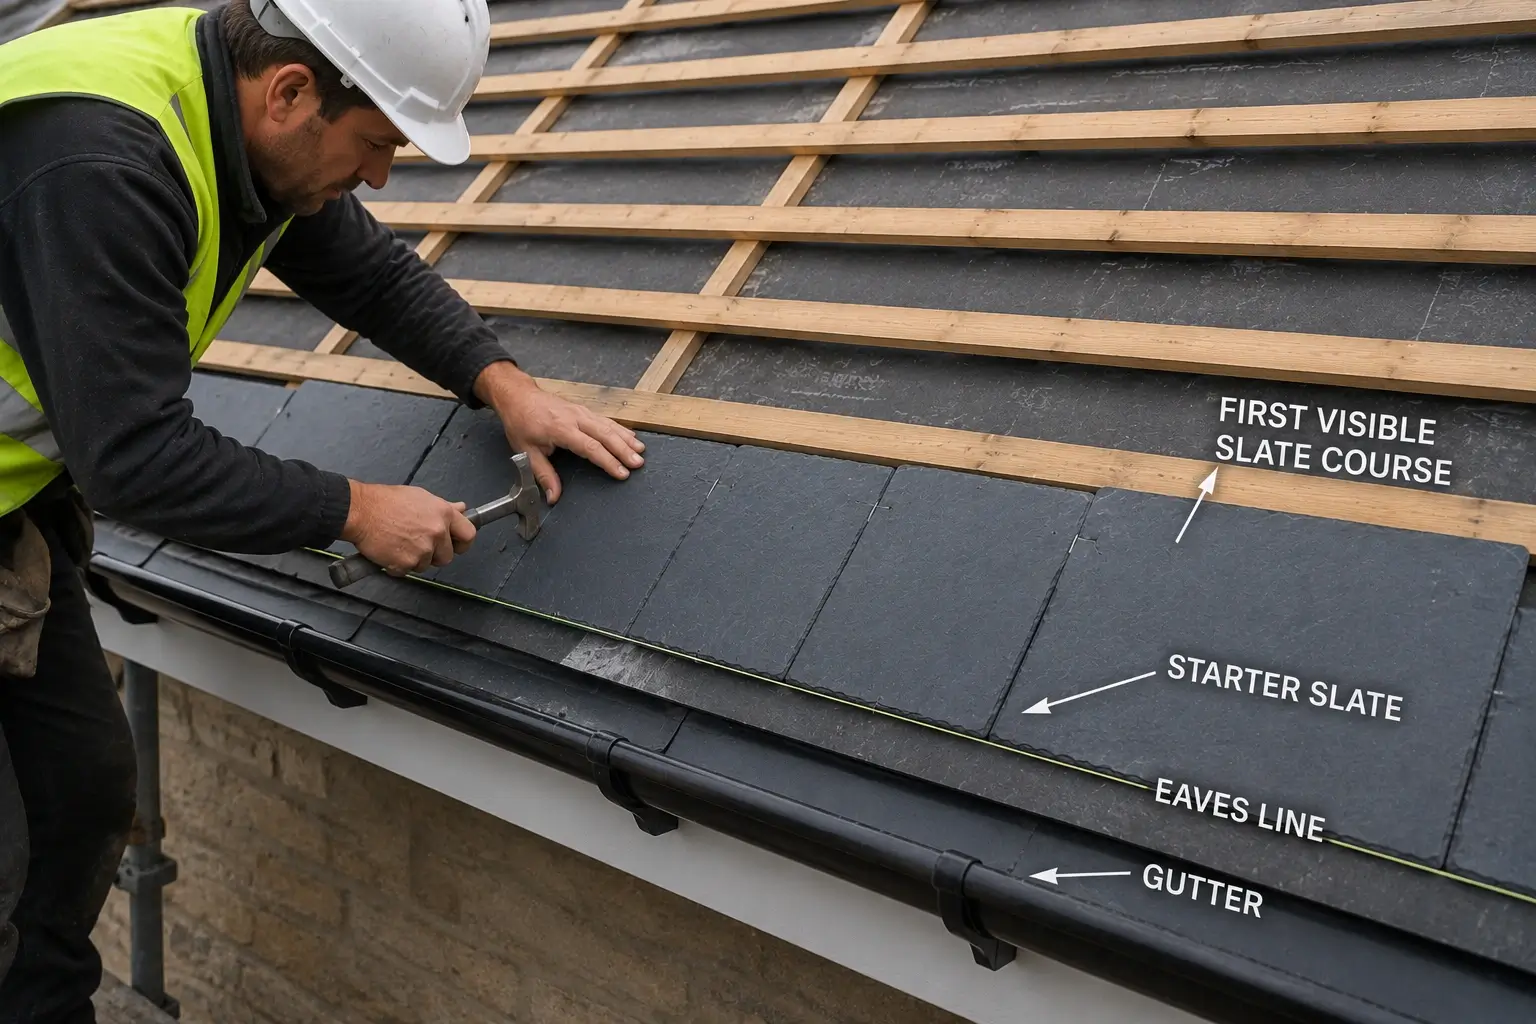
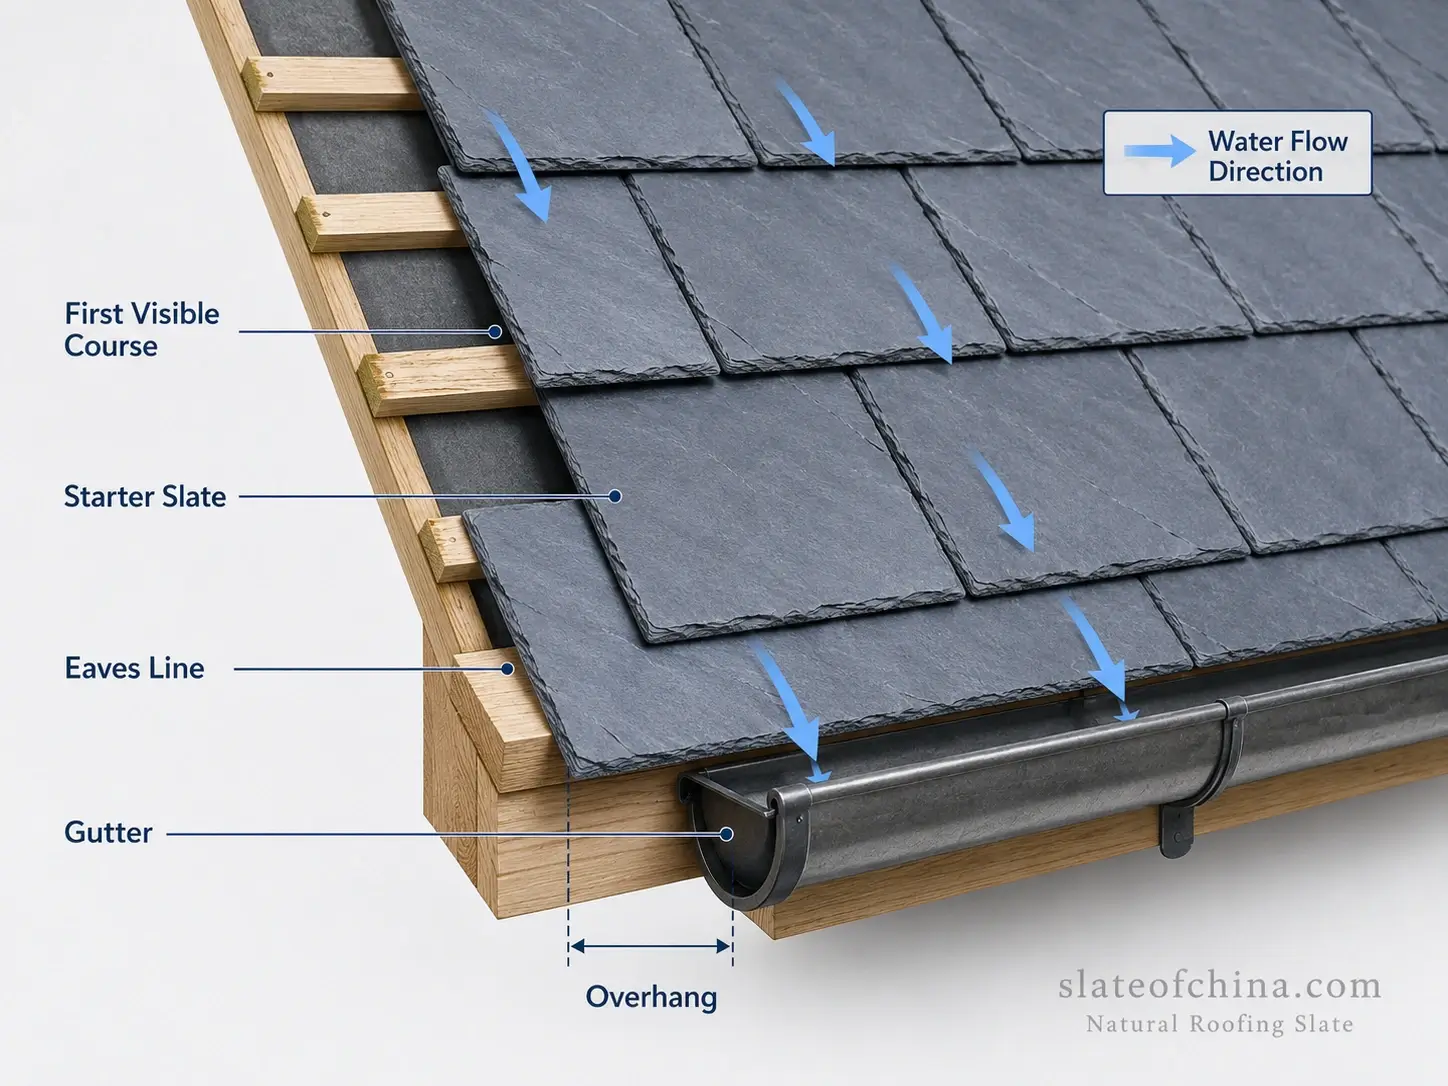
The starter course is the first row of slates installed at the eaves of the roof. Although it is partly hidden by the first visible course, it plays a critical role in supporting proper water drainage, creating the correct slate overlap, and forming a strong foundation for the rest of the roof.
A correctly installed starter course helps prevent water from reaching the underlayment at the eaves, improves wind resistance, and ensures that the first visible row of roofing slate sits evenly and securely. If the starter course is poorly installed, the entire slate roof layout may be affected, leading to uneven courses, poor alignment, and reduced weather protection.
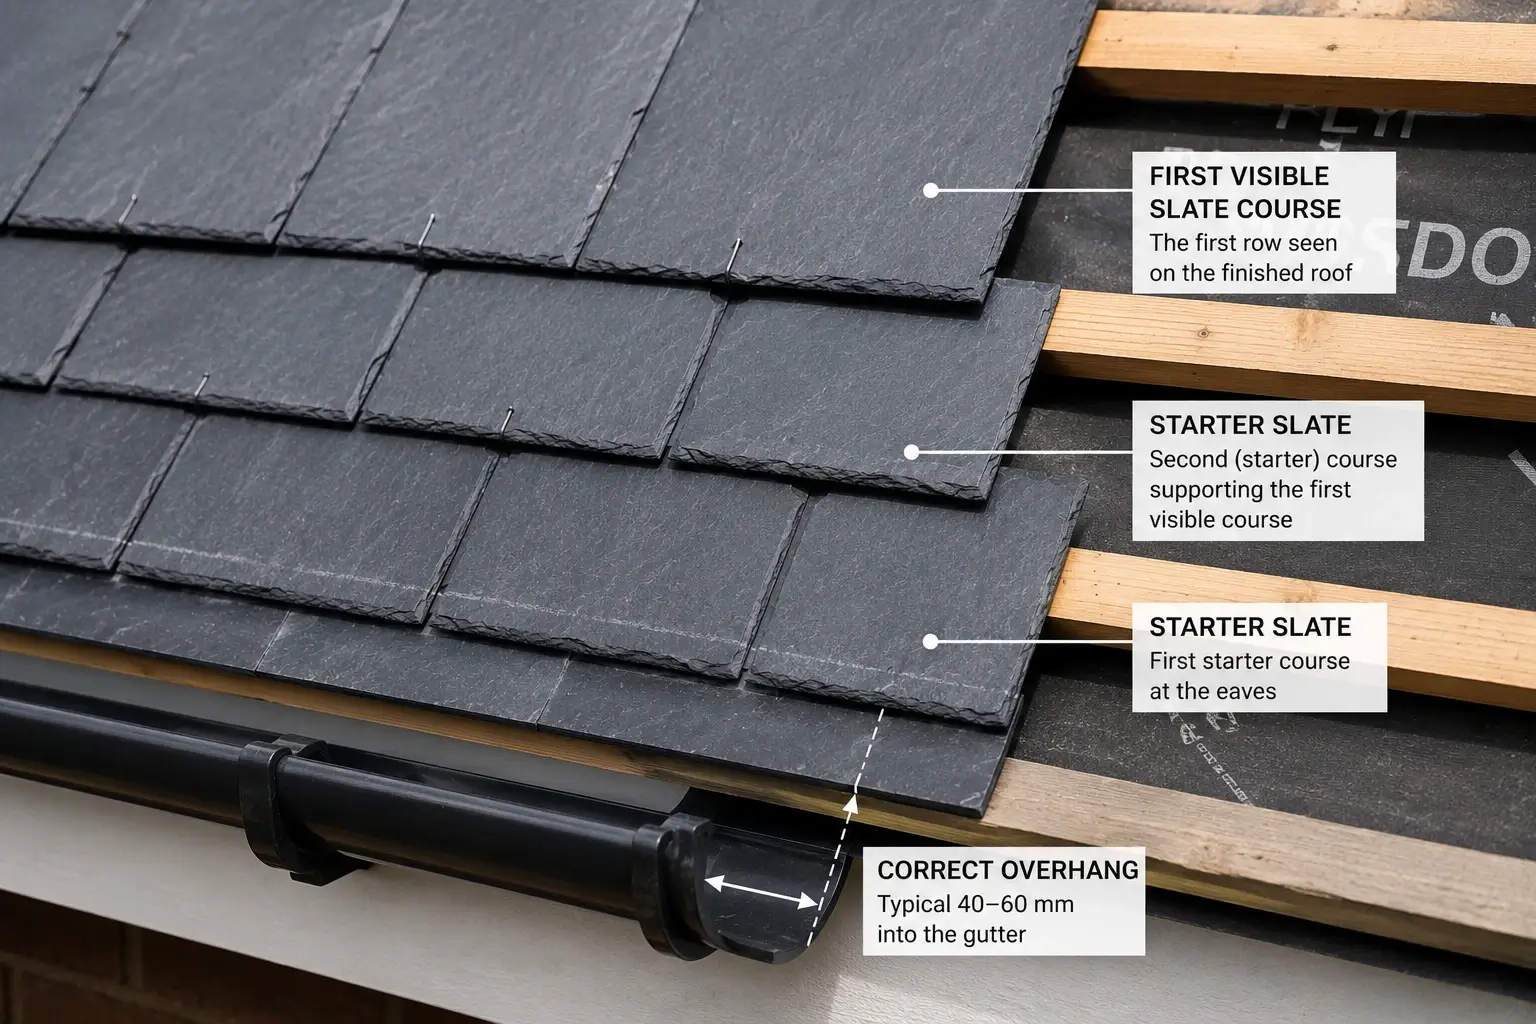
For natural roofing slate, the starter course is commonly installed as a double layer at the eaves, with the under-eaves course supporting the first full slate course above it.
What Is a Starter Course?
A starter course is the first supporting row of slates installed at the bottom edge of the roof.
It is usually installed beneath the first visible course and helps create the correct thickness, angle, and overlap at the eaves.
In slate roofing, the starter course may include:
- A first layer of starter slates at the eaves
- A second visible slate course above it
- Correct overhang into the gutter
- Proper alignment with the eaves line
- Secure fixing using nails or hooks
This double-layer arrangement helps ensure water flows smoothly from the slate surface into the gutter without entering beneath the roof covering.
Double Starter Course
Why a Double Course Is Used
Unlike some lightweight roofing materials, natural roofing slate requires a well-supported eaves detail. A double starter course provides extra thickness at the roof edge and helps the first visible row match the correct angle of the following courses.
The double course also improves weather protection by ensuring that the joints in the first visible row are properly covered.
Benefits of a Double Starter Course
| Benefit | Why It Matters |
|---|---|
| Better water drainage | Helps guide rainwater into the gutter |
| Improved wind resistance | Strengthens the vulnerable eaves area |
| Correct slate angle | Supports the first visible slate course |
| Cleaner appearance | Creates a straight, professional eaves line |
| Stronger roof edge | Reduces movement and slate breakage |
How to Install the Starter Course
Begin at the eaves and work along the roof edge. The starter slates should be aligned carefully with the eaves line and installed with the correct overhang into the gutter.
The first visible course is then laid above the starter course, ensuring that joints are staggered and properly overlapped. The overlap must be sufficient to protect nail holes and prevent water penetration.
Always check that the bottom edge of the first visible course is straight before continuing with the remaining slate courses.
Key Tasks
- Mark a straight eaves line before installation.
- Install the first layer of starter slates at the roof edge.
- Ensure the starter course has the correct overhang into the gutter.
- Lay the first visible slate course above the starter course.
- Stagger joints to prevent direct water paths.
- Fix slates securely using the correct nails or hooks.
- Check alignment across the full roof width before proceeding upward.
Checklist
✔ Eaves line marked accurately
✔ Starter slates installed at the roof edge
✔ Correct overhang into the gutter
✔ Double starter course formed properly
✔ First visible course aligned straight
✔ Joints staggered correctly
✔ Slates securely fixed
✔ Roof ready for full slate laying
Common Mistakes to Avoid
❌ Installing only a single unsupported first row
❌ Poor eaves alignment
❌ Incorrect overhang into the gutter
❌ Allowing joints to line up vertically
❌ Using damaged or uneven starter slates
❌ Fixing slates too tightly
❌ Failing to check the first row before continuing upward
Pro Tip
Take extra time with the starter course. The first row determines the alignment, drainage, and appearance of the entire slate roof. A small mistake at the eaves can become more visible as each additional slate course is installed.
Why the Starter Course Is Important
✔ Creates a strong base at the eaves
✔ Supports the first visible slate row
✔ Improves water drainage into the gutter
✔ Helps prevent wind-driven rain penetration
✔ Keeps slate courses straight and consistent
✔ Enhances the finished roof appearance
Internal Link Suggestions
/roofing-slate/installation/eaves/
/roofing-slate/installation/starter-course/
/roofing-slate/installation/headlap/
/roofing-slate/installation/nails/
/roofing-slate/installation/gutters/
A strong slate roof starts at the eaves. The starter course sets the line, support, and drainage path for the entire roof.
Step 6:Lay Roofing Slates
Why It Matters
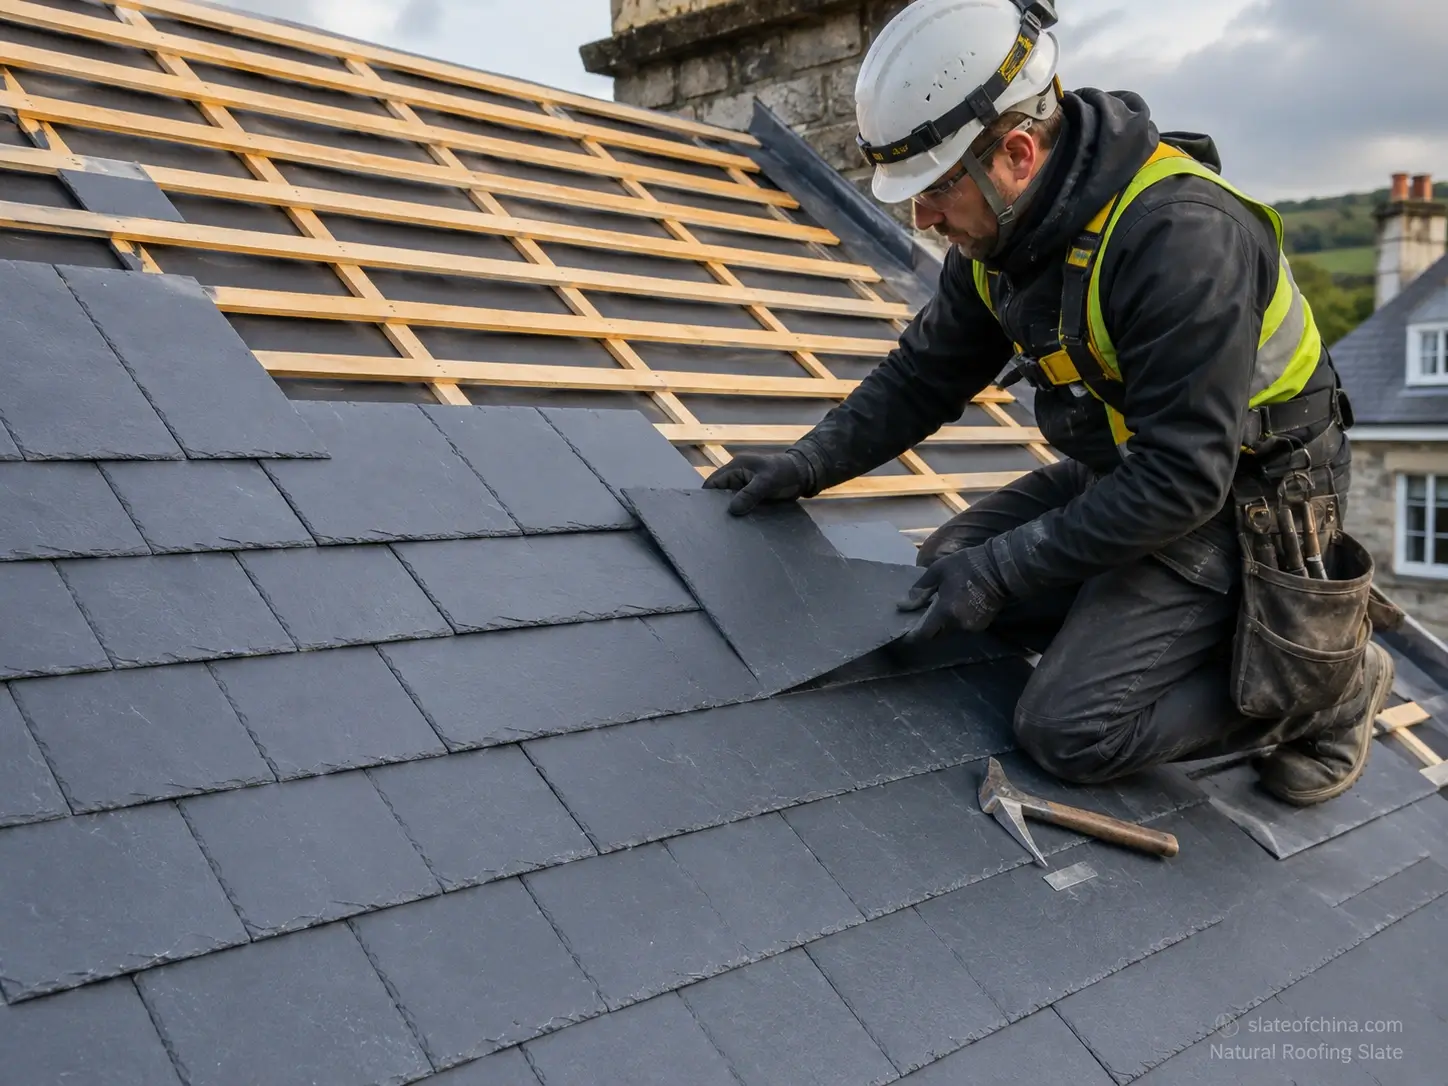
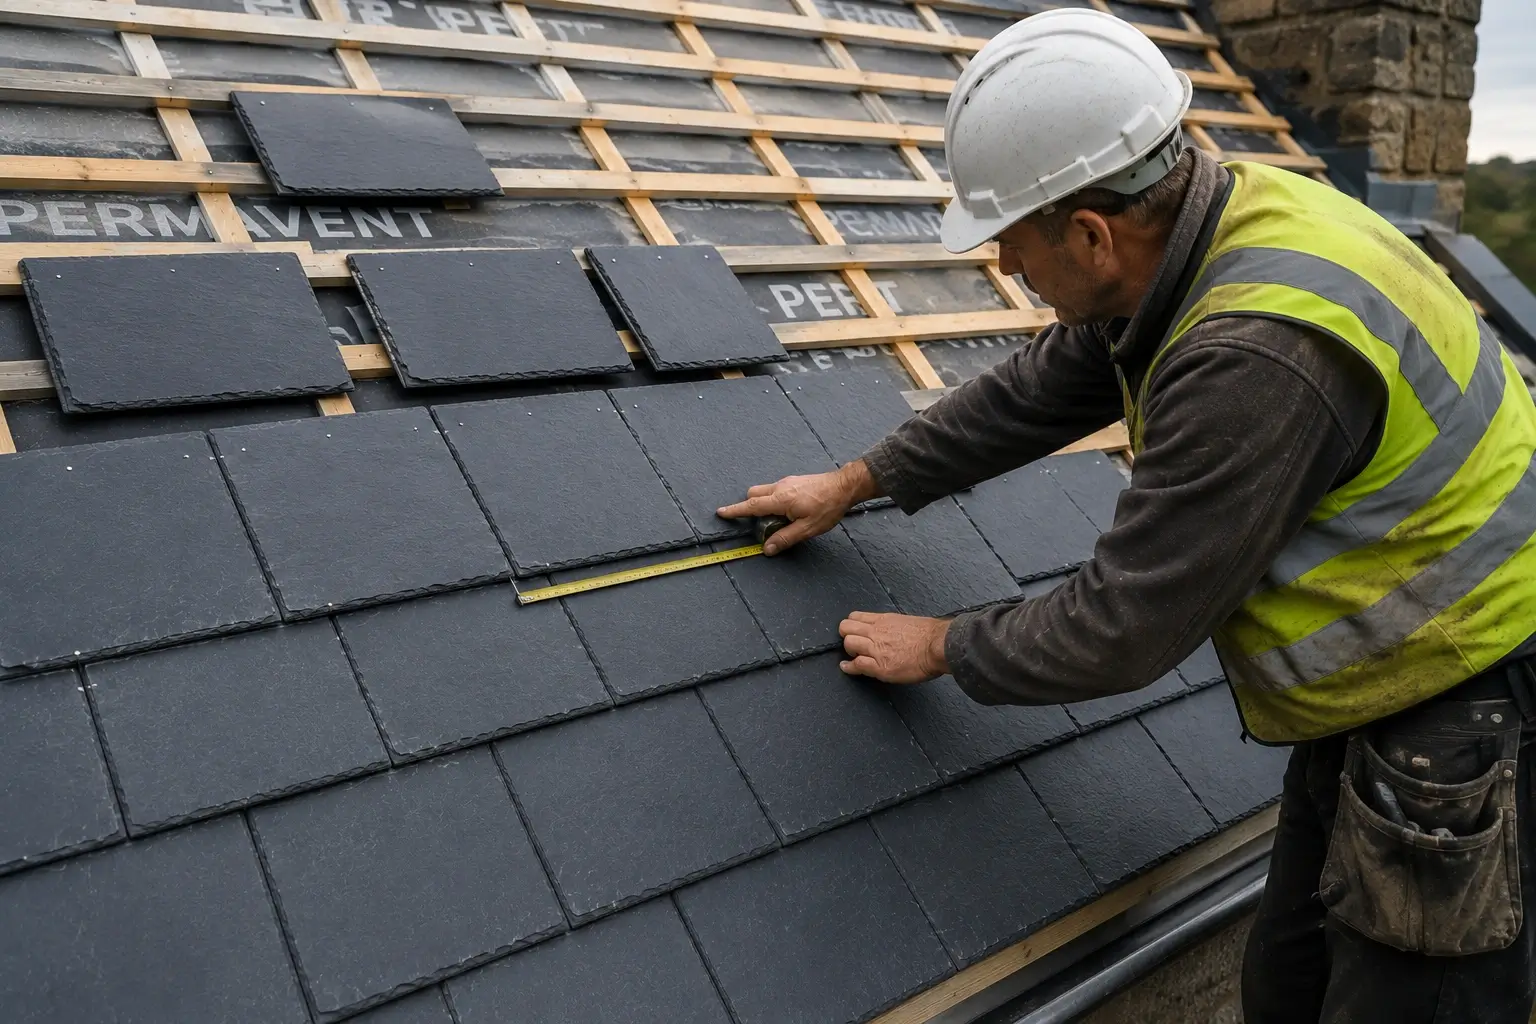
Laying the roofing slates is the most visible and technically important stage of the installation process. Each slate must be positioned, overlapped, fixed, and aligned correctly to create a roof that is both beautiful and weatherproof.
Natural roofing slate is highly durable, but its performance depends on correct installation details such as nail position, headlap, side lap, exposure, and course alignment. Poor workmanship at this stage may lead to broken slates, visible irregularities, loose tiles, water penetration, or reduced roof lifespan.
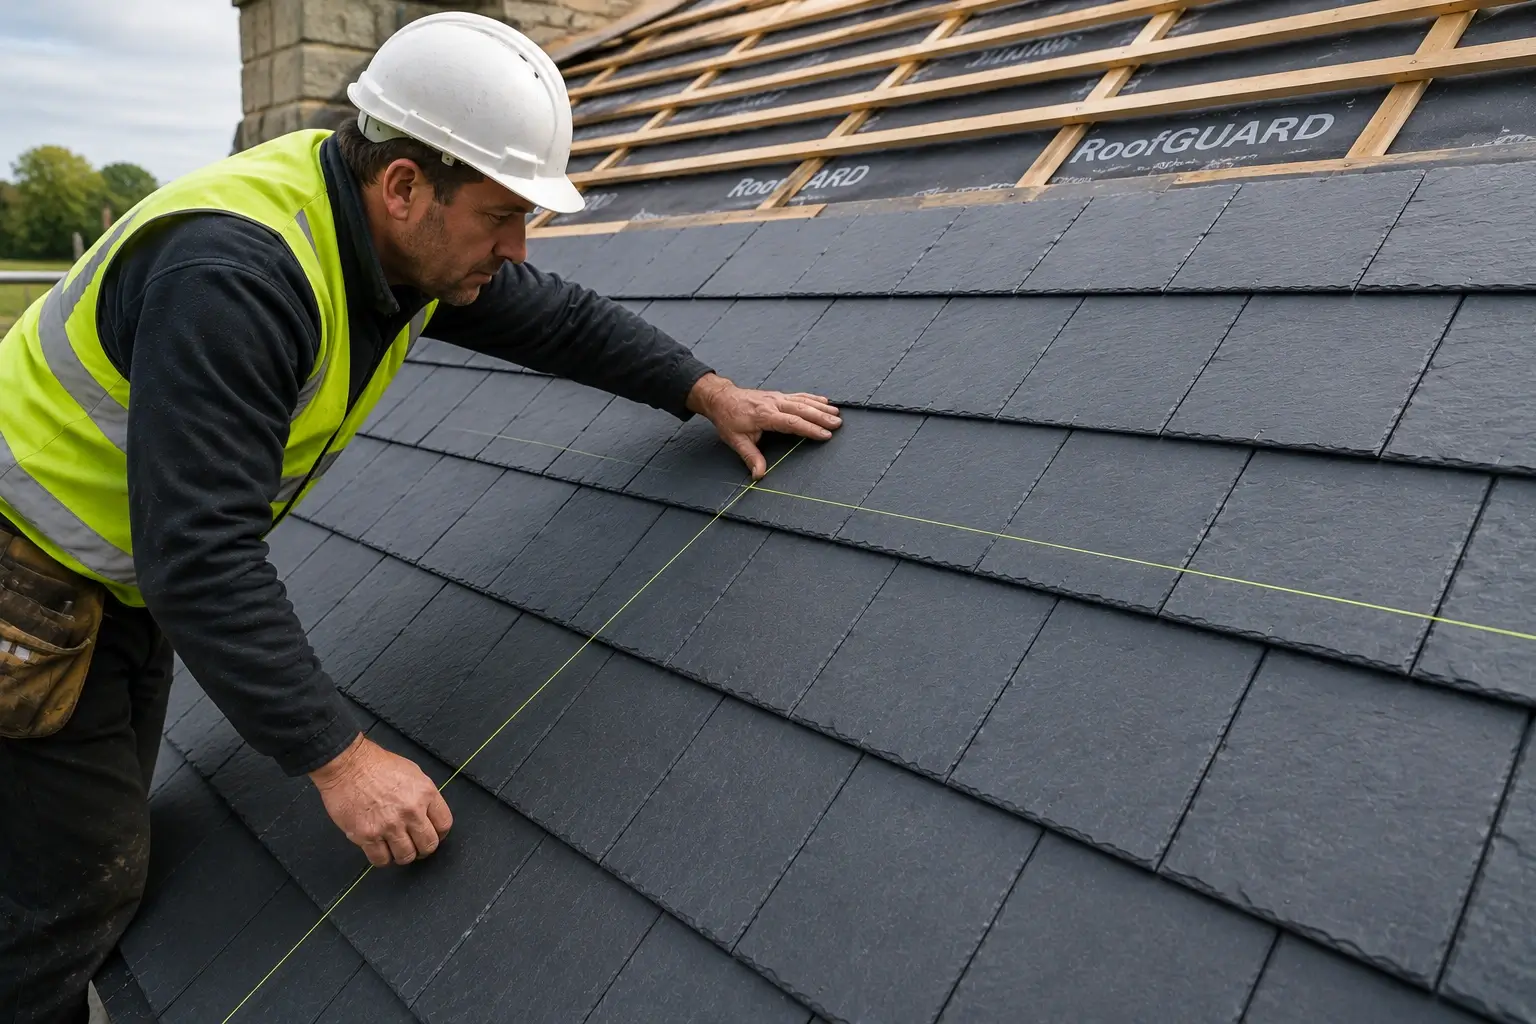
A professionally laid slate roof should have straight horizontal courses, staggered joints, secure fixings, and consistent overlap from the eaves to the ridge.
How to Lay Roofing Slates
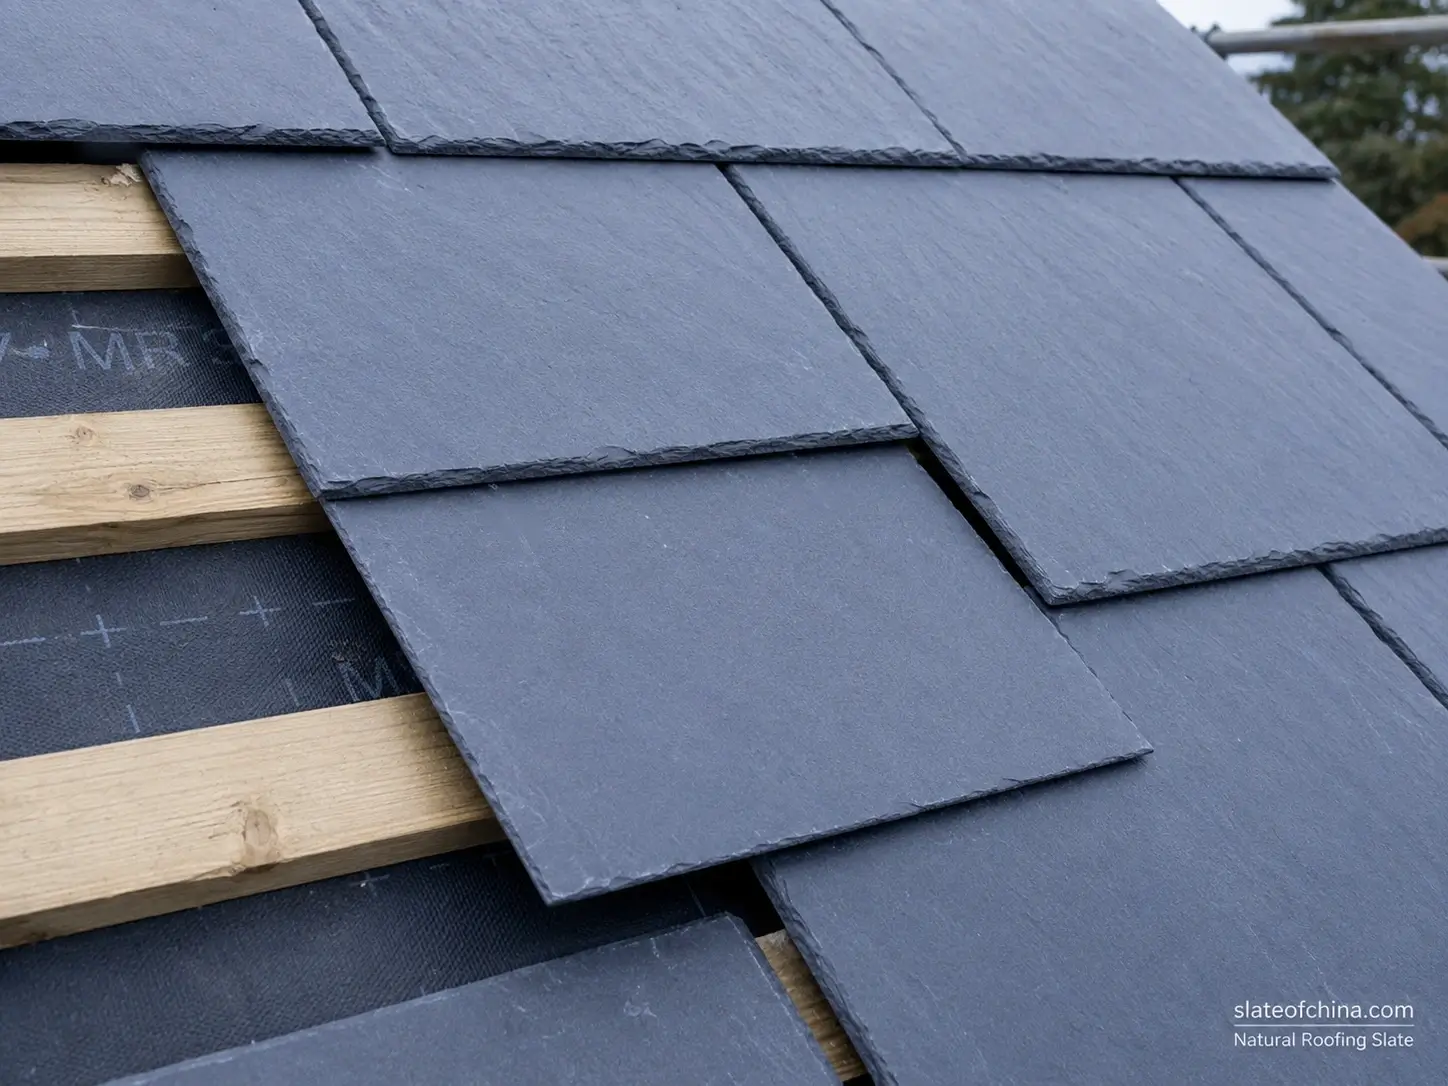
Start from the starter course at the eaves and work upward toward the ridge. Each slate should be placed on the battens according to the calculated exposure and gauge. The joints between slates should be staggered so that water cannot travel directly through the roof covering.
Slates are typically fixed using copper nails, stainless steel nails, or slate hooks, depending on the project specification and local installation practice. When using nails, they should be positioned correctly and covered by the slate course above, so they are protected from direct rain exposure.
During installation, constantly check that each course remains straight and that the side laps are consistent. Small alignment errors can become very noticeable across a large slate roof.
Nail Position
Correct Nail Position Is Critical
Nails should be placed in the designated nail holes or fixing area of each slate. The purpose of the nail is to hold the slate securely while allowing slight natural movement caused by temperature changes, wind, and roof movement.
The nails should not be driven too tightly. A slate should be secure, but not clamped rigidly. Overdriven nails can crack the slate, while loose nails may allow movement in high winds.
Key Principles
- Use corrosion-resistant copper or stainless steel nails.
- Position nails high enough so they are covered by the slate above.
- Do not nail too close to the slate edge.
- Do not overdrive the nail head.
- Make sure the slate hangs naturally without stress.
- Replace cracked or damaged slates immediately.
Important: After installation, slate nails should normally be hidden and protected by the overlapping slate above. Exposed nails may increase the risk of corrosion, leakage, and poor appearance.
Overlap and Headlap
Ensure Proper Vertical Overlap
Overlap is essential for keeping water out of the roof system. Each slate must overlap the course below it according to the required headlap. The correct headlap depends on the slate size, roof pitch, wind exposure, and local weather conditions.
Insufficient headlap is one of the most common causes of slate roof leaks. It can allow wind-driven rain or melting snow to reach nail holes and underlayment.
Good Practice
- Maintain the calculated exposure throughout the roof.
- Check headlap regularly as each course is installed.
- Increase headlap where required by roof pitch or local standards.
- Avoid creating direct water paths between slate joints.
- Pay special attention around valleys, hips, ridges, chimneys, and roof penetrations.
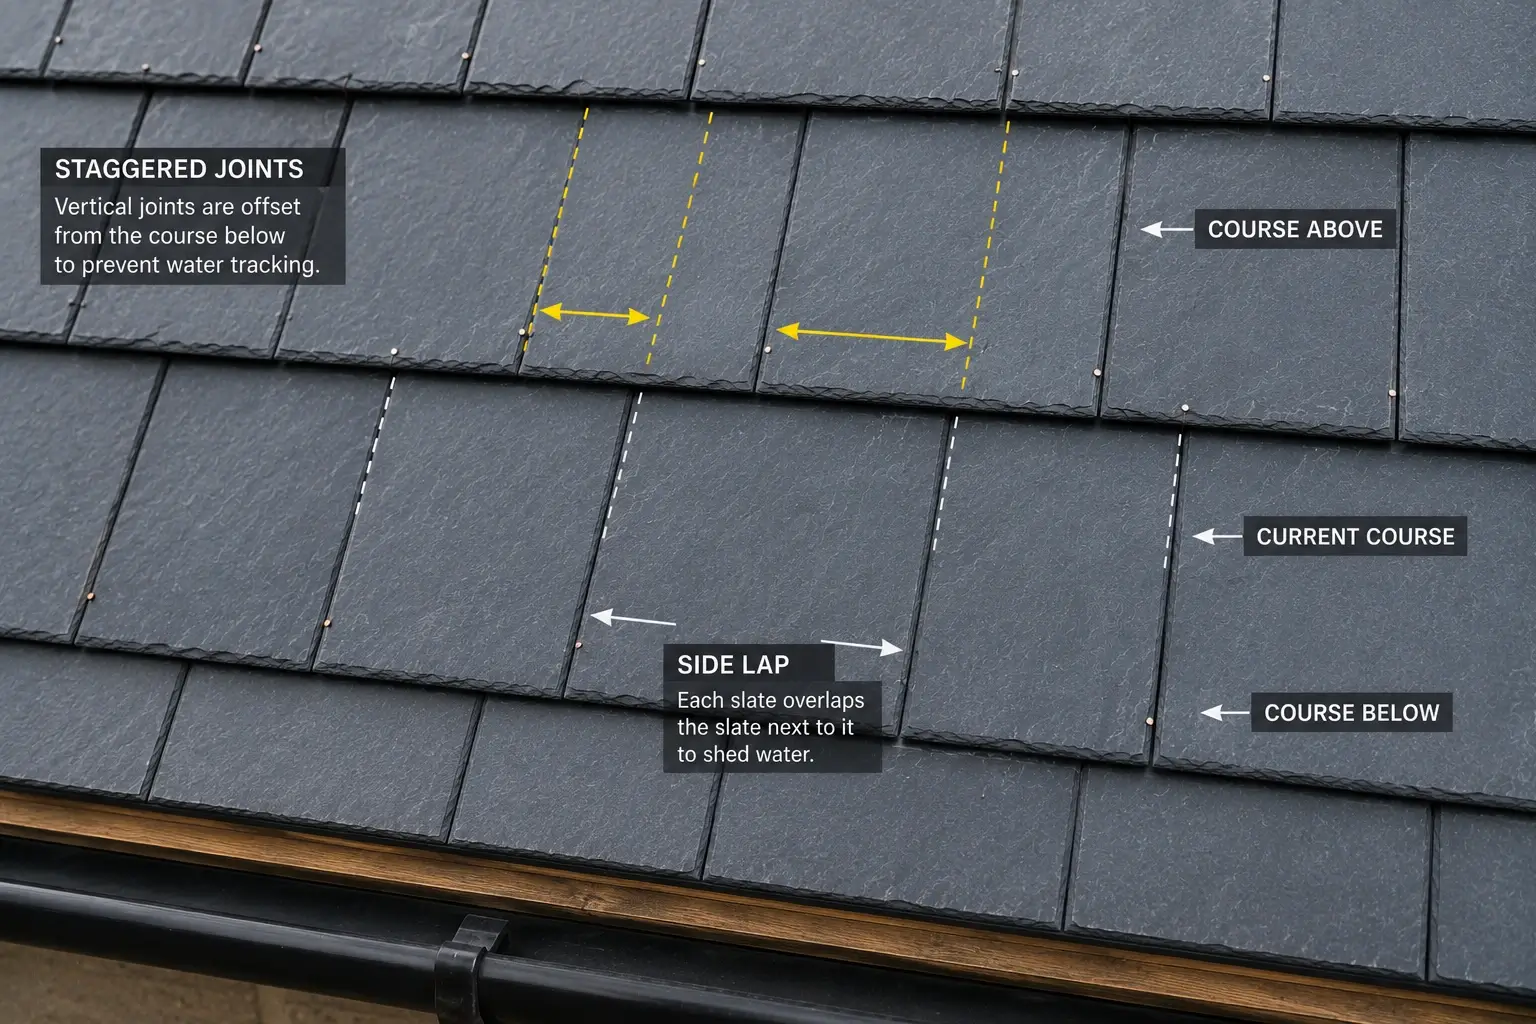
Side Lap
Keep Side Joints Properly Staggered
Side lap refers to the horizontal overlap between adjacent slates and the relationship between vertical joints in different courses. Correct side lap prevents water from passing directly through vertical joints.
In a good slate roof layout, the vertical joints in one course should not line up with the joints in the course below. Instead, joints should be staggered to create a broken bond pattern.
Why Side Lap Matters
- Reduces the risk of water penetration
- Improves wind resistance
- Creates a stronger roof covering
- Enhances the finished roof appearance
- Prevents visible joint lines running up the roof
Alignment
Keep Every Course Straight and Consistent
Slate roofs are admired for their clean lines and natural beauty. To achieve this appearance, every course must be carefully aligned.
Use chalk lines, measuring tape, and regular visual checks to ensure that each slate course remains straight. The bottom edges of the slates should form a clean horizontal line, and the vertical joints should be evenly staggered.
Alignment Tips
- Use a chalk line to guide each course.
- Check the first few rows carefully before continuing.
- Maintain consistent exposure.
- Adjust small variations gradually.
- Avoid forcing irregular slates into position.
- Sort slates by thickness where necessary for a smoother appearance.
Key Tasks
- Lay slates from the eaves upward.
- Follow the calculated exposure and batten spacing.
- Fix each slate using the correct nails or hooks.
- Keep nail positions covered by the slate above.
- Maintain proper headlap and overlap.
- Stagger side joints between courses.
- Check horizontal alignment regularly.
- Replace any cracked or defective slates.
- Inspect fixing quality before moving to the next section.
Checklist
✔ Slates laid from eaves to ridge
✔ Correct exposure maintained
✔ Headlap checked regularly
✔ Side joints properly staggered
✔ Nail positions covered by overlapping slates
✔ Nails not overdriven
✔ Courses aligned straight
✔ Damaged slates replaced immediately
✔ Roof ready for ridge, hip, and valley details
Common Mistakes to Avoid
❌ Exposed nails on finished slate courses
❌ Overdriven nails cracking the slate
❌ Insufficient headlap
❌ Vertical joints lining up between courses
❌ Inconsistent slate exposure
❌ Poor course alignment
❌ Using damaged or uneven slates
❌ Walking directly on installed slates
❌ Ignoring thickness sorting
❌ Rushing installation around valleys and penetrations
Pro Tip
Slate roofing is a precision craft. Do not rush this stage. Correct nail position, proper overlap, staggered side joints, and straight alignment all work together to create a roof that is durable, weather-resistant, and visually beautiful for generations.
What Makes a Good Slate Layout?
✔ Hidden and protected fixings
✔ Correct headlap
✔ Consistent exposure
✔ Staggered vertical joints
✔ Straight horizontal courses
✔ Even slate thickness distribution
✔ Clean edges around roof details
✔ No cracked or loose slates
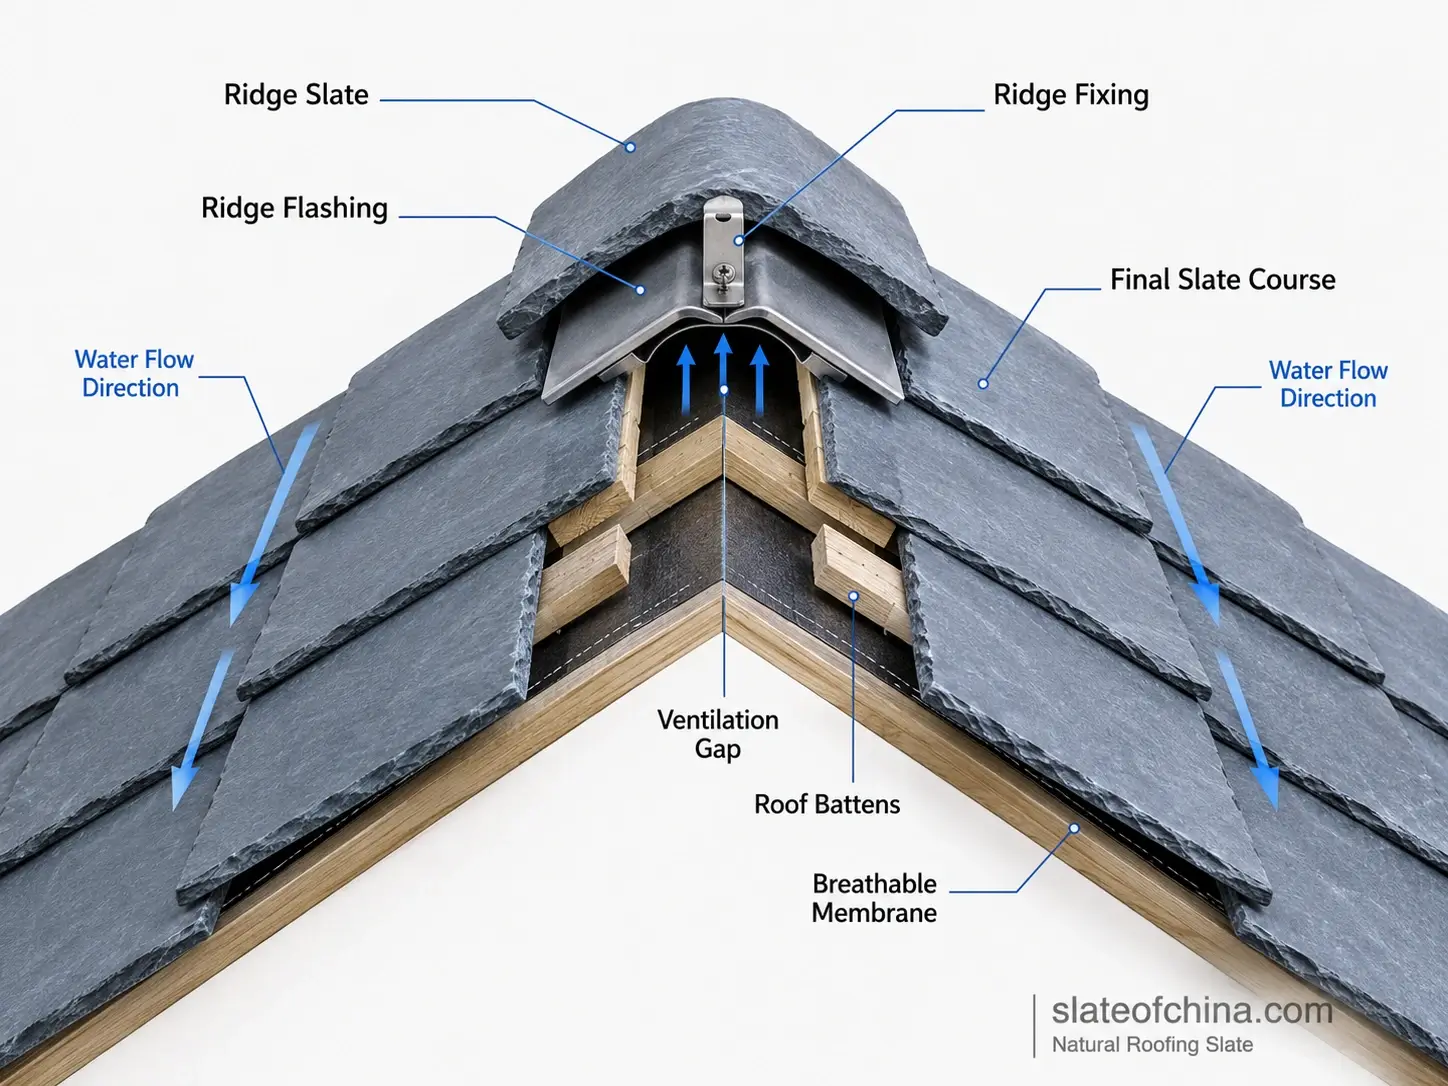
Step 7: Install the Roof Ridge
Why It Matters
The roof ridge is the highest point where two roof slopes meet. It is one of the most exposed areas of a slate roof and must be carefully finished to prevent water penetration, wind uplift, and long-term maintenance problems.
A properly installed ridge protects the top joint of the roof, secures the final slate courses, improves weather resistance, and gives the roof a clean, finished appearance. Poor ridge installation may lead to leaks, loose ridge pieces, damaged flashing, or premature roof repairs.
For natural roofing slate, the ridge detail usually includes ridge slates, ridge flashing, and secure ridge fixing. The exact method may vary depending on roof design, local building standards, ventilation requirements, and project specifications.
What Is a Roof Ridge?
The roof ridge is the horizontal line at the top of a pitched roof where two roof planes meet.
In slate roof installation, the ridge system normally performs three important functions:
- Covers the top joint between two roof slopes
- Protects the final slate courses from water entry
- Provides a neat and durable roof finish
- Helps resist wind-driven rain and uplift
- May support roof ventilation depending on the design
Because the ridge is highly exposed to wind and weather, it should be installed with careful attention to flashing, overlap, fixing method, and alignment.
Ridge Slate
Choosing and Positioning Ridge Slates
Ridge slates or ridge pieces are installed along the roof ridge to cover the joint between the two roof slopes. They may be made from natural slate, stone, clay, metal, or other compatible roofing materials depending on the design style.
For a natural slate roof, ridge pieces should match the roof in color, proportion, and durability. A well-matched ridge detail enhances the overall appearance of the roof while maintaining long-term weather protection.
Key Considerations
- Ridge pieces should align evenly along the ridge line.
- The ridge should fully cover the top joint between roof slopes.
- The final slate courses below the ridge must be properly fixed.
- Ridge pieces should overlap or join correctly according to the chosen system.
- The ridge detail should be compatible with the roof pitch and local weather exposure.
Ridge Flashing
Protecting the Ridge Against Water Penetration
Ridge flashing provides an additional waterproof barrier beneath or around the ridge detail. It helps protect the roof from wind-driven rain, snow, and moisture entering at the roof peak.
Depending on the roof design, ridge flashing may include metal flashing, waterproof membrane, ridge roll, or breathable ridge systems. In ventilated slate roof systems, the ridge detail may also allow controlled airflow while still preventing water entry.
Why Ridge Flashing Is Important
| Function | Benefit |
|---|---|
| Waterproof protection | Helps prevent leaks at the roof peak |
| Wind resistance | Reduces the risk of wind-driven rain entering the ridge |
| Moisture management | Supports ventilation when designed correctly |
| Long-term durability | Protects timber battens, underlayment, and roof structure |
| Clean finishing | Helps form a neat, professional ridge line |
Ridge Fixing
Secure the Ridge Correctly
Ridge pieces must be securely fixed to resist wind uplift and movement. The fixing method depends on the ridge material, roof structure, and local installation practice.
Common ridge fixing methods include:
- Mechanical fixing with screws or clips
- Mortar bedding in traditional systems
- Dry ridge systems
- Metal ridge caps
- Natural slate ridge detailing
For modern roofing projects, mechanical or dry ridge systems are often preferred because they provide consistent fixing strength, reduce maintenance, and may improve ventilation.
The ridge should be fixed firmly, but not in a way that damages the slate or restricts necessary roof movement.
How to Install the Ridge
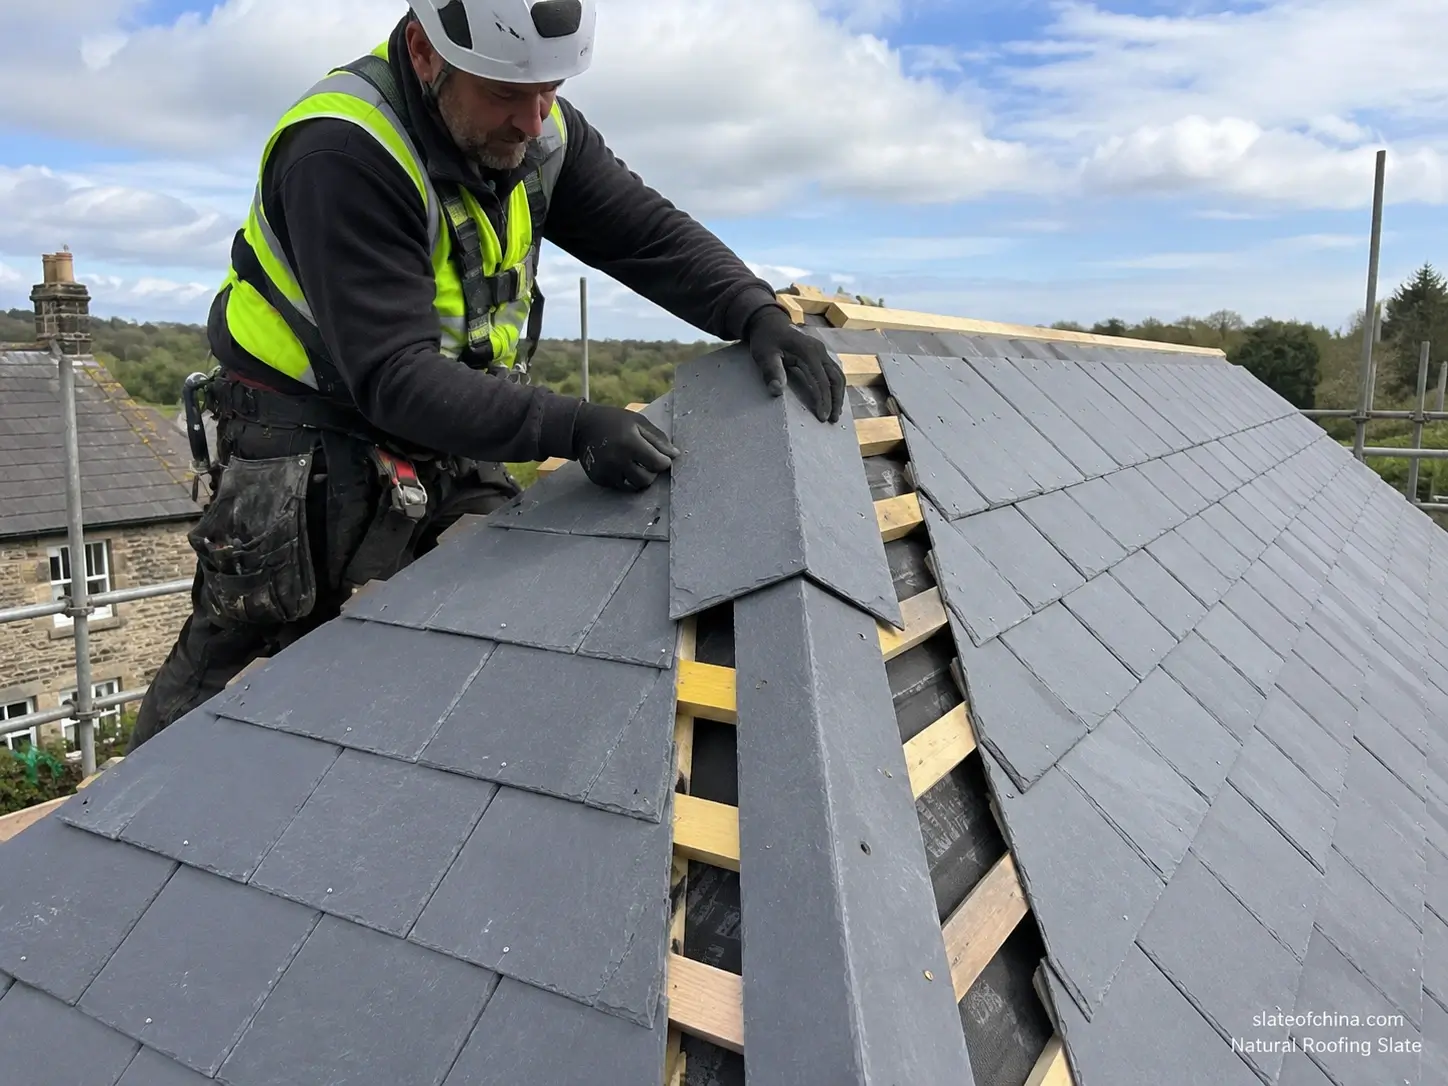
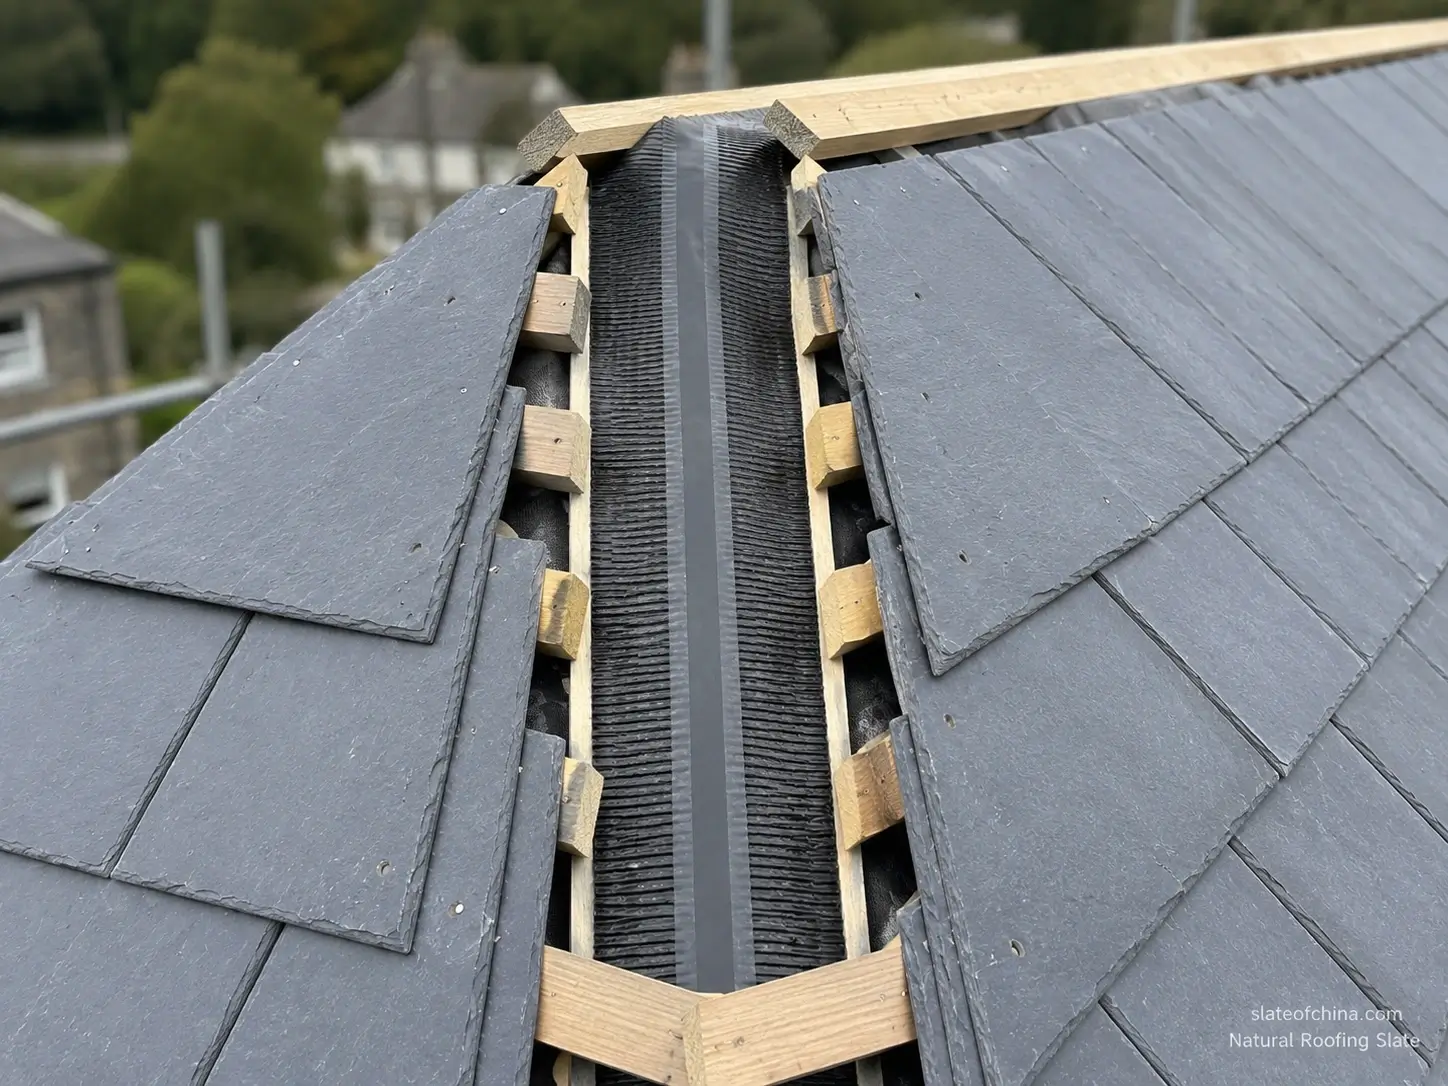
Begin by checking that the final courses of roofing slate on both roof slopes are correctly aligned and securely fixed. Install any required ridge membrane, flashing, or ventilation components before placing the ridge pieces.
Lay the ridge slates or ridge caps along the ridge line, ensuring consistent overlap, straight alignment, and secure fixing. Each ridge piece should sit evenly and provide full coverage over the top joint.
After installation, inspect the full ridge line from end to end to confirm that the ridge is straight, weatherproof, and firmly secured.
Key Tasks
- Check that the final slate courses are properly aligned.
- Install ridge flashing, ridge roll, or waterproof membrane as required.
- Ensure ventilation openings remain clear where applicable.
- Position ridge slates or ridge caps along the roof peak.
- Maintain consistent overlap and straight alignment.
- Fix ridge pieces securely using the specified method.
- Seal or finish ridge ends properly.
- Inspect the entire ridge line for gaps, movement, or loose pieces.
Checklist
✔ Final slate courses securely fixed
✔ Ridge flashing installed correctly
✔ Ridge ventilation maintained where required
✔ Ridge slates or caps aligned straight
✔ Correct overlap between ridge pieces
✔ Ridge fixings secure
✔ No visible gaps or loose ridge sections
✔ Ridge ends properly finished
✔ Roof ready for hip and valley details
Common Mistakes to Avoid
❌ Leaving gaps beneath ridge pieces
❌ Poorly aligned ridge slates or caps
❌ Insufficient ridge flashing
❌ Blocking required roof ventilation
❌ Using incompatible fixing materials
❌ Over-tightening fixings and damaging components
❌ Ignoring wind exposure at the ridge
❌ Poor finishing at ridge ends
Pro Tip
The ridge is one of the most exposed parts of a slate roof. Always treat it as both a waterproofing detail and a finishing detail. A good ridge installation should look straight and clean while also protecting the roof from wind-driven rain, snow, and long-term moisture damage.
What Makes a Good Slate Roof Ridge?
✔ Straight ridge line
✔ Secure ridge fixing
✔ Proper ridge flashing
✔ Weather-resistant overlap
✔ Compatible ridge materials
✔ Clear ventilation path where required
✔ Neat ridge end finishing
✔ Long-term resistance to wind and rain
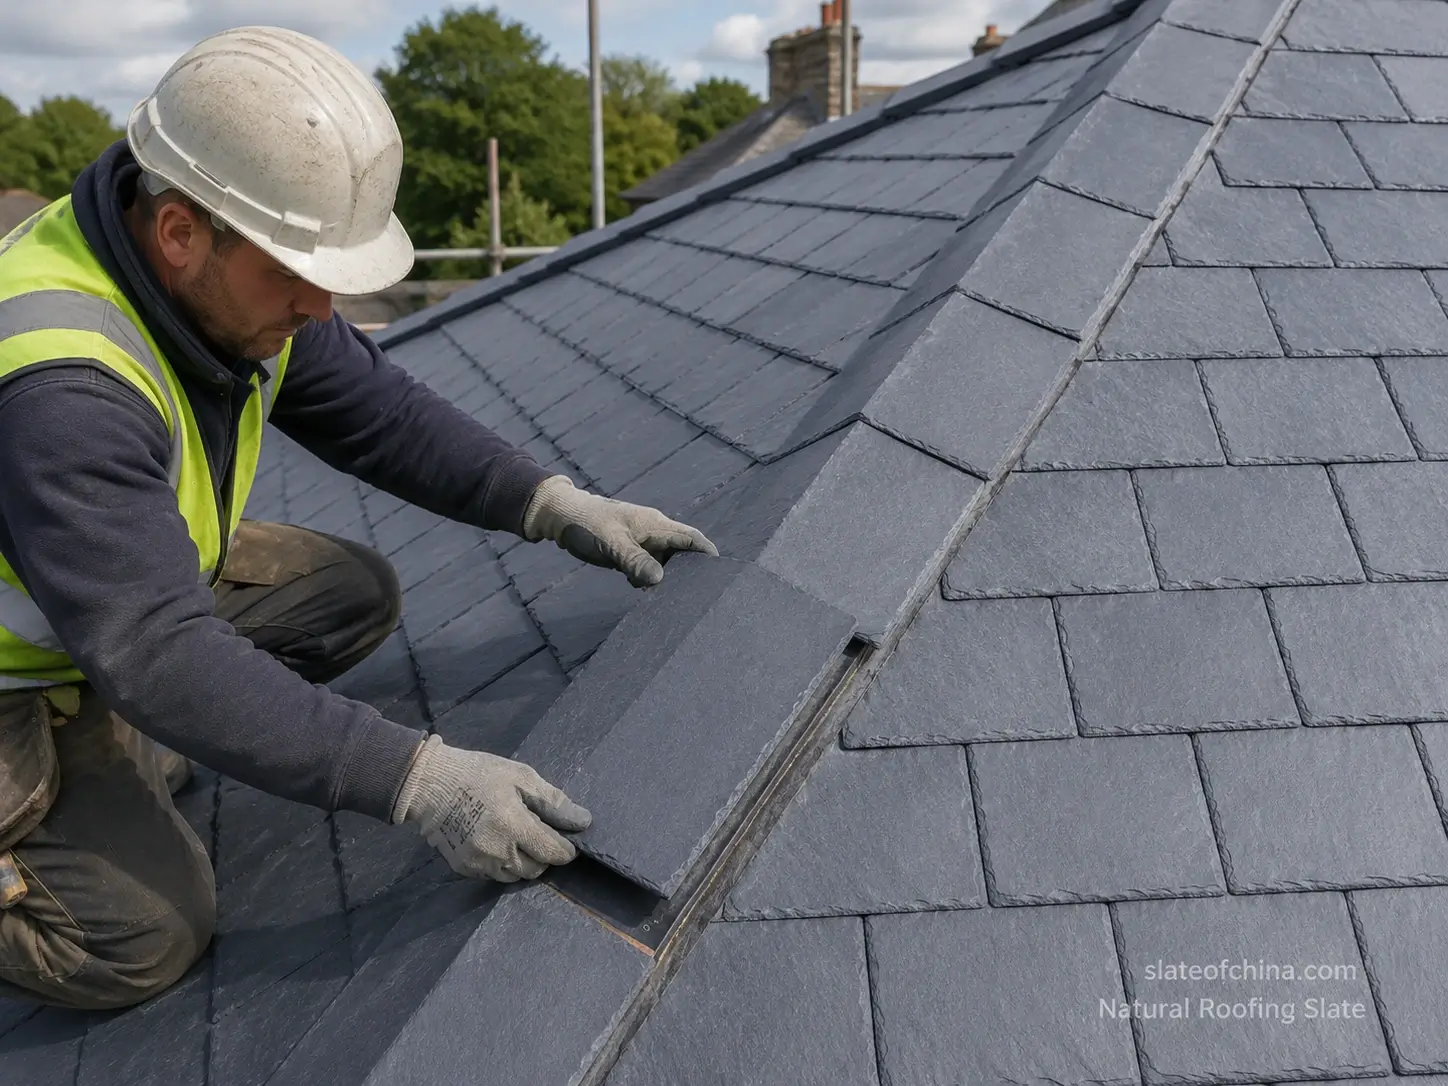
Step 8:Install the Roof Hip
Why It Matters
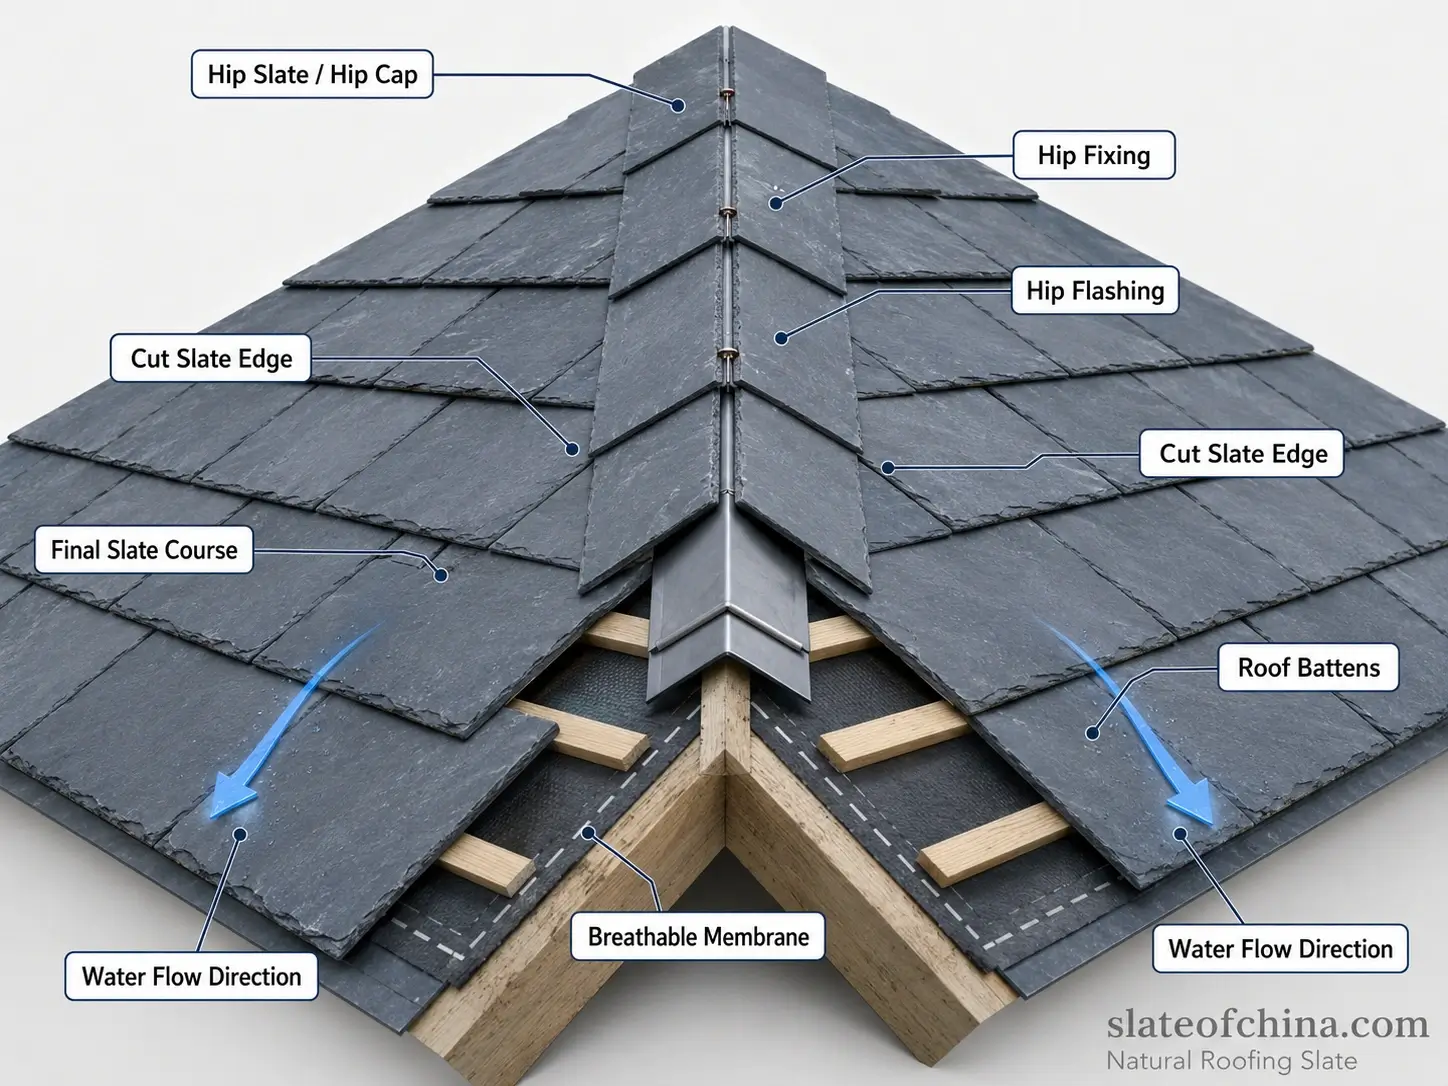
A roof hip is the external angled line where two sloping roof planes meet. On a natural slate roof, the hip is one of the most visible roof details and one of the most exposed areas to wind-driven rain, snow, and uplift forces.
A properly installed hip protects the junction between two roof slopes, secures the cut slate edges, and creates a clean, continuous roof line from the eaves to the ridge. Poor hip installation can lead to water penetration, loose hip pieces, uneven slate cuts, wind damage, and an unfinished roof appearance.
Because hip details involve angled slate cuts, flashing, fixing, and alignment, they require careful workmanship and accurate setting-out before installation begins.
What Is a Roof Hip?
A roof hip is the external intersection between two roof slopes. Unlike a valley, which collects and channels water inward, a hip sheds water outward on both sides.
In slate roof installation, the hip detail usually includes:
- Cut roofing slates along both sides of the hip line
- Hip slates, hip caps, or hip ridge pieces
- Hip flashing or waterproof membrane beneath the hip
- Secure mechanical fixing
- Straight alignment from eaves to ridge
- Proper overlap between hip units
A good hip detail should be both weather-resistant and visually consistent with the rest of the slate roof.
Hip Installation
How to Install the Hip Correctly
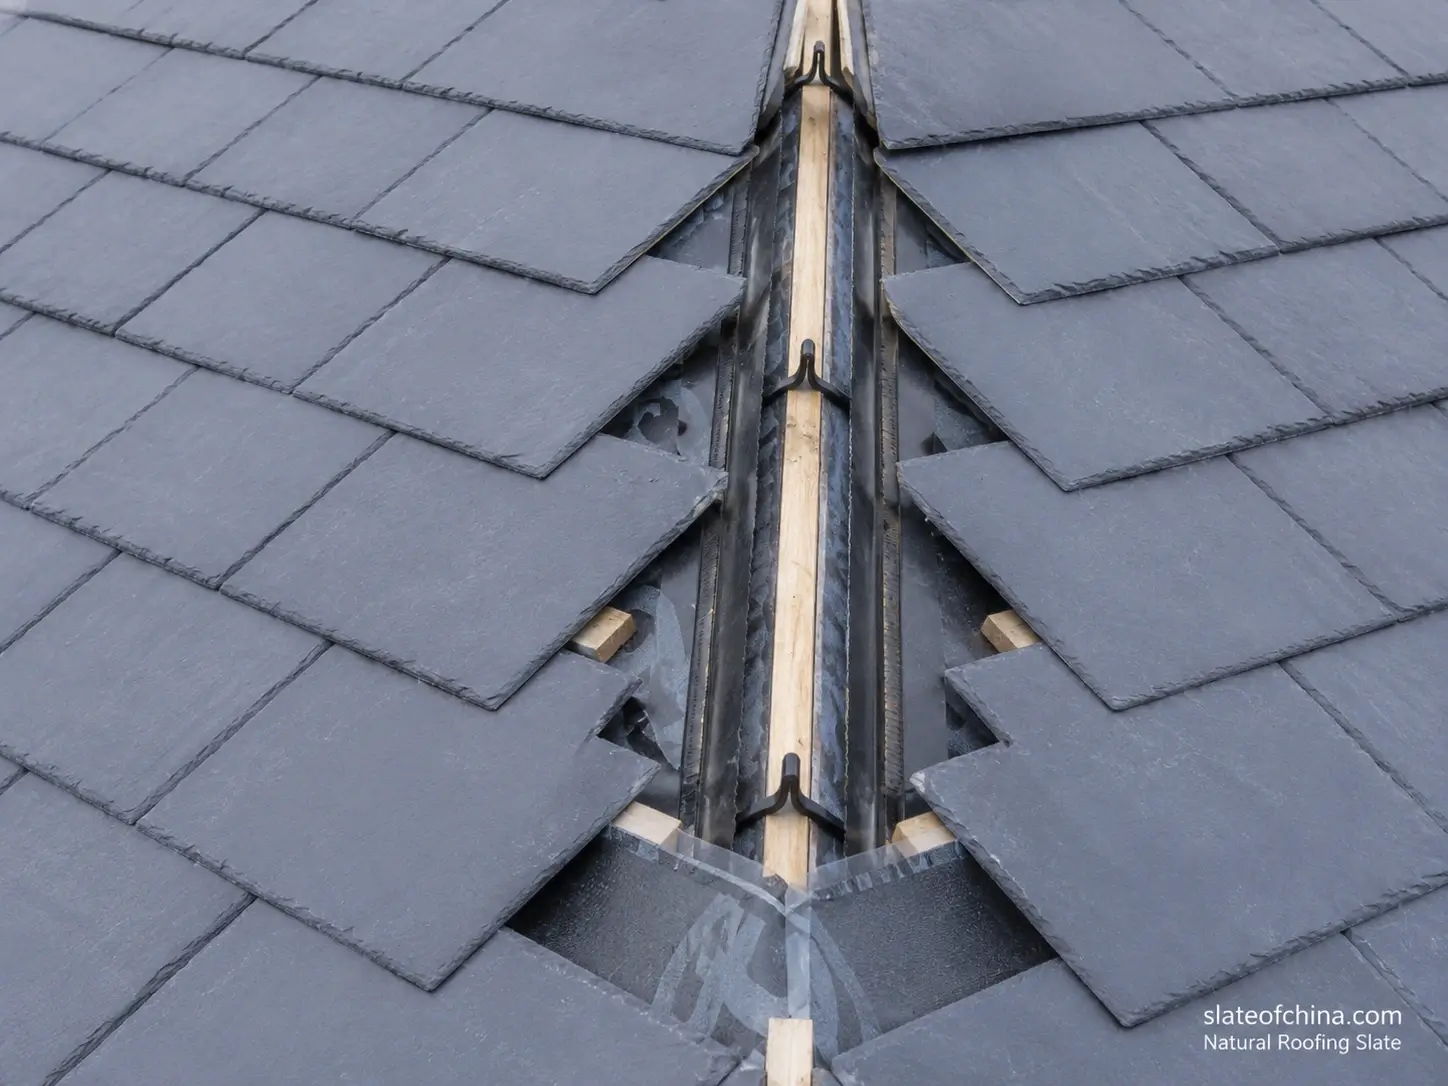
Before installing the hip finish, the roof slates on both sides of the hip should be cut accurately to follow the hip line. Each cut slate must be supported, properly overlapped, and securely fixed.
The hip line should be marked clearly with a chalk line or guide string before cutting and fixing. This helps ensure that the hip remains straight and visually clean from bottom to top.
Depending on the roof design and local practice, the hip may be finished using:
- Natural slate hip pieces
- Slate ridge-style hip caps
- Metal hip flashing
- Dry hip system
- Mortar-bedded hip units
- Decorative stone or clay hip caps
For natural slate roofs, the selected hip material should be compatible with the slate in color, durability, fixing method, and weather resistance.
Hip Flashing and Waterproofing
Protect the Hip Junction
Although the hip sheds water away from the roof junction, it is still vulnerable to wind-driven rain and moisture movement. A suitable waterproof membrane, hip flashing, or dry hip system should be used where required to provide additional protection beneath the visible hip finish.
The flashing or membrane should be installed continuously along the hip line and integrated with the underlayment and slate courses on both roof slopes.
Why Hip Waterproofing Matters
| Function | Benefit |
|---|---|
| Prevents water penetration | Protects the joint between two roof planes |
| Improves wind resistance | Reduces risk from wind-driven rain |
| Protects cut slate edges | Helps avoid moisture entry at exposed edges |
| Supports long-term durability | Reduces maintenance and repair risks |
| Improves roof finish | Creates a clean and reliable hip detail |
Hip Fixing
Secure Hip Pieces Against Wind Uplift
Hip pieces must be securely fixed because the hip is highly exposed to wind. The fixing method should follow project specifications, local roofing standards, and the recommendations of the hip system manufacturer.
Common fixing methods include:
- Stainless steel screws or clips
- Copper or stainless steel fixings
- Mechanical dry hip systems
- Mortar bedding in traditional roofs
- Hidden fixing systems for slate hip pieces
The fixing should hold the hip units firmly while avoiding damage to the slate or restricting normal roof movement.
Key Tasks
- Mark a straight hip line from eaves to ridge.
- Cut slates accurately along both sides of the hip.
- Ensure cut slates are properly supported and fixed.
- Install hip flashing, membrane, or dry hip components where required.
- Position hip slates or hip caps evenly along the hip line.
- Maintain consistent overlap between hip pieces.
- Secure hip units using the specified fixing method.
- Check the hip line for straightness, gaps, and weather protection.
- Finish the hip neatly where it meets the ridge and eaves.
Checklist
✔ Hip line marked accurately
✔ Cut slates aligned cleanly along both slopes
✔ Cut edges supported and securely fixed
✔ Hip flashing or waterproof membrane installed where required
✔ Hip slates or caps positioned evenly
✔ Consistent overlap maintained
✔ Hip fixings secure
✔ No visible gaps along the hip line
✔ Hip junctions finished neatly at ridge and eaves
Common Mistakes to Avoid
❌ Uneven or poorly cut slates along the hip
❌ Wavy or misaligned hip line
❌ Insufficient waterproofing beneath hip pieces
❌ Loose hip caps or weak fixings
❌ Inconsistent overlap between hip units
❌ Leaving unsupported cut slate edges
❌ Using incompatible fixing materials
❌ Poor finishing where the hip meets the ridge
Pro Tip
The hip is both a structural weather detail and a visual feature. Always set out the hip line carefully before cutting slates. A straight, secure, and well-flashed hip improves roof durability while giving the natural slate roof a clean and professional appearance.
What Makes a Good Slate Roof Hip?
✔ Straight hip line
✔ Accurately cut slate edges
✔ Secure hip fixing
✔ Proper hip flashing or membrane
✔ Consistent overlap
✔ Compatible hip materials
✔ Neat connection to ridge and eaves
✔ Strong resistance to wind-driven rain
Step 9:Install the Roof Valley
Why It Matters
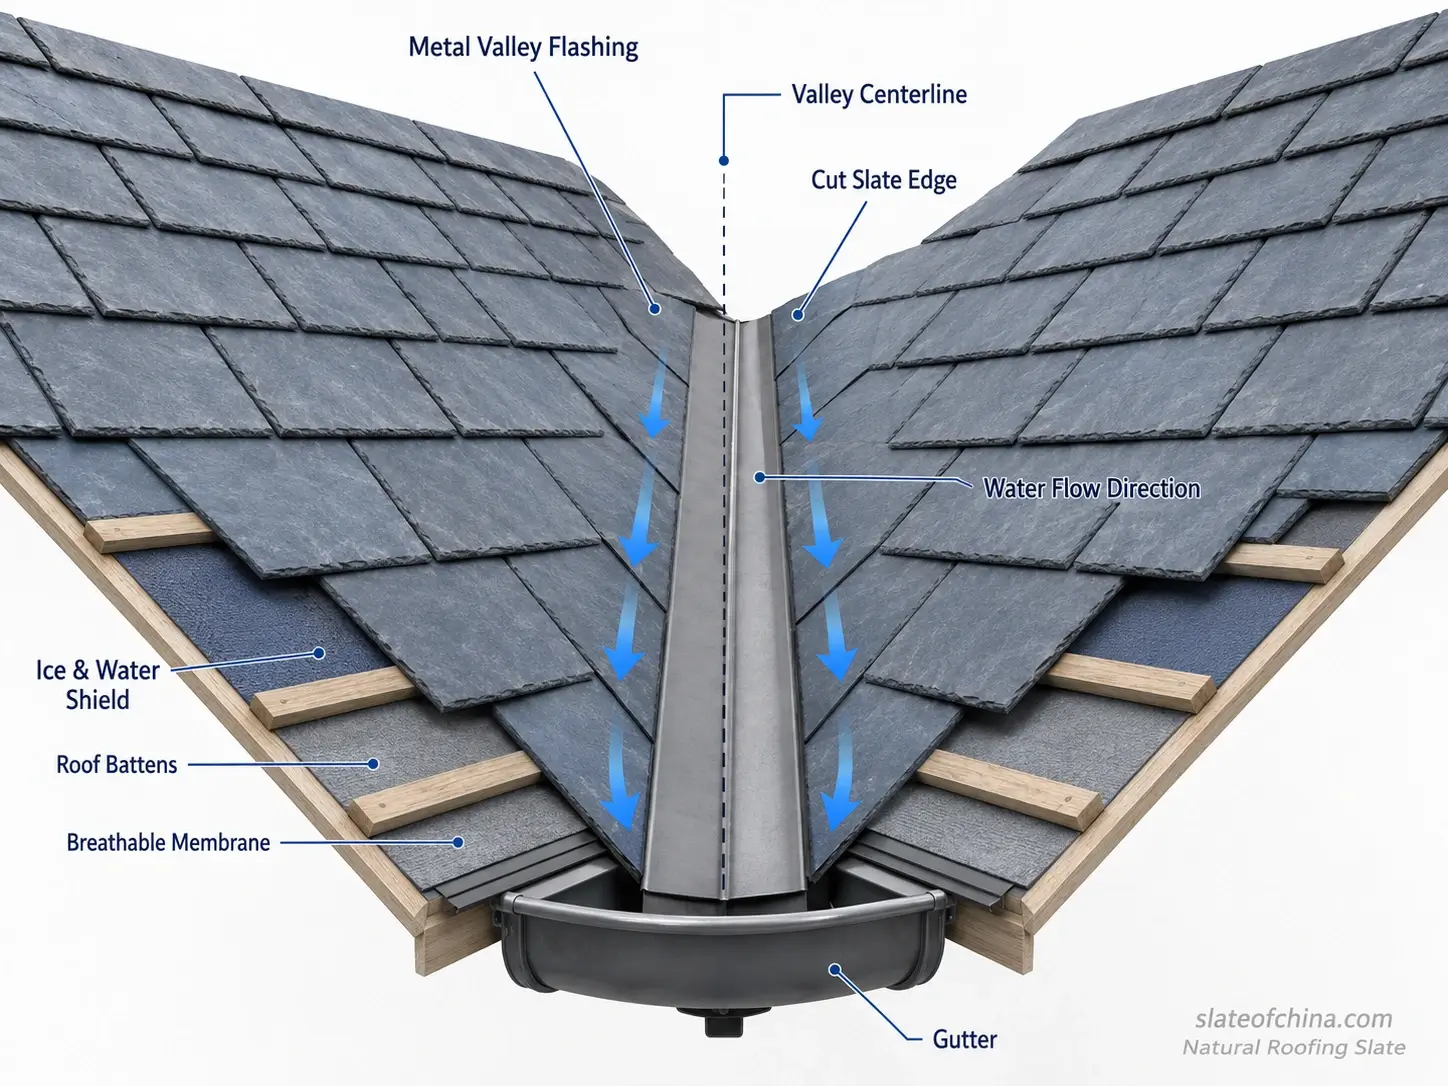
A roof valley is the internal angle where two roof slopes meet and channel rainwater, snowmelt, and debris down toward the gutter. Because valleys carry more water than most other parts of the roof, they are one of the most critical waterproofing details in natural roofing slate installation.
A properly installed slate roof valley helps direct water safely off the roof, protects the underlayment and roof deck, and reduces the risk of leaks in heavy rain or snow. Poor valley installation may cause water backing, slate breakage, debris buildup, corrosion, or long-term moisture damage.
For natural slate roofs, the most common valley options include open valleys, closed valleys, and metal valleys. The best choice depends on roof design, climate, roof pitch, appearance requirements, and local roofing standards.
What Is a Roof Valley?
A roof valley is the inward-facing joint where two sloping roof planes intersect. Unlike a roof hip, which sheds water away on both sides, a valley collects water from two roof slopes and directs it downward.
In slate roof installation, valley design must consider:
- Water flow volume
- Roof pitch
- Slate size and layout
- Valley flashing material
- Underlayment protection
- Snow and ice exposure
- Debris accumulation
- Long-term maintenance access
Because valleys handle concentrated water flow, they should always be treated as high-risk waterproofing areas.
Open Valley
A Durable and Easy-to-Maintain Valley Detail
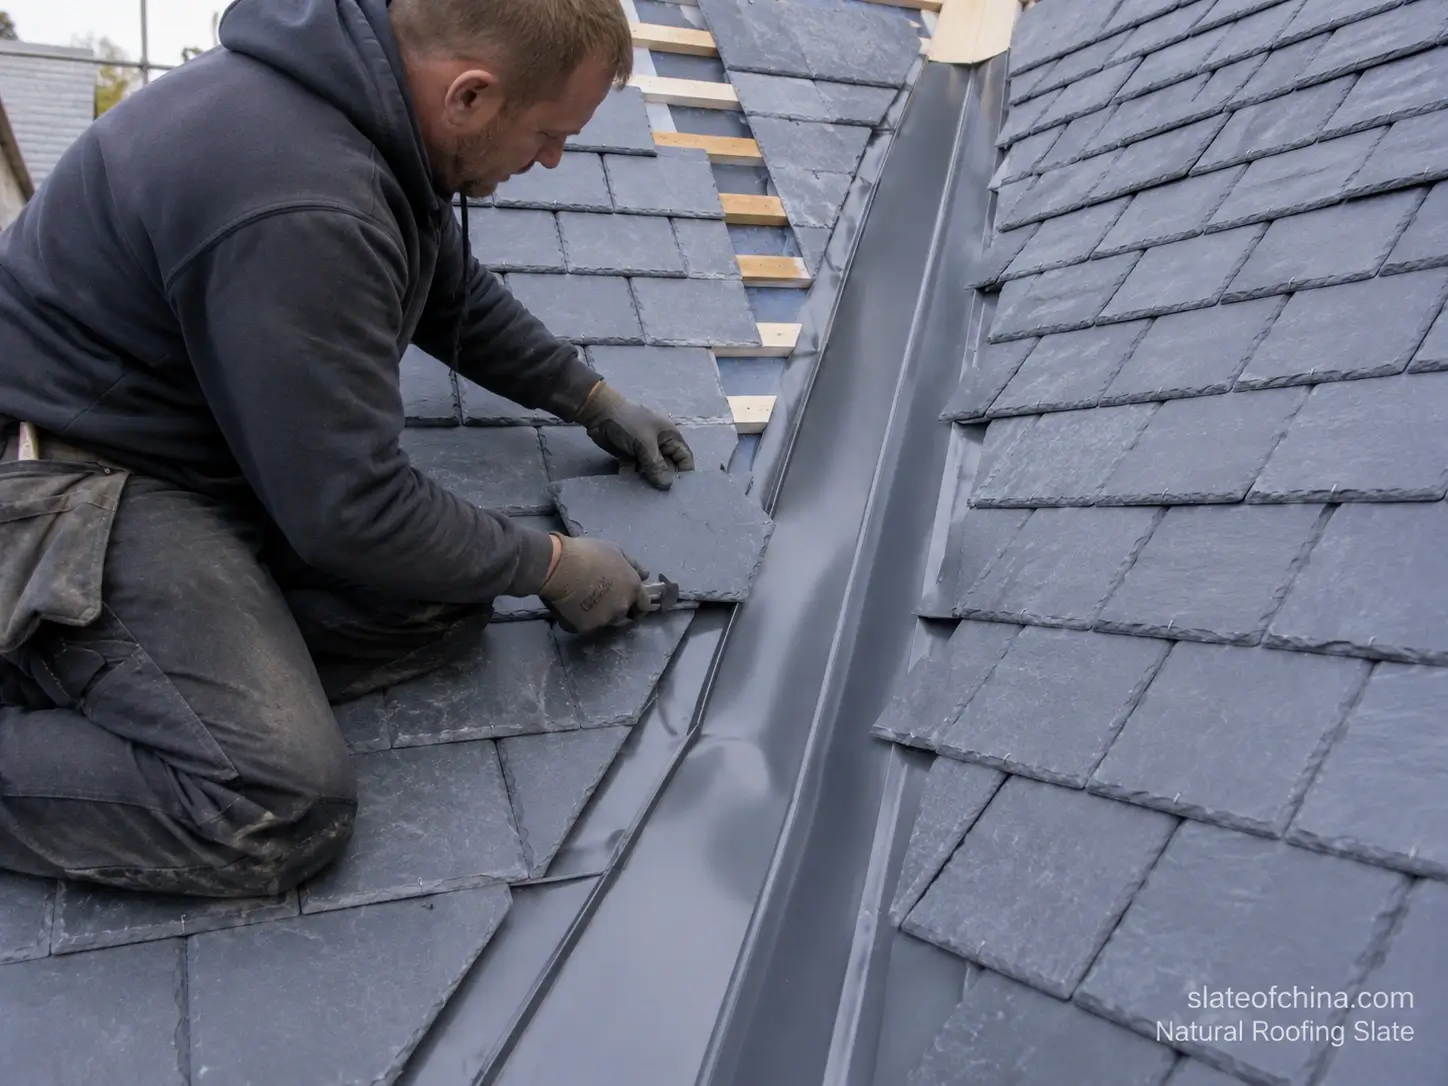
An open valley leaves a visible channel between the slate courses on both sides of the valley. This channel is usually lined with metal flashing or another approved waterproof valley material.
Open valleys are commonly used because they provide excellent water drainage and make it easier to inspect and maintain the valley area.
Advantages of Open Valleys
| Advantage | Why It Matters |
|---|---|
| Excellent water flow | Allows rainwater and snowmelt to drain quickly |
| Easy inspection | Valley flashing remains visible |
| Easier maintenance | Debris can be removed more easily |
| Strong waterproofing | Metal flashing provides a clear drainage path |
| Suitable for heavy rain areas | Performs well where water volume is high |
Best Used For
- Roofs with heavy rain exposure
- Long valley runs
- Steeper slate roofs
- Projects requiring easier maintenance
- Areas with snow, leaves, or debris accumulation
Open valleys are often the preferred choice for performance-focused slate roof installation.
Closed Valley
A Cleaner, More Concealed Appearance
A closed valley is formed when the slates are cut tightly along the valley line so that the valley flashing is mostly hidden beneath the slate.
This creates a cleaner and more continuous visual appearance, but it requires very accurate cutting, careful waterproofing, and proper water flow design.
Advantages of Closed Valleys
| Advantage | Why It Matters |
|---|---|
| Cleaner appearance | Valley flashing is less visible |
| Traditional look | Often preferred on heritage or high-end buildings |
| Seamless roof design | Creates a more continuous slate surface |
| Good protection when detailed correctly | Works well with proper flashing and underlayment |
Important Considerations
Closed valleys are more demanding to install than open valleys. If the slate cuts are uneven, the valley channel is too narrow, or the flashing is not properly protected, water may be trapped or forced beneath the slates.
Closed valleys should only be installed by experienced slate roofers and should always follow local roofing standards.
Metal Valley
Reliable Waterproof Protection for Slate Roofs
A metal valley uses metal flashing to form the main water-carrying channel. The flashing may be exposed in an open valley or hidden beneath slate in a closed valley.
Common metal valley materials include:
- Copper
- Zinc
- Stainless steel
- Galvanized steel
- Aluminum
- Lead, where permitted by local regulations
The selected metal should be corrosion-resistant, compatible with the slate and fasteners, and suitable for the local climate.
Why Metal Valleys Are Common
Metal valleys are widely used because they provide a durable and predictable water path. They are especially valuable in areas with heavy rainfall, snow, or complex roof shapes.
Key Points for Metal Valley Installation
- Use corrosion-resistant valley flashing.
- Install a suitable waterproof membrane beneath the valley.
- Maintain proper overlap between metal sections.
- Avoid puncturing the water channel with fasteners.
- Provide enough valley width for expected water flow.
- Ensure slate cuts do not restrict drainage.
- Keep metal compatible with nails, hooks, and surrounding materials.
How to Install a Slate Roof Valley
Before installing the valley, confirm that the roof deck is sound and that the underlayment is properly installed. Valleys should receive additional waterproofing, such as Ice & Water Shield or a self-adhering waterproof membrane, because they are high-risk areas.
Next, install the valley flashing or valley lining from the eaves upward, maintaining proper laps between sections. Slate courses should then be cut and fitted along the valley line, leaving the correct opening for water flow if using an open valley.
Throughout the process, check that the valley remains straight, smooth, and free from sharp edges, gaps, or obstructions.
Key Tasks
- Identify all valley lines before slate installation begins.
- Install additional waterproof membrane beneath the valley area.
- Fit valley flashing from the eaves upward.
- Maintain proper overlap between flashing sections.
- Cut slates accurately along the valley line.
- Leave sufficient drainage width for open valleys.
- Avoid placing nails or hooks in the water channel.
- Ensure water flows freely into the gutter.
- Inspect the valley for gaps, sharp edges, debris traps, or loose slates.
Checklist
✔ Valley underlayment installed correctly
✔ Ice & Water Shield or waterproof membrane added where required
✔ Valley flashing securely positioned
✔ Flashing overlaps facing the correct water flow direction
✔ Slate cuts are clean and accurate
✔ Open valley channel is wide enough
✔ No fixings placed in the water path
✔ Water flows freely to the gutter
✔ Valley edges aligned neatly
✔ Roof ready for final detailing and inspection
Common Mistakes to Avoid
❌ Using valley flashing that is too narrow
❌ Cutting slates too close to the valley centerline
❌ Blocking the valley water channel
❌ Installing metal laps against the water flow
❌ Nailing through the main valley water path
❌ Using incompatible metals and fixings
❌ Ignoring additional waterproofing beneath the valley
❌ Leaving rough or uneven slate cuts
❌ Allowing debris traps along the valley
❌ Poor transition into the gutter
Pro Tip
A valley should be designed as a water channel first and a visual detail second. Always allow enough space for water flow, use durable flashing, and provide additional waterproofing beneath the valley. This is especially important for natural slate roofs in areas with heavy rain, snow, or wind-driven weather.
What Makes a Good Slate Roof Valley?
✔ Strong waterproof membrane beneath the valley
✔ Durable metal valley flashing
✔ Correct flashing overlap
✔ Clean and accurate slate cuts
✔ Sufficient drainage width
✔ No nails in the water channel
✔ Smooth transition into the gutter
✔ Easy access for inspection and maintenance
Open Valley vs Closed Valley vs Metal Valley
| Valley Type | Appearance | Waterproofing Performance | Maintenance | Best For |
|---|---|---|---|---|
| Open Valley | Visible metal channel | Excellent | Easy | Heavy rain, snow, long valleys |
| Closed Valley | Flashing mostly hidden | Good if installed correctly | Moderate | Traditional appearance, premium roofs |
| Metal Valley | Visible or hidden metal flashing | Excellent | Easy to moderate | Most slate roof valley systems |
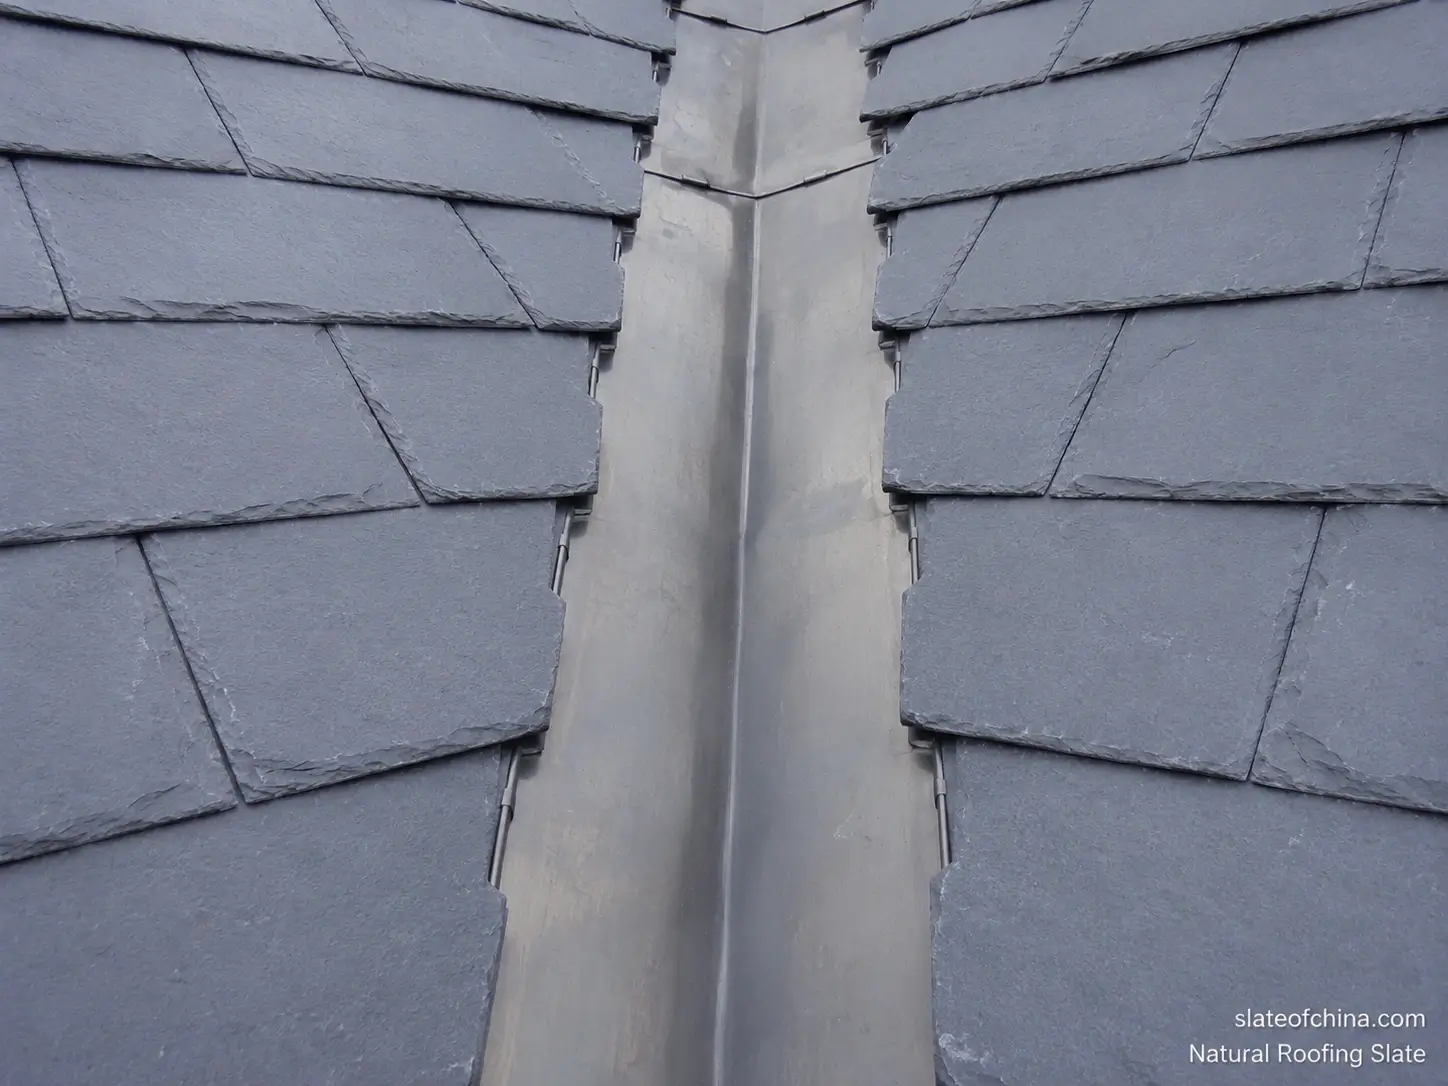
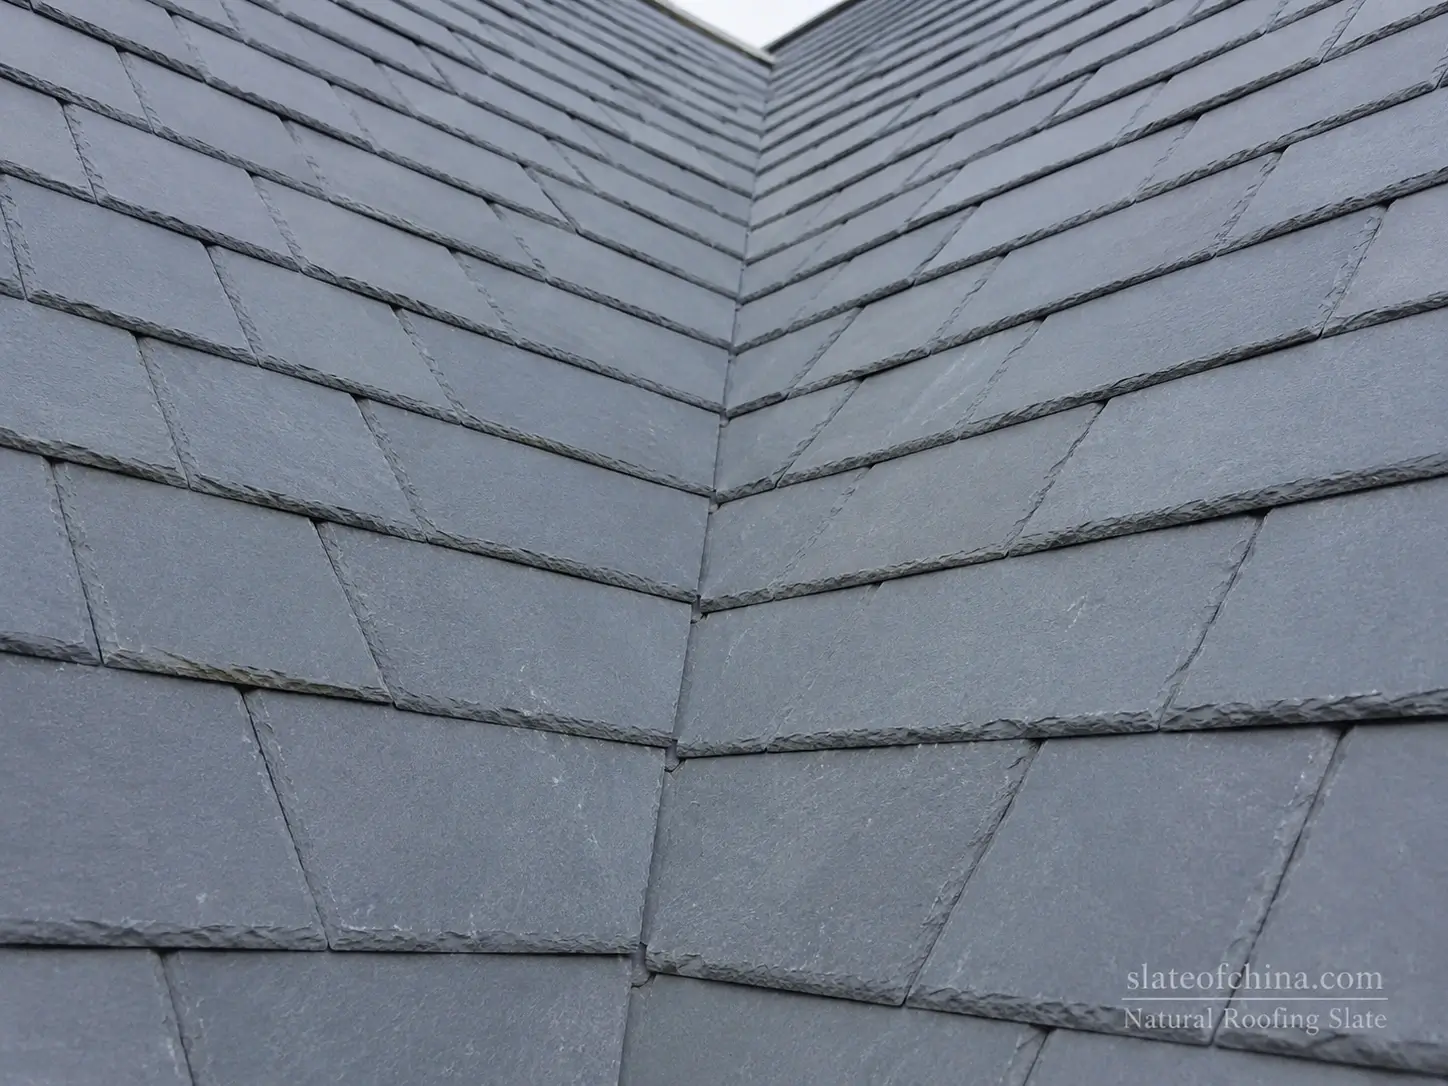
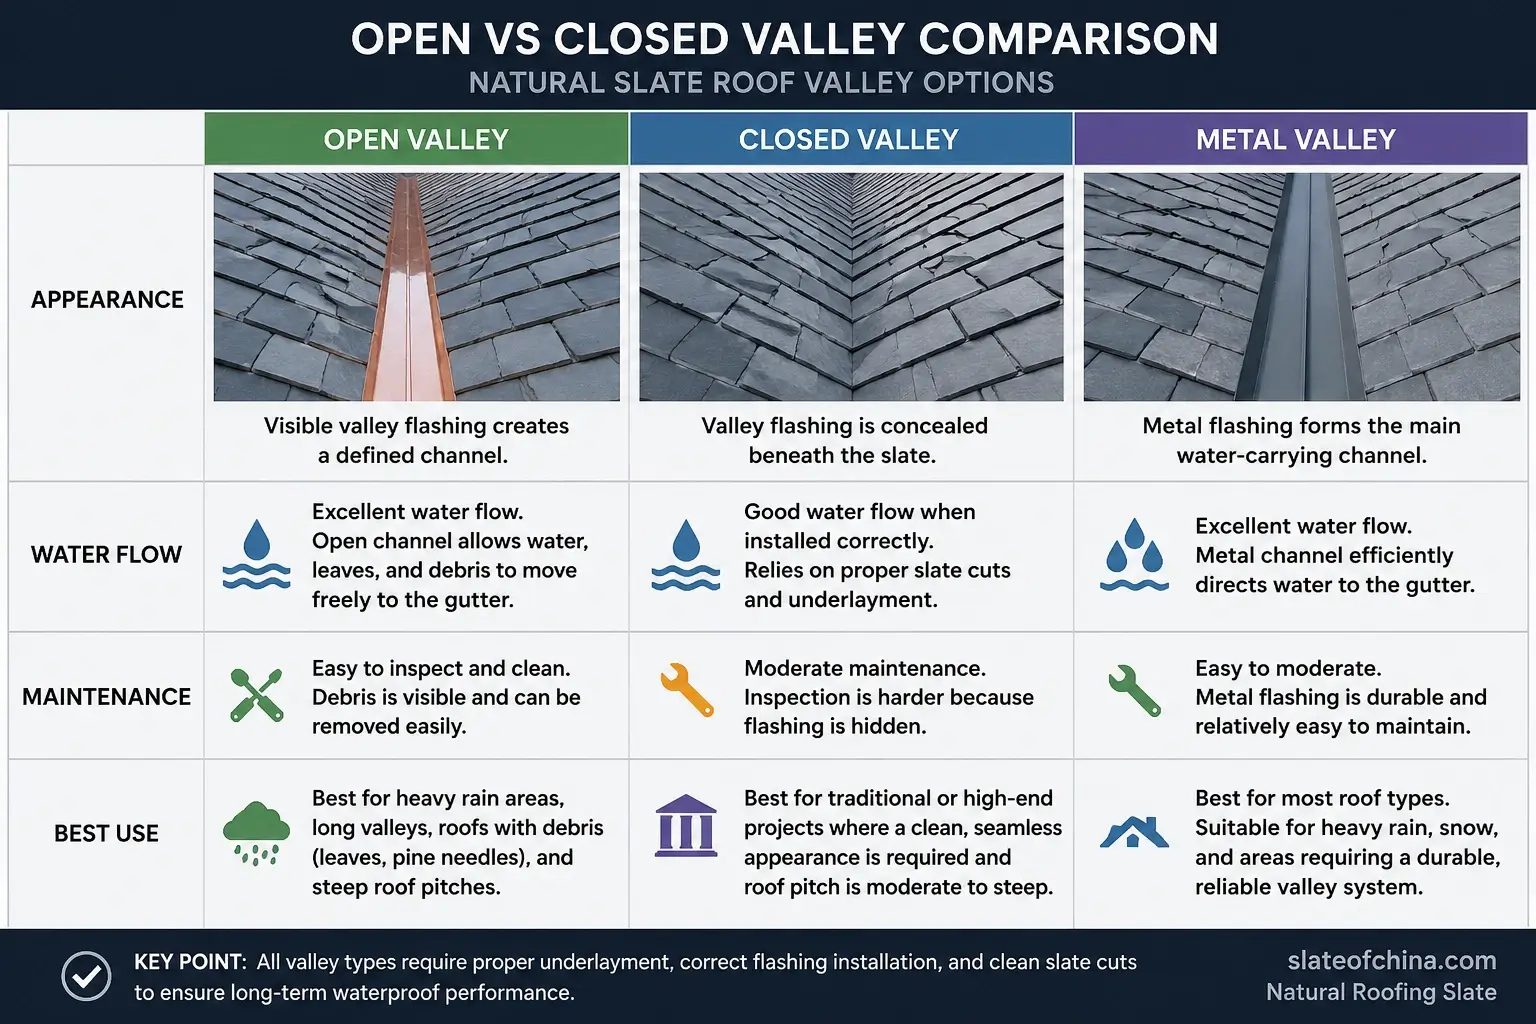
For complex roof shapes, valleys should be designed together with ridge, hip, flashing, and gutter details to ensure a complete waterproof slate roofing system.
A slate roof valley is a high-volume water channel. The best valley detail should combine durable waterproofing, clean slate cutting, proper flashing, and unrestricted water flow.
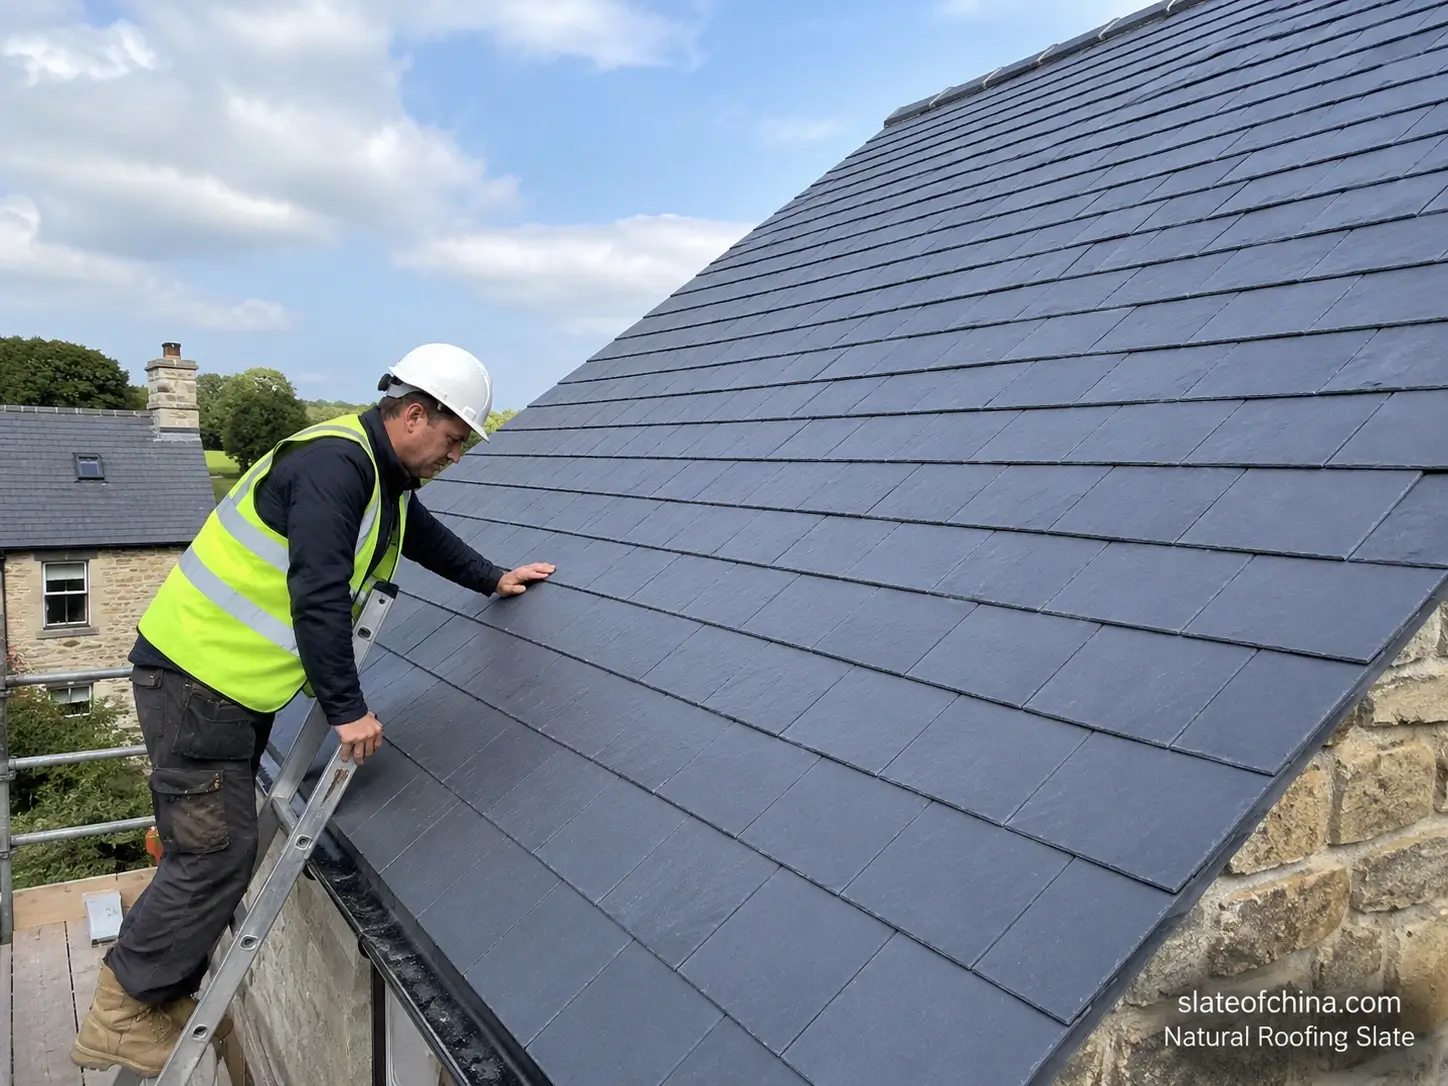
Step 10: Final Inspection
Make Sure the Slate Roof Is Secure, Straight, and Weatherproof
Final inspection is the last quality-control step before a natural slate roof is considered complete. Even when the installation process has been carefully followed, small issues such as misaligned slates, loose fixings, cracked pieces, exposed nails, or incomplete flashing details can affect the roof’s appearance, waterproofing, and long-term performance.
A professional final inspection helps ensure the slate roof is properly aligned, securely fixed, free from visible damage, and ready to withstand rain, wind, snow, and daily weather exposure.
For a premium natural roofing slate system, this step is especially important because the roof is expected to perform reliably for many decades.
1. Check Slate Alignment
A well-installed slate roof should have clean, straight horizontal courses from one side of the roof to the other. The exposure should remain consistent, and the joints should be evenly staggered.
Poor alignment may affect both the appearance and the weather resistance of the roof.
Check carefully for:
- Straight horizontal slate courses
- Consistent slate exposure
- Properly staggered vertical joints
- Clean lines along eaves, ridges, hips, and valleys
- No visible waves or uneven sections
Professional Tip:
Inspect the roof from different angles and distances. Alignment problems are often easier to see from the ground or from the opposite side of the roof.
2. Check for Loose Slates
Loose slates can move under wind pressure and may eventually crack, slip, or fall from the roof. Every slate should be securely fixed while still allowing normal movement caused by temperature changes and roof expansion.
Loose slates are especially common around roof edges, valleys, hips, ridges, chimneys, skylights, and cut slate areas.
Check carefully for:
- Slates that lift or move easily
- Slates not properly seated on battens
- Loose slate hooks or nails
- Poorly supported cut slates
- Movement around ridges, hips, and valleys
Professional Tip:
Any loose slate should be refixed immediately before the roof is handed over.
3. Replace Broken or Damaged Slates
Natural roofing slate is extremely durable, but damaged pieces should never be left in place. Cracked, broken, or heavily chipped slates may allow water to enter the roofing system or reduce the finished appearance of the roof.
Even small cracks can become worse over time due to freeze-thaw cycles, wind movement, or foot traffic during maintenance.
Check carefully for:
- Cracked slates
- Broken corners
- Large chips on visible edges
- Split or delaminated pieces
- Tool damage
- Foot traffic damage
Professional Tip:
Always replace damaged slates before final completion. Do not rely on sealant or temporary repairs for broken roofing slate.
4. Inspect Nails and Fixings
Correct nail position is essential for a durable slate roof. Nails should normally be covered by the slate course above and protected from direct rain exposure. Exposed nails, overdriven nails, loose nails, or nails placed too close to the slate edge can cause leaks, slate breakage, or long-term fixing failure.
Use only corrosion-resistant fixings such as copper nails, stainless steel nails, or approved slate hooks.
Check carefully for:
- Nails covered by overlapping slates
- No exposed nail heads on finished courses
- No overdriven nails cracking the slate
- No loose or missing nails
- Correct nail position
- Proper hook placement where slate hooks are used
Professional Tip:
Slate should be held securely, but not clamped too tightly. Over-tight fixing can crack the slate or restrict natural movement.
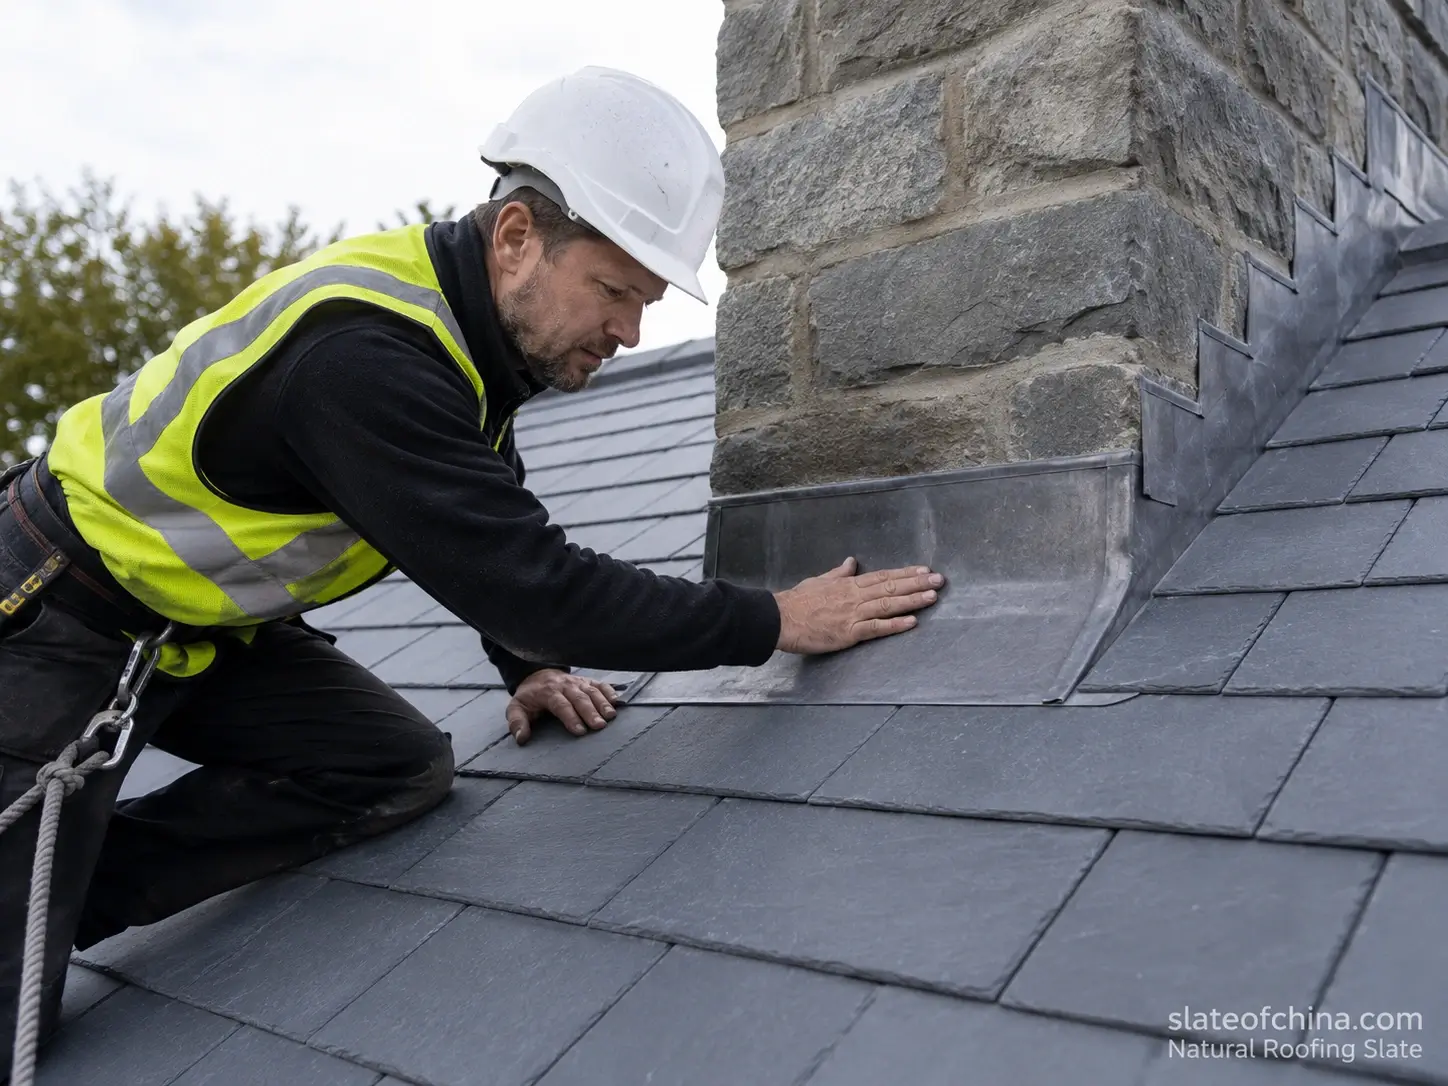
5. Inspect Flashing Details
Flashing is one of the most important waterproofing components of a slate roof. Even if the main slate field is installed correctly, poor flashing can cause leaks around roof junctions and penetrations.
Pay close attention to valleys, ridges, hips, chimneys, skylights, dormers, sidewalls, eaves, and gutters.
Check carefully for:
- Valley flashing is clean and unobstructed
- Ridge flashing is properly covered and secured
- Hip flashing is correctly protected
- Chimney flashing is sealed and well integrated
- Skylight flashing overlaps correctly
- No fasteners placed in water channels
- Water can flow freely into gutters
- No visible gaps or unfinished edges
Professional Tip:
Most slate roof leaks occur at details, not in the main field of the roof. Flashing inspection should never be rushed.
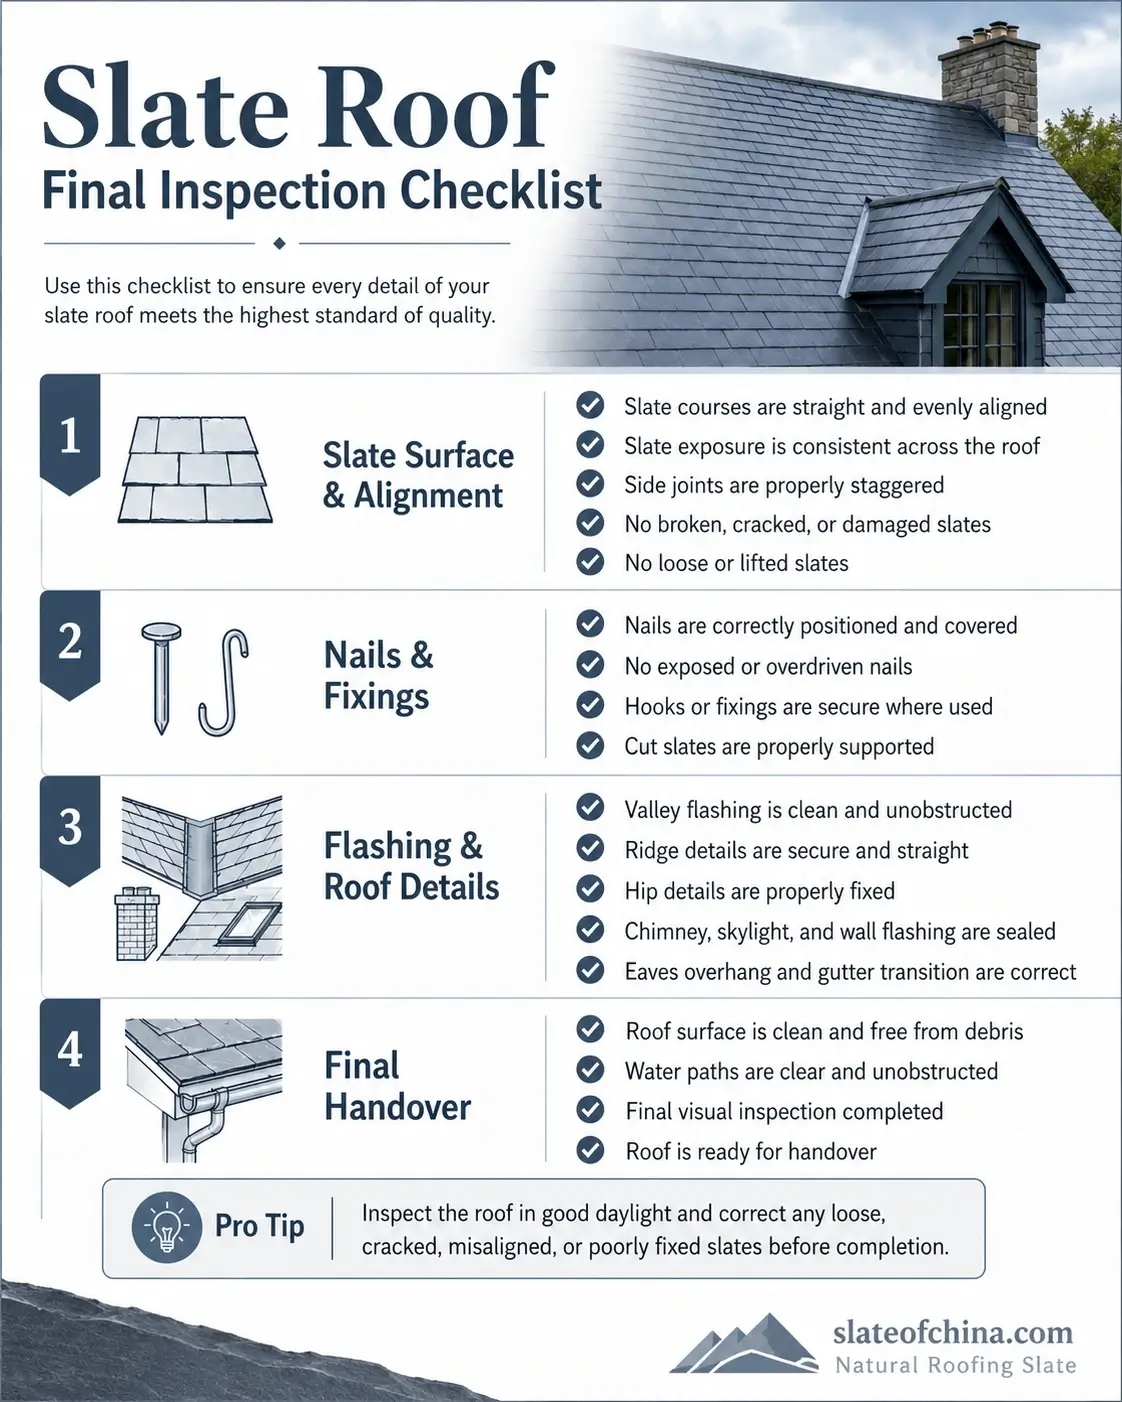
Final Slate Roof Inspection Checklist
✔ Slate courses are straight and evenly aligned
✔ Slate exposure is consistent across the roof
✔ Headlap and overlap are correct
✔ Side joints are properly staggered
✔ No loose or lifted slates
✔ No broken, cracked, or damaged slates
✔ Nails are correctly positioned and covered
✔ No exposed or overdriven nails
✔ Ridge details are secure and straight
✔ Hip details are properly fixed
✔ Valley flashing is clean and unobstructed
✔ Chimney, skylight, and wall flashing are sealed
✔ Eaves overhang and gutter transition are correct
✔ Roof surface is clean and free from debris
✔ Roof is ready for final handover
Common Final Inspection Issues
| Issue | Possible Cause | Recommended Action |
|---|---|---|
| Uneven slate courses | Incorrect layout or batten spacing | Recheck alignment and correct affected area |
| Loose slates | Poor fixing or damaged nail holes | Refix or replace the slates |
| Cracked slates | Overdriven nails or impact damage | Replace damaged slates |
| Exposed nails | Incorrect nail position or insufficient overlap | Correct the fixing and ensure nails are covered |
| Water trapped in valley | Narrow valley or debris buildup | Clean the valley and check flashing design |
| Flashing gaps | Poor detailing or movement | Refit or reseal flashing |
| Poor eaves line | Incorrect starter course | Adjust affected slates if possible |
Common Mistakes to Avoid
❌ Skipping the final inspection
❌ Inspecting only from the ground
❌ Leaving small cracked slates in place
❌ Ignoring exposed nails
❌ Failing to check valley flashing
❌ Leaving debris on the roof surface
❌ Walking directly on installed slates
❌ Handing over the roof without a checklist
Pro Tip
A slate roof is only complete after it has been carefully inspected. Straight alignment, secure slates, hidden fixings, clean flashing, and consistent overlap are all signs of professional slate roof installation.
Any loose, cracked, misaligned, or poorly fixed slate should be corrected before the project is finished.
Slate Roof Fixing Methods:Choose the Right Fixing Method for Long-Term Roof Performance
The fixing method is one of the most important decisions in natural roofing slate installation. Even high-quality roofing slate can fail if it is fixed incorrectly. Proper fixing keeps each slate secure, allows water to drain correctly, resists wind uplift, and helps the roof perform for decades.
The three most common slate roof fixing methods are nail fixing, hook fixing, and mixed fixing. Each method has its own advantages and is suitable for different roof designs, local standards, climates, and installation traditions.
For international projects, especially in Europe, the fixing method should be selected according to the project specification, roof pitch, wind exposure, slate size, and local building practice.
1. Nail Fixing
The Traditional Method for Slate Roof Installation
Nail fixing is one of the most traditional and widely recognized methods for installing natural roofing slate. Each slate is fixed to the timber batten or roof deck using corrosion-resistant nails, usually copper nails or stainless steel nails.
The nails are placed through pre-punched nail holes near the upper part of the slate. After the next slate course is installed, the nail heads should be covered by the overlapping slate above. This helps protect the fixings from direct rain exposure.
Key Features of Nail Fixing
- Traditional and widely accepted
- Suitable for many natural slate roof projects
- Provides strong mechanical fixing
- Works well with copper or stainless steel nails
- Requires accurate nail position and proper headlap
- Nail heads should normally be hidden after installation
Advantages
| Advantage | Why It Matters |
|---|---|
| Strong fixing | Helps secure each slate against wind and movement |
| Traditional appearance | Commonly used in classic slate roofing projects |
| Compatible with many slate sizes | Suitable for a wide range of natural roofing slate formats |
| Hidden fixings | Nails are usually covered by the slate course above |
| Proven method | Long history in slate roof installation |
Important Installation Notes
Nails should not be driven too tightly. The slate should be held securely but still allowed to hang naturally. Overdriven nails may crack the slate, while loose nails may allow slate movement.
Use only corrosion-resistant fixings. Poor-quality nails can rust, stain the roof, or fail over time.
Common Mistakes to Avoid
❌ Driving nails too tightly
❌ Nailing too close to the slate edge
❌ Leaving nail heads exposed
❌ Using low-quality galvanized nails in harsh climates
❌ Failing to maintain correct headlap
❌ Installing cracked slates around nail holes
Best Used For
Nail fixing is suitable for:
- Traditional slate roof installation
- Residential slate roofs
- Heritage-style roofing projects
- Projects using standard pre-holed roofing slate
- Roofs where local practice prefers nailed slate fixing
2. Hook Fixing:
A Popular Method in European Slate Roofing
Hook fixing is widely used in many European markets, especially in countries such as France and Germany. Instead of fixing the slate directly with nails through the slate body, stainless steel slate hooks are used to hold the bottom edge of each slate in position.
This method is especially popular because it can provide strong fixing, allow easier slate replacement, and reduce stress around nail holes.
How Hook Fixing Works
Slate hooks are attached to the battens or roof structure. Each hook supports and holds the lower edge of the slate. The slate above then overlaps the lower slate, creating a secure and weather-resistant roof covering.
The hook remains visible as a small fixing point at the bottom edge of the slate, depending on the hook type and installation pattern.
Key Features of Hook Fixing
- Common in European slate roofing systems
- Especially popular in France and Germany
- Uses stainless steel slate hooks
- Reduces the need for nail holes in some installation systems
- Allows easier replacement of individual slates
- Can improve resistance to slate slipping
- Requires correct hook length and specification
Advantages
| Advantage | Why It Matters |
|---|---|
| Easier replacement | Individual damaged slates can often be changed more easily |
| Reduced stress on slate | Less risk of cracking around nail holes |
| Strong mechanical holding | Hooks help prevent slate slippage |
| Widely accepted in Europe | Familiar method for many European installers |
| Suitable for certain roof designs | Works well where hook fixing is specified |
Important Installation Notes
Hook fixing must be designed carefully. The hook length, material, batten spacing, slate thickness, roof pitch, and wind exposure all affect performance.
Stainless steel hooks are commonly preferred because they offer good corrosion resistance and long service life.
Common Mistakes to Avoid
❌ Using the wrong hook length
❌ Using hooks that are not corrosion-resistant
❌ Poor hook alignment
❌ Incorrect batten spacing
❌ Using hooks not suitable for the slate thickness
❌ Ignoring local wind-load requirements
Best Used For
Hook fixing is suitable for:
- European slate roofing projects
- French and German market installations
- Projects requiring easier slate replacement
- Roofs using compatible slate sizes and thicknesses
- Projects where stainless steel slate hooks are specified
3. Mixed Fixing
A Flexible Solution for Special Roofing Projects
Mixed fixing combines different fixing methods in the same slate roof system. For example, the main roof area may use nail fixing, while exposed edges, valleys, hips, ridges, or repair areas may use hooks, clips, or additional mechanical fixings.
This method is often used for special roof designs, complex details, high-wind areas, restoration projects, or roofs with mixed installation requirements.
When Mixed Fixing May Be Used
Mixed fixing may be appropriate when different roof areas experience different levels of wind exposure, water flow, or installation difficulty.
For example:
- Nails for the main slate field
- Hooks for repair areas
- Extra fixings near edges or verges
- Special clips around hips, valleys, or ridges
- Additional mechanical fixing in high-wind zones
Advantages
| Advantage | Why It Matters |
|---|---|
| Flexible design | Allows different fixing solutions for different roof areas |
| Better performance in complex areas | Helps secure slates around details and edges |
| Useful for restoration work | Can adapt to existing roof conditions |
| Supports special project requirements | Suitable for unusual roof shapes or specifications |
| Improves fixing security where needed | Extra protection in exposed areas |
Important Installation Notes
Mixed fixing should not be used randomly. It should be based on project design, structural requirements, wind exposure, roof pitch, and local standards.
The fixing materials must be compatible with each other. Mixing incompatible metals may cause corrosion problems over time.
Common Mistakes to Avoid
❌ Mixing fixing methods without a clear reason
❌ Using incompatible metals
❌ Applying extra fixings in the wrong position
❌ Ignoring manufacturer or project specifications
❌ Creating visible fixing inconsistencies
❌ Over-complicating a simple roof system
Best Used For
Mixed fixing is suitable for:
- Complex slate roof designs
- Restoration or repair projects
- High-wind exposure areas
- Roofs with hips, valleys, dormers, chimneys, and penetrations
- Projects requiring special engineering or local compliance
Nail Fixing vs Hook Fixing vs Mixed Fixing
建议网页中放一张对比表,用户会很容易理解,也有利于 SEO。
| Fixing Method | Main Materials | Appearance | Maintenance | Best Use |
|---|---|---|---|---|
| Nail Fixing | Copper nails or stainless steel nails | Hidden fixings | Moderate | Traditional slate roofs, standard installation |
| Hook Fixing | Stainless steel slate hooks | Small hooks may be visible | Easier slate replacement | European projects, France, Germany |
| Mixed Fixing | Nails, hooks, clips, special fixings | Depends on design | Depends on system | Complex roofs, repairs, high-wind areas |
How to Choose the Right Fixing Method
The best fixing method depends on several project conditions:
- Roof pitch
- Slate size
- Slate thickness
- Wind exposure
- Local climate
- Building regulations
- Installer experience
- Architectural style
- Maintenance requirements
- Market preference
For example, many traditional projects prefer nail fixing, while many European projects may specify hook fixing. For complex roofs with multiple details, mixed fixing may provide the best practical solution.
Key Tasks
- Confirm the fixing method before installation begins.
- Choose corrosion-resistant nails or hooks.
- Match fixing method with slate size and thickness.
- Follow project specifications and local roofing standards.
- Ensure nail or hook positions do not interfere with water flow.
- Check fixings regularly during installation.
- Use additional fixing where required in exposed areas.
- Avoid incompatible metal combinations.
Checklist
✔ Fixing method selected according to project requirements
✔ Copper nails, stainless steel nails, or slate hooks prepared
✔ Nail holes and hook positions checked
✔ Fixings compatible with slate thickness
✔ Fixings suitable for local climate and wind exposure
✔ Nails are covered by overlapping slates where nail fixing is used
✔ Hooks are correctly positioned where hook fixing is used
✔ No fixings placed in water channels
✔ Roof details receive additional fixing where required
Common Mistakes to Avoid
❌ Choosing fixing method only by price
❌ Using poor-quality nails or hooks
❌ Ignoring roof pitch and wind exposure
❌ Leaving nails exposed
❌ Driving nails too tightly
❌ Using incorrect hook length
❌ Mixing metals that may corrode
❌ Applying the same fixing detail to every roof area without checking conditions
Pro Tip
The fixing method should match the roof design, local climate, and installation standard. A well-fixed slate roof should resist wind uplift, allow proper water drainage, and protect the fixings from corrosion and weather exposure.
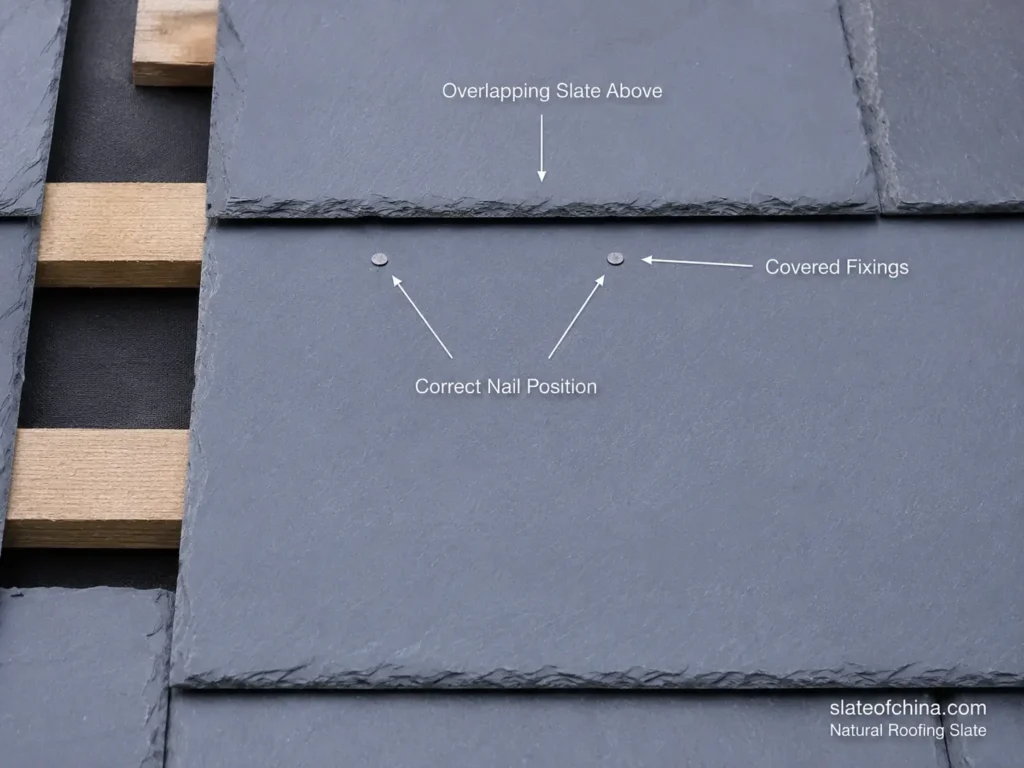
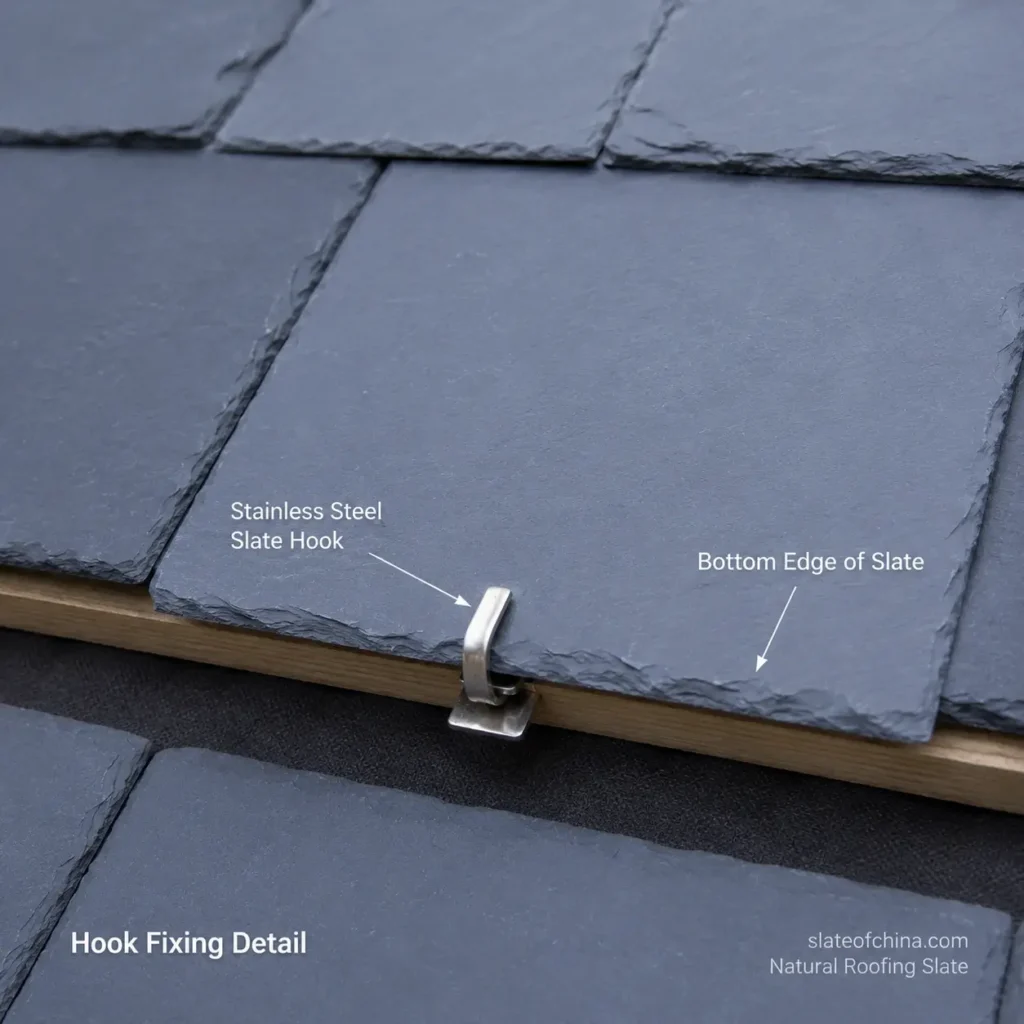
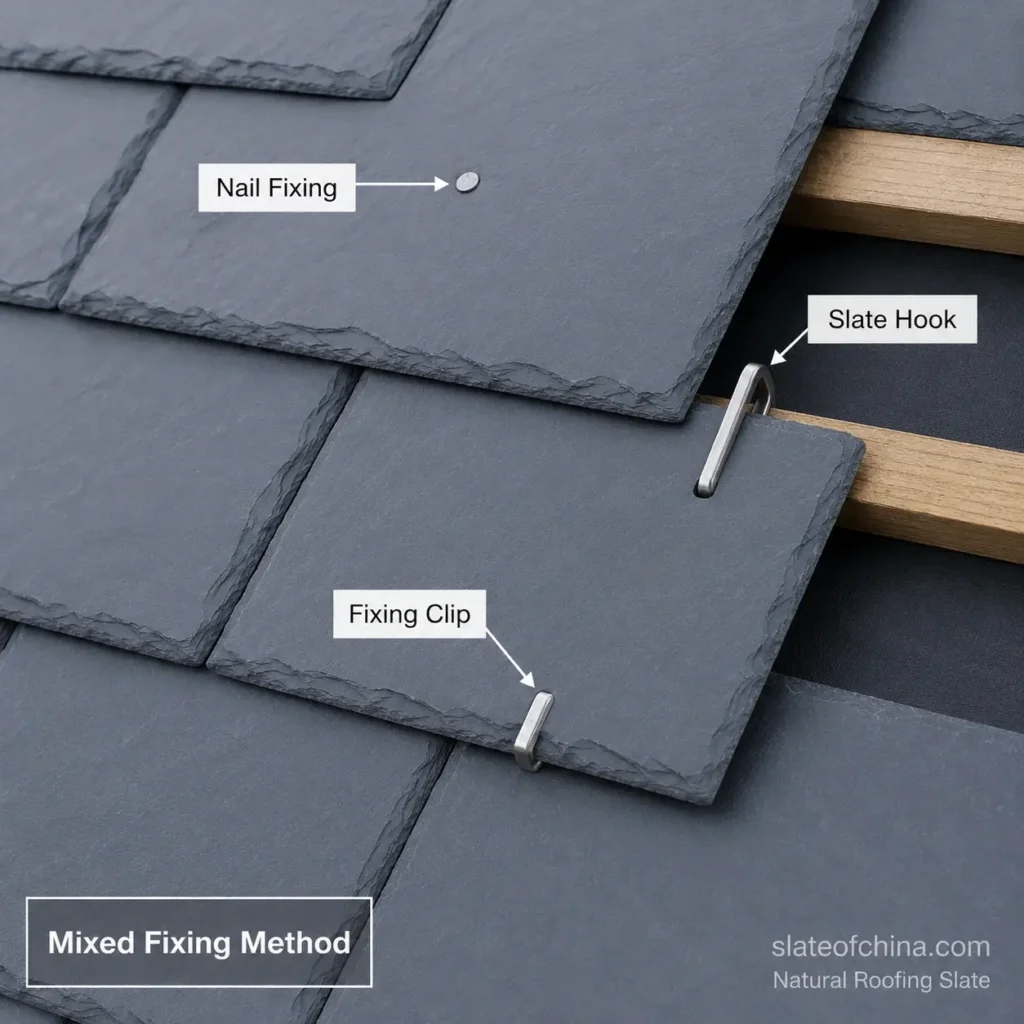

A durable slate roof depends not only on the quality of the slate, but also on the fixing method. Correct nails, hooks, or mixed fixing details help the roof stay secure, weatherproof, and serviceable for decades.
Common Slate Roof Installation Mistakes
Avoid These Problems to Protect the Lifespan of Your Slate Roof
Natural roofing slate is one of the most durable roofing materials available. A properly installed slate roof can last for many decades, and in many cases over 100 years. However, even the best slate can fail early if the installation is not done correctly.
Most slate roof problems are not caused by the slate itself, but by poor installation details such as wrong overlap, incorrect nail fixing, poor ventilation, bad flashing, or improper valley construction.
Understanding these common slate roof installation mistakes helps homeowners, builders, roofers, and importers identify quality problems before they become expensive repairs.
1. Wrong Overlap or Insufficient Headlap
Wrong overlap is one of the most common causes of slate roof leaks. If the headlap is too small, wind-driven rain or melting snow may reach the nail holes or underlayment.
Headlap should be calculated according to slate size, roof pitch, local climate, and roofing standards. Lower roof pitches and harsh weather conditions usually require greater headlap.
Why it matters:
- Increases risk of water penetration
- Exposes nail holes to moisture
- Reduces weather resistance
- May shorten roof service life
Correct practice:
Calculate the exposure and headlap before installation. Never guess slate overlap by eye.
2. Incorrect Nail Length
Using the wrong nail length can affect fixing strength and roof durability. Nails that are too short may not hold the slate securely. Nails that are too long may damage the batten, underlayment, or roof deck.
For natural roofing slate, corrosion-resistant copper nails or stainless steel nails are commonly recommended.
Why it matters:
- Loose slates may slip or move
- Poor wind resistance
- Higher risk of fixing failure
- Possible damage to roof layers
Correct practice:
Choose nail length according to slate thickness, batten thickness, and project requirements.
3. Overdriven Nails
Slate nails should hold the slate securely, but they should not clamp it too tightly. Overdriven nails can crack the slate or create stress around the nail holes.
Natural slate needs to hang naturally on the roof. If it is fixed too tightly, movement caused by temperature change, wind, or roof settlement may cause cracking.
Why it matters:
- Cracked slate around nail holes
- Reduced roof durability
- Increased replacement work
- Hidden damage after installation
Correct practice:
Drive nails flush enough to secure the slate, but not so tight that the slate is compressed or cracked.
4. Poor Roof Ventilation
Poor ventilation can trap moisture beneath the slate roof system. Over time, this may cause condensation, timber decay, mold, or damage to underlayment and roof decking.
A breathable membrane can help manage moisture, but it should be combined with a properly designed ventilation system when required.
Why it matters:
- Condensation under the roof
- Timber batten or deck deterioration
- Reduced roof system lifespan
- Moisture damage in the roof structure
Correct practice:
Design ventilation according to the roof structure, climate, and local building standards. Keep ventilation paths clear at eaves and ridge where required.
5. Wrong Batten Spacing
Batten spacing, also called gauge, directly controls slate exposure. If the battens are spaced incorrectly, the headlap and overlap will also be wrong.
Even small spacing errors can become serious across a full roof area.
Why it matters:
- Inconsistent slate exposure
- Poor headlap
- Uneven roof appearance
- Increased risk of leaks
- Extra slate waste
Correct practice:
Calculate batten spacing based on slate length and required headlap before fixing battens.
6. Installing Broken or Damaged Slates
Broken, cracked, or heavily chipped slates should never be installed. Even small cracks can become larger over time due to freeze-thaw cycles, wind movement, or roof traffic.
Natural slate is durable, but damaged pieces can weaken the roof system and reduce visual quality.
Why it matters:
- Possible water penetration
- Poor roof appearance
- Early maintenance problems
- Higher replacement cost later
Correct practice:
Inspect slates before installation. Remove cracked, delaminated, or badly damaged pieces.
7. Poor Flashing Installation
Flashing is one of the most important waterproofing details in a slate roof. Most leaks occur around roof details, not in the main slate field.
Poor flashing around chimneys, skylights, valleys, hips, ridges, walls, and dormers can allow water to enter the roof system.
Why it matters:
- Leaks around roof penetrations
- Moisture damage to roof deck
- Staining or interior water damage
- Expensive repair work
Correct practice:
Use durable flashing materials and ensure correct overlap, sealing, and integration with the underlayment and slate courses.
8. Improper Valley Installation
A roof valley carries more water than almost any other part of the roof. If the valley is too narrow, poorly flashed, blocked, or incorrectly cut, water may back up under the slates.
Both open valleys and closed valleys must be installed carefully.
Why it matters:
- High risk of roof leaks
- Water backup during heavy rain
- Debris buildup
- Flashing corrosion or failure
- Damage to valley slates
Correct practice:
Use proper valley flashing, maintain a clear water path, and avoid placing nails or hooks in the valley water channel.
9. Walking on Slate Incorrectly
Natural roofing slate can crack if walked on incorrectly, especially after installation. Foot traffic may break corners, loosen slates, or damage the surface.
This problem often happens during inspection, chimney work, solar installation, or later maintenance.
Why it matters:
- Cracked or broken slates
- Loose fixings
- Hidden damage
- Increased maintenance cost
Correct practice:
Use roof ladders, crawling boards, or proper access equipment. Avoid walking directly on installed slates whenever possible.
10. Ignoring Expansion and Movement
Roofs naturally move due to temperature changes, wind loads, structural settlement, and moisture variation. If slates, flashing, battens, or metal components are installed too tightly, they may not allow normal movement.
This is especially important around metal flashing, long roof runs, ridges, hips, and valleys.
Why it matters:
- Cracking around fixed points
- Buckled flashing
- Stress on slate edges
- Long-term waterproofing failure
Correct practice:
Allow appropriate movement in flashing, fixings, and roof details according to project specifications and local standards.
11. Poor Side Lap and Aligned Vertical Joints
Vertical joints should be staggered between slate courses. If joints line up directly, water can travel more easily through the roof covering.
This is a common mistake when installers rush the layout or fail to check side lap.
Why it matters:
- Direct water paths
- Poor weather resistance
- Unprofessional appearance
- Higher leak risk in wind-driven rain
Correct practice:
Maintain proper side lap and staggered joints across all slate courses.
12. Using Incompatible Fixings or Metals
Using incompatible metals can cause corrosion over time, especially where moisture is present. For example, poor-quality nails, hooks, or clips may rust and fail before the slate reaches the end of its service life.
Why it matters:
- Corroded fixings
- Slate slipping
- Staining on the roof
- Reduced roof lifespan
Correct practice:
Use corrosion-resistant copper nails, stainless steel nails, stainless steel slate hooks, and compatible flashing materials.
13. Poor Starter Course Installation
The starter course at the eaves sets the line, support, and drainage path for the whole roof. If it is poorly installed, the first visible course may be uneven or unsupported.
Why it matters:
- Poor eaves alignment
- Incorrect overhang into gutter
- Weak first slate course
- Water may not drain properly
Correct practice:
Install a proper starter course with correct overhang, straight eaves line, and secure fixing.
14. Ignoring Roof Pitch Requirements
Not every slate size or installation method is suitable for every roof pitch. Lower roof pitches usually require greater headlap, careful underlayment, and sometimes special installation details.
Why it matters:
- Higher leak risk on low-slope roofs
- Insufficient water drainage
- Wrong exposure calculation
- Possible non-compliance with local standards
Correct practice:
Confirm the minimum roof pitch and recommended installation system before choosing slate size and headlap.
15. Skipping Final Inspection
Even a well-installed slate roof should be inspected before handover. Small defects such as loose slates, exposed nails, broken pieces, blocked valleys, or poor flashing should be corrected immediately.
Why it matters:
- Hidden defects remain unresolved
- Higher risk of early repairs
- Reduced customer confidence
- Poor project quality control
Correct practice:
Use a final inspection checklist covering alignment, loose slates, broken slates, nails, flashing, ridge, hip, valley, eaves, and gutters.
Common Mistakes and How to Avoid Them
| Common Mistake | Possible Problem | Correct Practice |
|---|---|---|
| Wrong overlap | Water penetration | Calculate exposure and headlap correctly |
| Incorrect nail length | Loose slates or weak fixing | Use proper copper or stainless steel nails |
| Overdriven nails | Cracked slate | Fix securely but do not clamp too tightly |
| Poor ventilation | Condensation and timber decay | Keep ventilation paths clear |
| Wrong batten spacing | Poor headlap and uneven courses | Calculate gauge before installation |
| Broken slates | Early leaks or poor appearance | Replace damaged pieces before fixing |
| Poor flashing | Leaks around roof details | Use correct flashing and overlap |
| Improper valley | Water backup and leakage | Keep valley channel clear |
| Walking on slate incorrectly | Cracked slates | Use roof ladders or crawling boards |
| Ignoring movement | Cracking or flashing failure | Allow proper expansion and movement |
Warning Signs of Poor Slate Roof Installation
You may have a slate roof installation problem if you notice:
- Uneven slate courses
- Exposed nail heads
- Slates slipping or lifting
- Cracked or broken slates
- Water stains inside the building
- Rust marks around fixings
- Blocked or narrow valleys
- Poorly sealed flashing
- Wavy ridge or hip lines
- Inconsistent slate exposure
If any of these signs appear, the roof should be inspected by a professional slate roofer.
The Most Serious Slate Roof Installation Mistakes
The most serious mistakes are usually related to waterproofing and fixing:
✔ Insufficient headlap
✔ Exposed or overdriven nails
✔ Poor valley flashing
✔ Incorrect batten spacing
✔ Poor chimney or skylight flashing
✔ Broken slates left in place
✔ Incompatible or corroding fixings
These problems can reduce the lifespan of a natural slate roof and may lead to costly repairs.
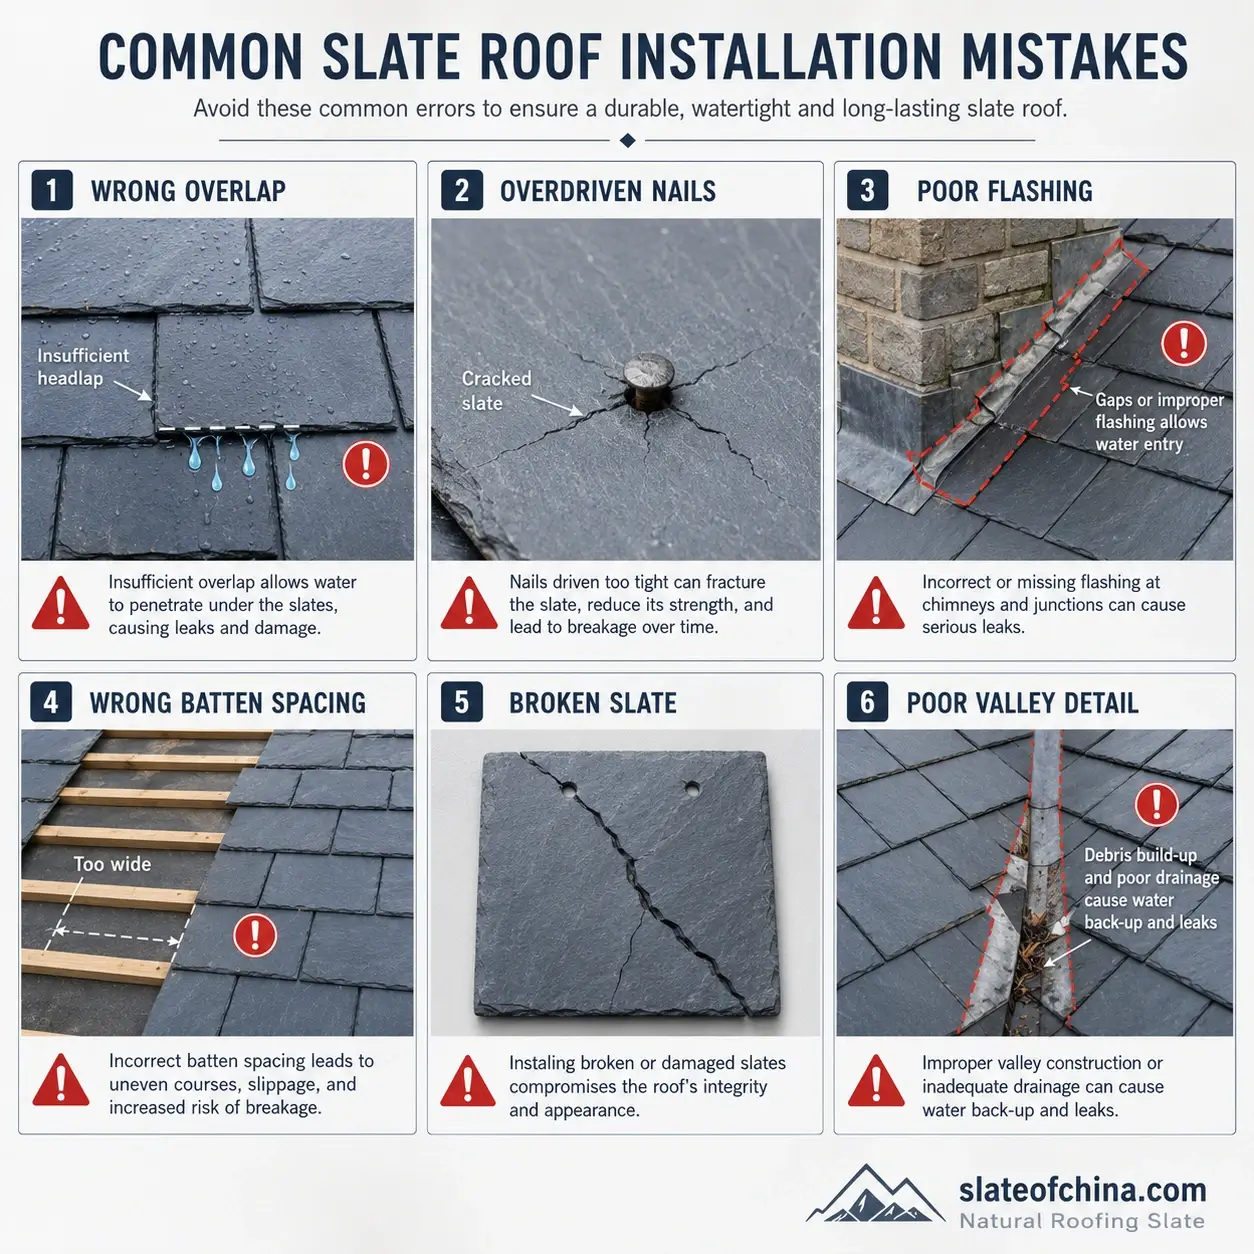
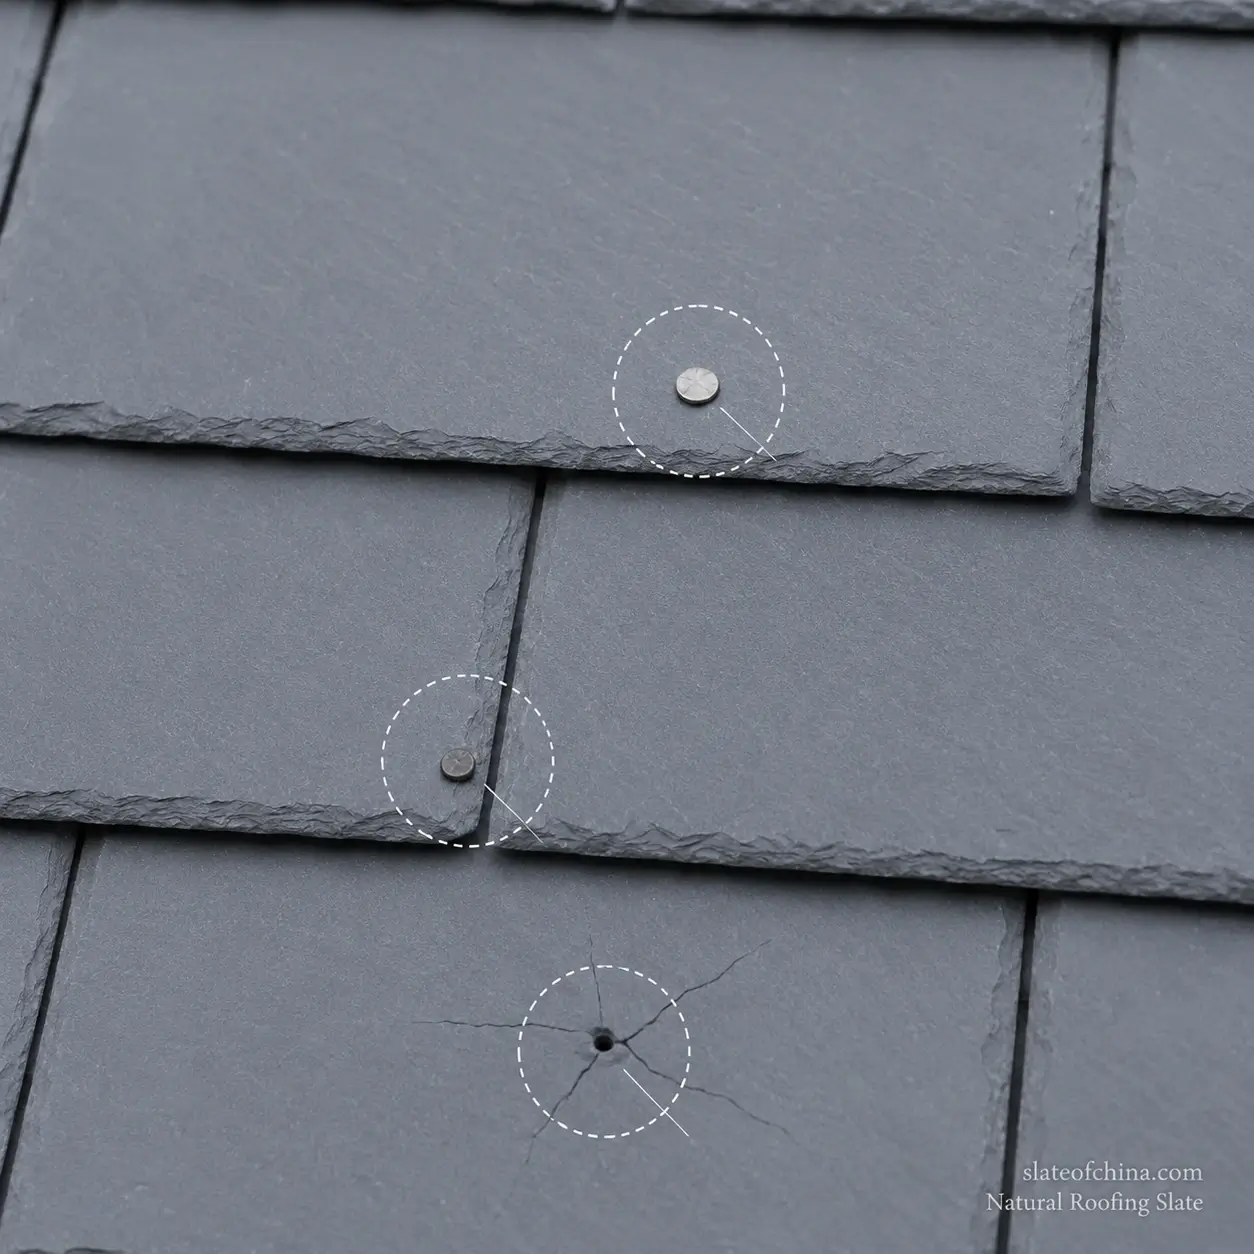
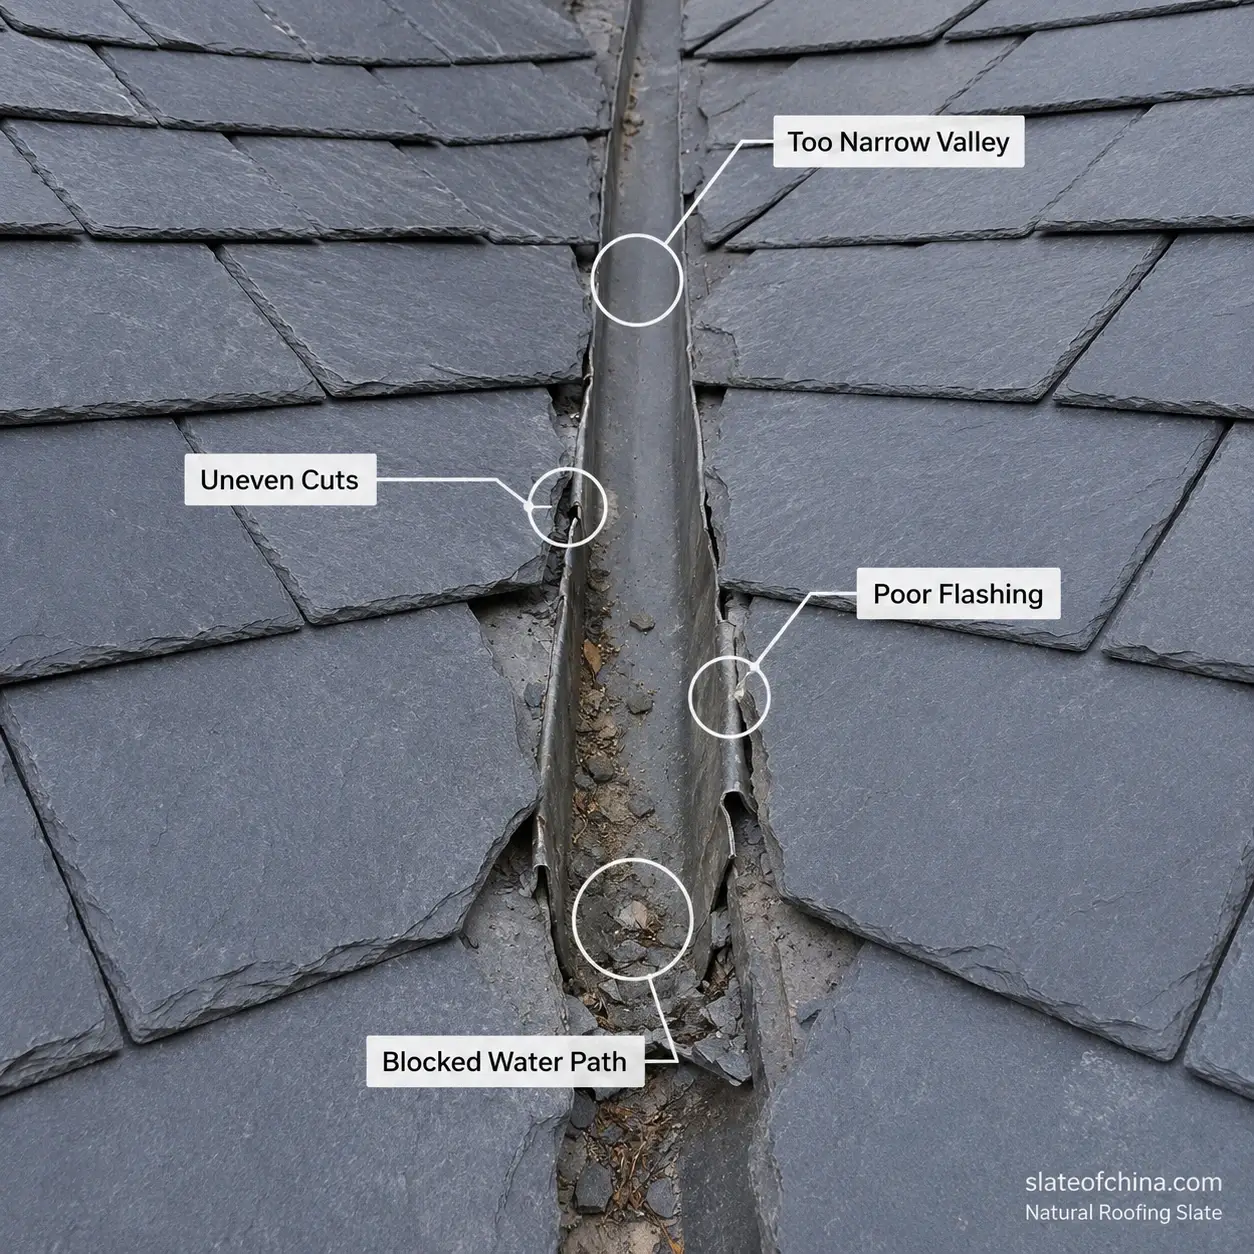
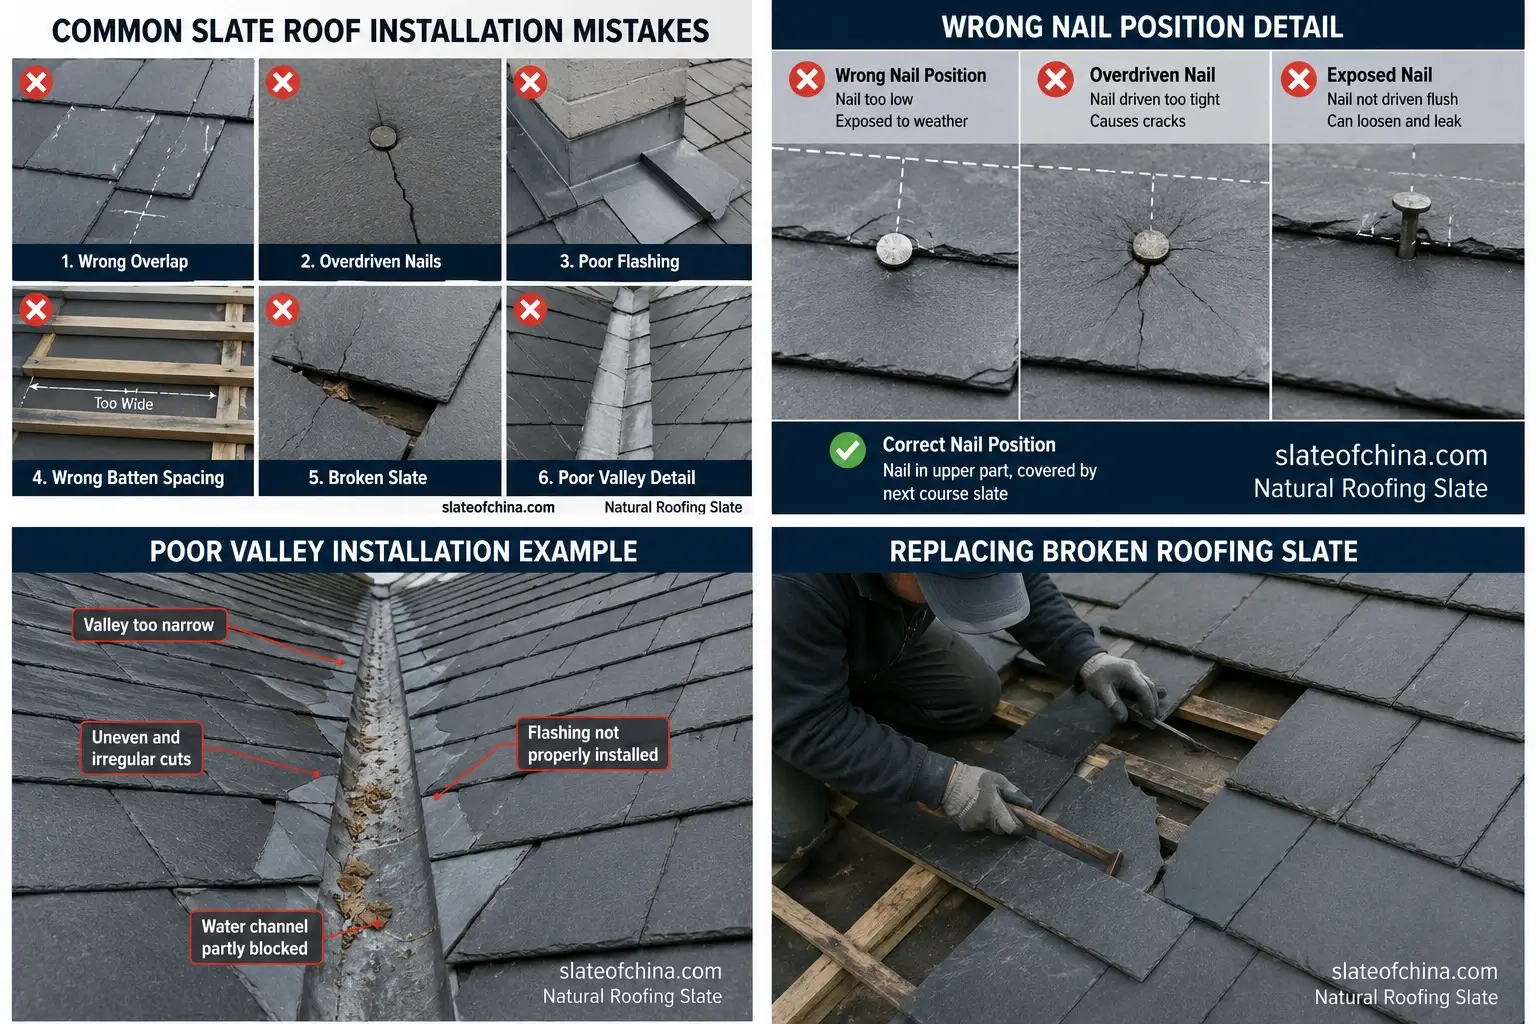
Slate Roof Installation Safety Tips
Work Safely When Installing Natural Roofing Slate
Natural roofing slate is durable, heavy, and long-lasting, but installing it requires careful safety planning. Slate roof installation usually takes place on pitched roofs, often at height, and involves heavy materials, sharp slate edges, ladders, scaffolding, cutting tools, nails, hooks, and weather exposure.
A safe installation process protects roofers, reduces material damage, and helps ensure the slate roof is installed correctly. Before any roofing work begins, the site should be inspected, safety equipment should be prepared, and all workers should understand the risks.
Safety requirements may vary by country, region, and project type, so always follow local building regulations, workplace safety rules, and professional roofing standards.
1. Wear Proper PPE
PPE, or personal protective equipment, is essential for slate roof installation. Natural slate can have sharp edges, and roof work often involves cutting, lifting, hammering, drilling, and working at height.
Proper PPE helps reduce the risk of cuts, eye injury, slips, impact injuries, and dust exposure.
Recommended PPE for Slate Roofing
| PPE | Purpose |
|---|---|
| Safety helmet | Protects against falling objects and head impact |
| Safety glasses | Protects eyes from slate chips and dust |
| Cut-resistant gloves | Protects hands from sharp slate edges |
| Safety boots | Improves grip and protects feet from heavy slates |
| High-visibility clothing | Helps workers remain visible on site |
| Dust mask or respirator | Recommended when cutting slate |
| Hearing protection | Useful when using cutting or power tools |
Professional Tip
When cutting natural roofing slate, always use eye protection and dust control. Slate dust and small chips can be hazardous if safety precautions are ignored.
2. Use a Roof Ladder Correctly
A roof ladder helps spread weight across the roof and gives workers safer access on pitched surfaces. It is especially important on slate roofs because walking directly on installed slates can crack or loosen them.
A proper roof ladder should be stable, suitable for the roof pitch, and positioned so workers can reach the installation area without stepping directly on unsupported slate.
Why Roof Ladders Matter
- Reduce the risk of slipping
- Protect installed slates from breakage
- Provide safer access on pitched roofs
- Help distribute worker weight more evenly
- Improve control when installing or inspecting slate courses
Common Mistakes to Avoid
❌ Walking directly on installed slates
❌ Using an unstable or damaged ladder
❌ Placing the ladder on loose slates
❌ Overreaching from the ladder
❌ Using a ladder without proper support or anchoring
Professional Tip
A roof ladder should be used together with fall protection equipment where required. It is not a substitute for a full fall protection system.
3. Use Fall Protection
Falls are one of the greatest risks in roof installation. Because natural slate roofs are often steep and slippery, fall protection should be planned before work begins.
Fall protection may include a safety harness, lifeline, anchor points, guardrails, edge protection, scaffolding, or other approved systems depending on the project.
Key Fall Protection Measures
- Use a properly fitted safety harness
- Connect to approved anchor points
- Keep lifelines clear and correctly positioned
- Use guardrails or edge protection where possible
- Avoid working near unprotected roof edges
- Stop work during strong wind, heavy rain, snow, or icy conditions
Professional Tip
Fall protection should be inspected before use. Harnesses, ropes, connectors, and anchor points must be in good condition and suitable for the job.
4. Use Safe Scaffolding
Scaffolding provides a stable working platform and safer access around the roof perimeter. It is especially useful for slate roofing projects because slates are heavy, and workers often need to move materials, tools, and roof accessories safely.
Good scaffolding improves both safety and installation quality.
Scaffolding Helps With
- Safer access to eaves, ridges, hips, and valleys
- Easier movement of heavy roofing slate
- Better material staging
- Reduced ladder dependency
- Improved inspection and finishing work
- Safer gutter, flashing, and edge installation
What to Check
✔ Scaffold is level and stable
✔ Platforms are secure
✔ Guardrails are installed where required
✔ Access points are safe
✔ Materials are not overloaded
✔ Walkways are kept clear
✔ Scaffold is inspected before use
Professional Tip
Do not overload scaffolding with too many slate bundles. Natural roofing slate is heavy, and material loading should be carefully controlled.
5. Handle Heavy Slates Safely
Natural roofing slate is heavier than many other roofing materials. Improper handling can cause back injuries, hand injuries, broken slates, or unsafe loading on the roof.
Slates should be lifted, carried, stacked, and distributed carefully across the work area.
Safe Slate Handling Practices
- Lift with correct posture
- Use two-person lifting for heavy bundles
- Wear gloves to protect hands from sharp edges
- Avoid carrying too many slates at once
- Stack slates on stable surfaces
- Do not overload battens, scaffolding, or roof areas
- Keep materials away from roof edges
- Store slates securely to prevent sliding
Professional Tip
Distribute slate bundles evenly across the roof structure where appropriate. Concentrated loads can create safety risks and may damage the roof system.
6. Work Only in Safe Weather Conditions
Weather has a major impact on slate roof installation safety. Slate, underlayment, battens, and metal flashing can become slippery when wet, icy, or dusty.
Roofing work should not continue during dangerous weather.
Avoid Installation During
- Heavy rain
- Snow
- Ice or frost
- Strong wind
- Lightning
- Poor visibility
- Extremely hot conditions without heat precautions
Professional Tip
Wet slate can be slippery. If the roof surface is unsafe, pause the work and resume only when conditions improve.
7. Keep the Work Area Clean
A clean roof and scaffold area improves safety and installation efficiency. Loose slate pieces, nails, tools, packaging, and offcuts can create trip hazards or slide from the roof.
Good Housekeeping Includes
- Remove broken slate pieces promptly
- Keep tools organized
- Collect nails, hooks, and clips
- Clear dust and cutting waste
- Keep access routes open
- Do not leave loose materials near edges
- Secure tools when working at height
Professional Tip
Clean work areas also reduce the risk of scratching or damaging installed natural roofing slate.
Safety Checklist for Slate Roof Installation
✔ PPE prepared and worn correctly
✔ Safety helmet, gloves, glasses, and boots used
✔ Roof ladder positioned safely
✔ Fall protection system installed where required
✔ Safety harness connected to approved anchor points
✔ Scaffolding stable and inspected
✔ Slate bundles handled and stored safely
✔ Roof loading controlled
✔ Weather conditions checked before work
✔ Work area clean and free from loose debris
✔ Cutting area controlled for dust and chips
✔ Workers trained for working at height
Common Safety Mistakes to Avoid
❌ Working on a wet or icy slate roof
❌ Walking directly on installed slates
❌ Carrying too many slates at once
❌ Working without fall protection
❌ Using damaged ladders or scaffolding
❌ Leaving tools or broken slate pieces loose on the roof
❌ Overloading scaffolding with slate bundles
❌ Cutting slate without eye protection or dust control
❌ Ignoring strong wind conditions
❌ Rushing installation near roof edges
Safety First
Slate roof installation requires skill, planning, and proper safety equipment. PPE, roof ladders, fall protection, scaffolding, and careful material handling help protect workers and prevent damage to natural roofing slate.
A safe worksite leads to better workmanship, fewer accidents, and a higher-quality slate roof.
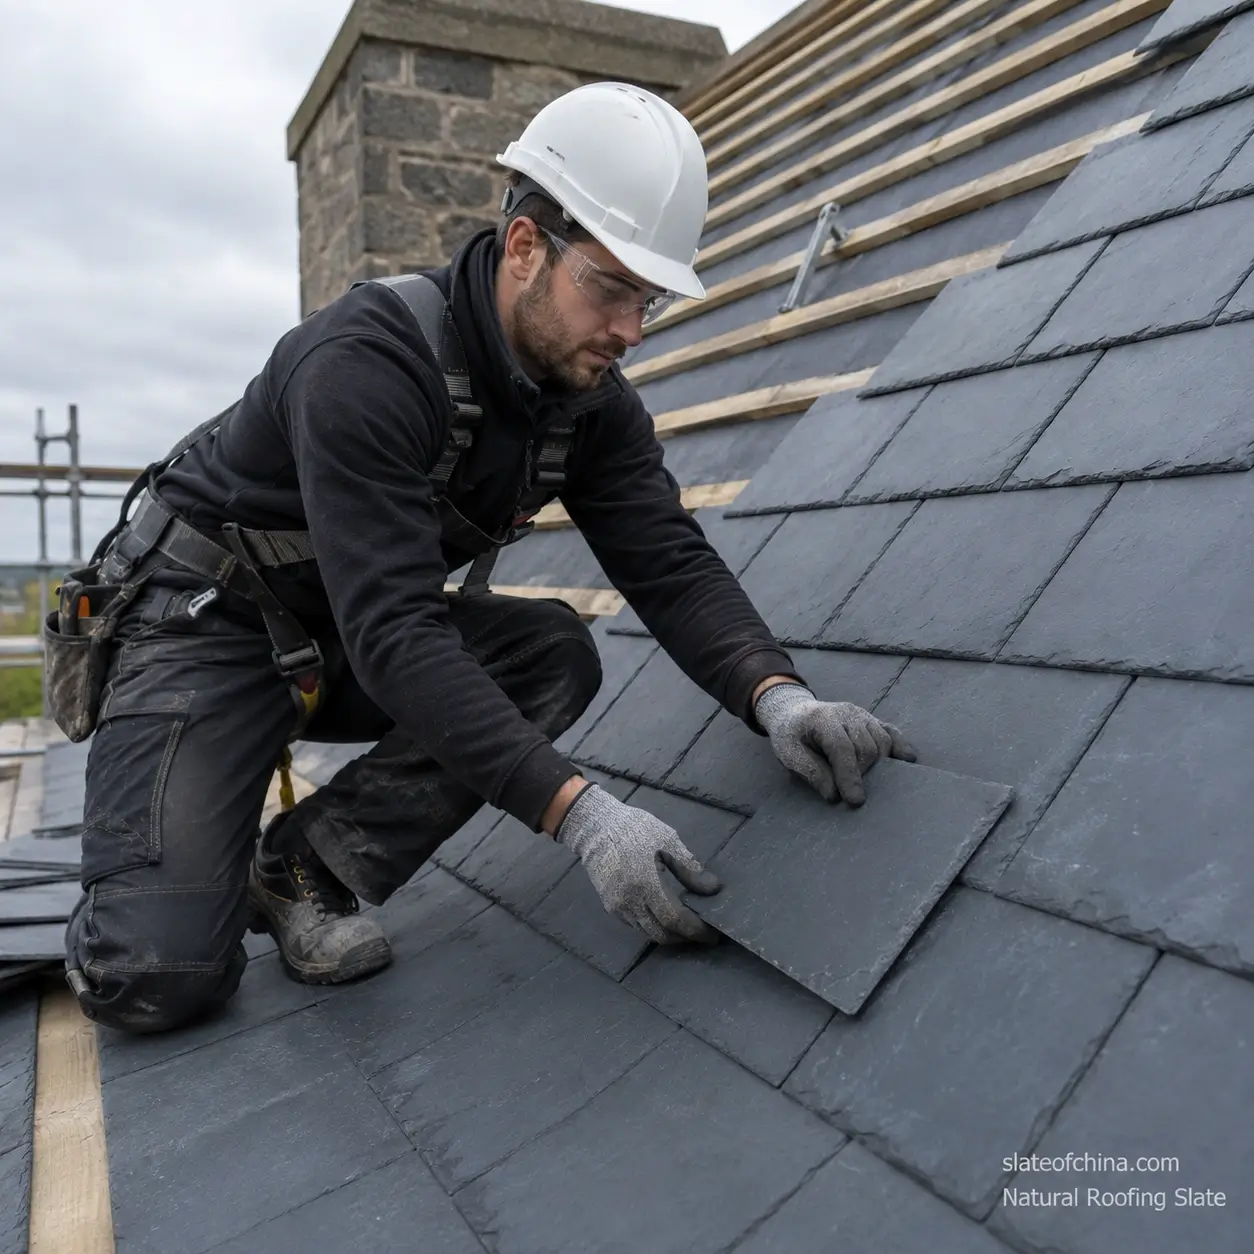
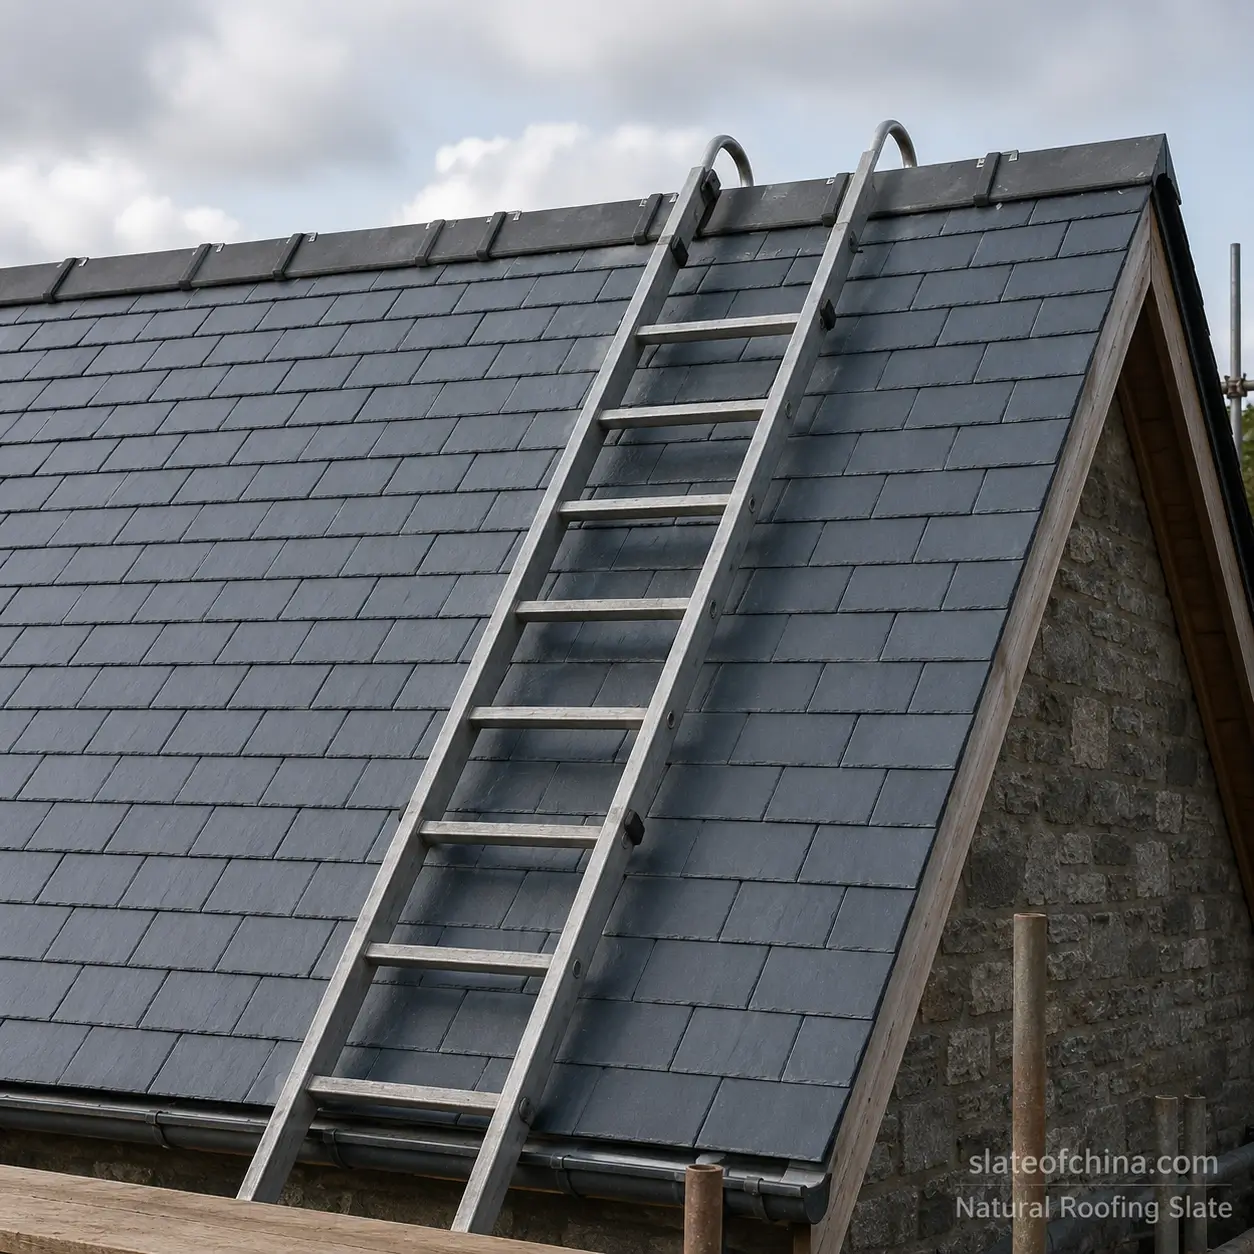
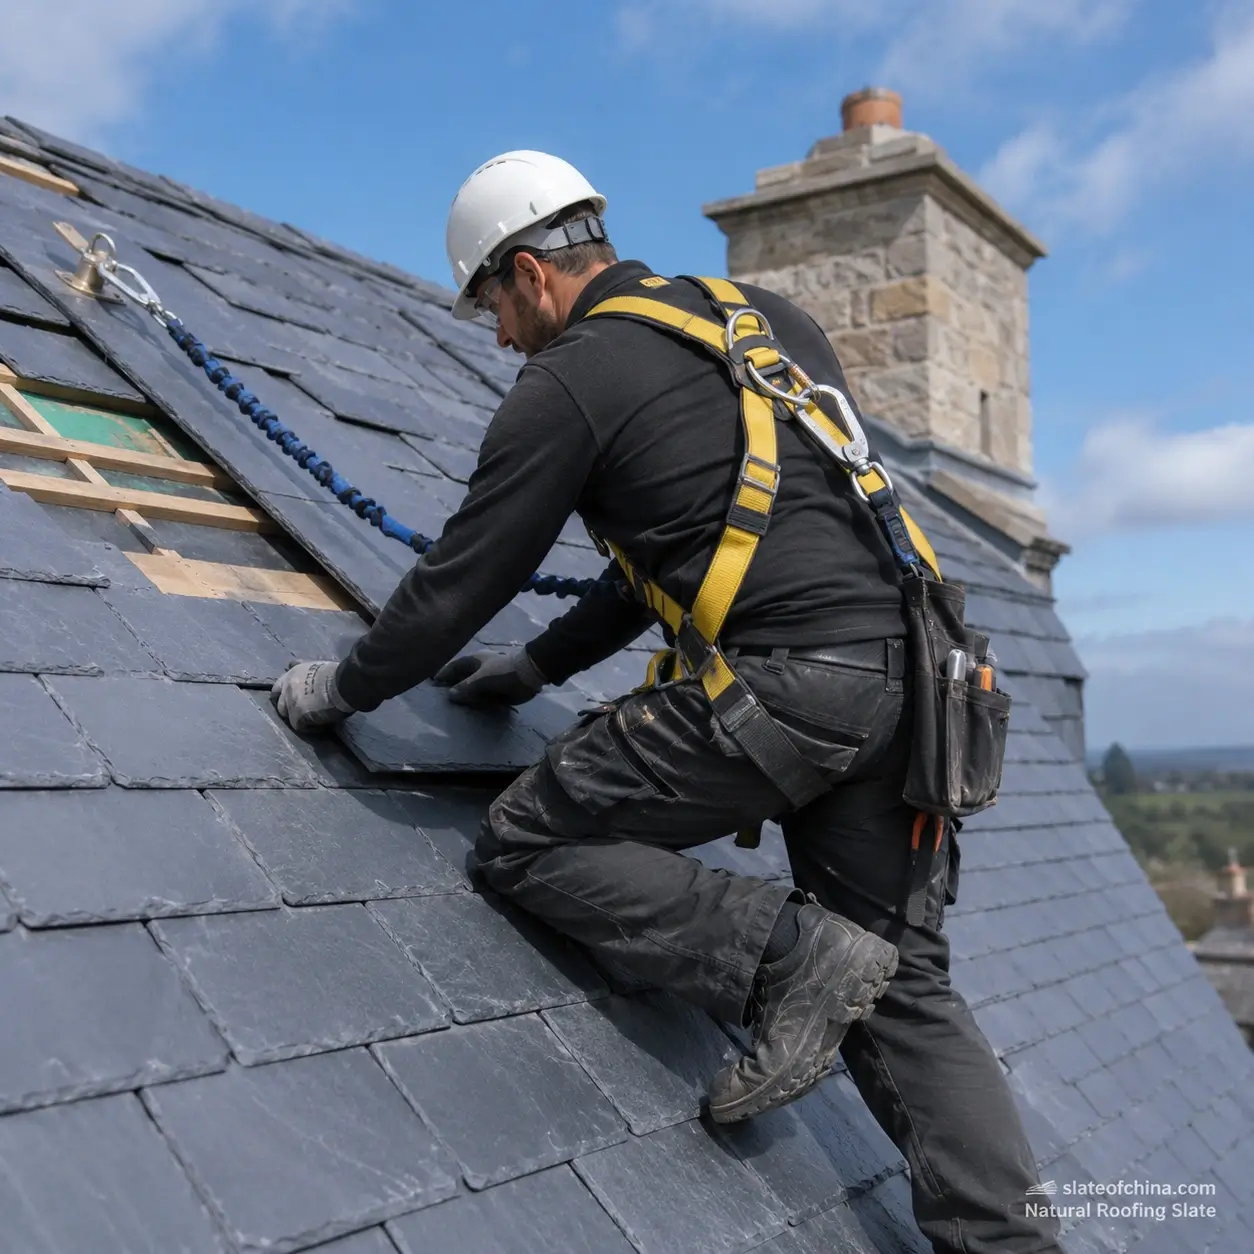
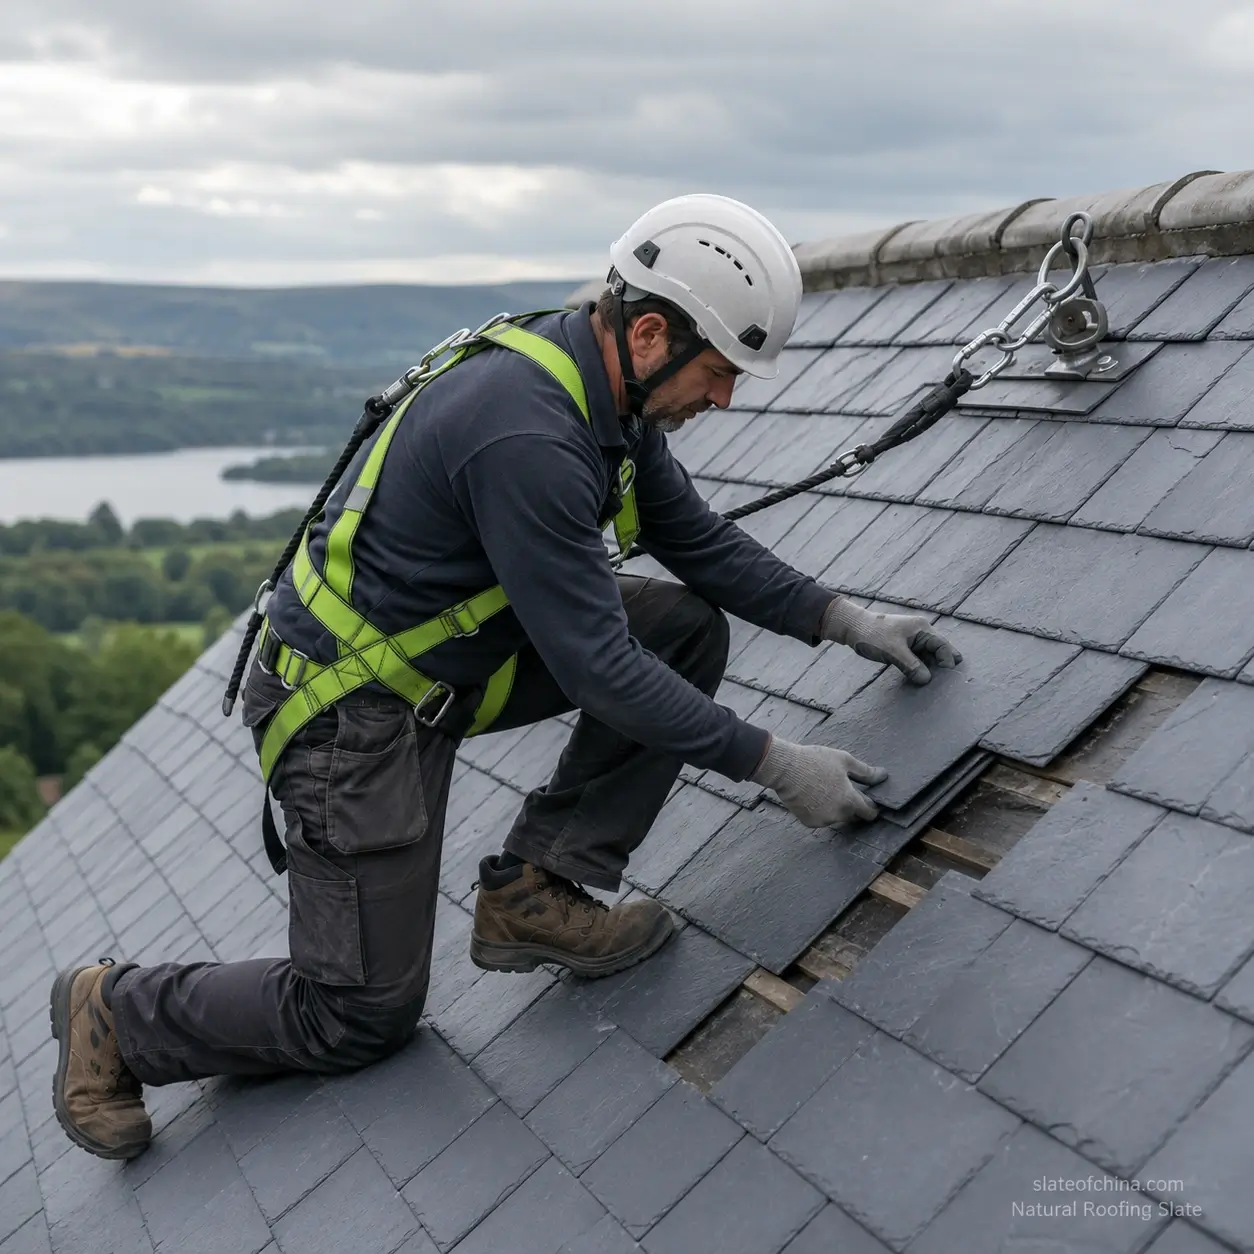
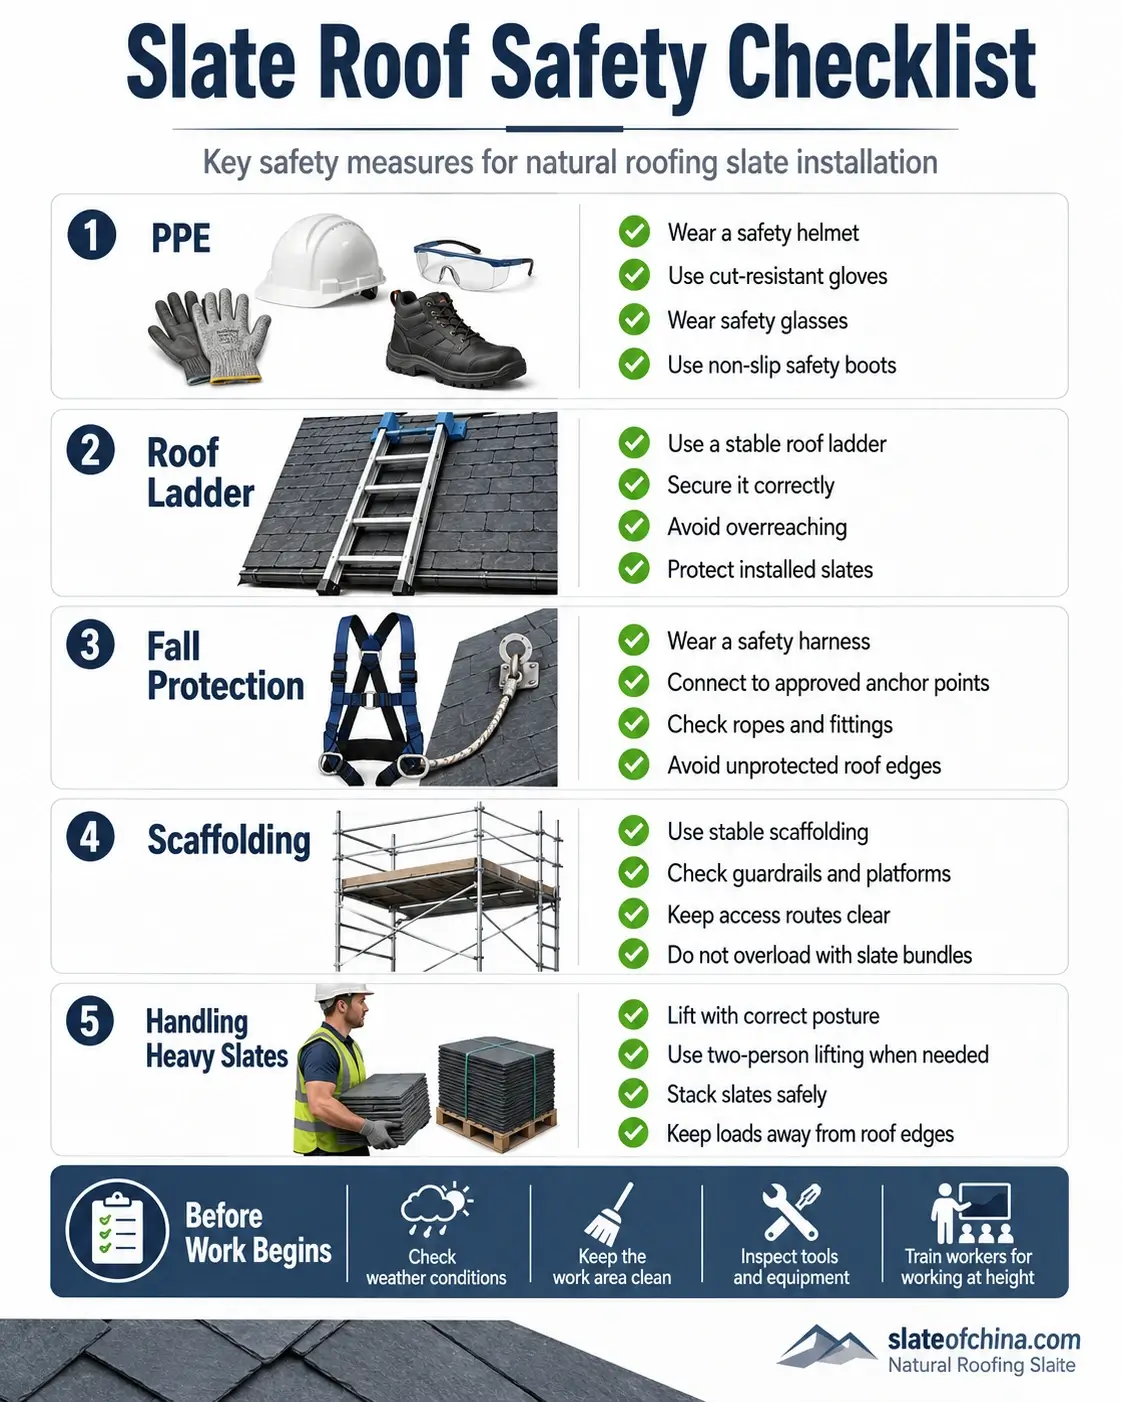
A safe slate roof installation protects both the workers and the roof itself. Proper PPE, roof ladders, fall protection, scaffolding, and careful slate handling are essential for professional roofing work
Maintenance After Installation
Keep Your Slate Roof Performing for Decades
A natural slate roof is known for its exceptional durability and long service life. When properly installed and maintained, high-quality roofing slate can protect a building for many decades.
However, even a strong slate roof still needs regular inspection and basic maintenance. Weather, wind, falling branches, snow, blocked gutters, foot traffic, or building movement can affect roof details over time.
Good maintenance helps identify small problems early, such as cracked slates, loose fixings, blocked valleys, damaged flashing, or clogged gutters. Fixing these issues early can prevent leaks and protect the full roof system.
1. First Inspection After Installation
The first inspection should be carried out after the slate roof has settled through its initial weather exposure. This helps confirm that all slates, fixings, flashing, valleys, ridges, hips, and gutters are performing correctly.
For many projects, the first inspection can be scheduled within the first few months after completion, or after the first major rain or storm event.
What to Check
- Slate courses remain straight and aligned
- No loose or lifted slates
- No cracked or broken slates
- Nails or hooks remain secure
- Ridge and hip details are stable
- Valley flashing is clean and draining properly
- Gutters are collecting and draining water correctly
- No visible water stains inside the building
Professional Tip
The first inspection is a good opportunity to confirm workmanship quality before small installation issues become long-term maintenance problems.
2. Annual Slate Roof Inspection
A slate roof should be inspected at least once a year. Regular annual inspection helps maintain the roof’s performance and extends its service life.
Annual inspections are especially important for buildings in areas with heavy rain, snow, strong wind, falling leaves, or large temperature changes.
Annual Inspection Checklist
✔ Check for cracked or slipped slates
✔ Inspect ridge, hip, and valley details
✔ Check chimney, skylight, and wall flashing
✔ Look for loose hooks, nails, or clips
✔ Remove leaves, moss, and debris where necessary
✔ Clean gutters and downpipes
✔ Check water flow through valleys and gutters
✔ Inspect attic or ceiling areas for signs of moisture
✔ Confirm that ventilation paths remain clear
Professional Tip
Spring or autumn is often a good time for annual inspection, especially before heavy rain, snow, or storm seasons.
3. Storm Inspection
After severe weather, the roof should be inspected for storm damage. Strong wind, hail, falling branches, heavy rain, snow, or ice can damage slates or roof details.
Even if the roof looks normal from the ground, hidden damage may exist around ridges, hips, valleys, flashing, and exposed edges.
After a Storm, Check For
- Slipped or missing slates
- Cracked or broken slates
- Loose ridge or hip pieces
- Damaged valley flashing
- Bent or lifted metal flashing
- Blocked gutters or downpipes
- Debris collected in valleys
- Water stains inside the building
- Fallen branches or impact damage
Professional Tip
Do not walk directly on the slate roof after a storm. Use proper roof access equipment or ask a professional roofer to inspect the roof safely.
4. Replace Cracked or Broken Slates
Cracked slates should be replaced as soon as possible. A small crack may allow water to enter the roof system, especially during wind-driven rain or freeze-thaw weather.
Replacing individual slates early is much easier and less expensive than repairing water damage later.
When to Replace a Slate
- The slate is cracked through the body
- A corner is broken near the overlap area
- The slate has slipped out of position
- Nail holes are broken
- The slate is delaminating or splitting
- Impact damage is visible
- Water leakage is suspected below the area
Professional Tip
Always replace damaged slates with matching natural roofing slate in similar size, thickness, color, and texture. This helps maintain both roof performance and appearance.
5. Clean Gutters and Downpipes
Gutters are essential for moving water away from the slate roof and building structure. If gutters become blocked, water can back up at the eaves, overflow onto walls, or increase moisture around roof edges.
Leaves, moss, slate chips, dust, and debris should be removed regularly.
Why Gutter Cleaning Matters
- Prevents water backup at the eaves
- Reduces risk of damp walls and fascia damage
- Helps valleys drain properly
- Protects underlayment and roof decking
- Reduces ice buildup in cold climates
- Improves long-term roof performance
Professional Tip
Clean gutters at least once or twice a year, especially after autumn leaf fall or heavy storms.
Maintenance Schedule for a Natural Slate Roof
| Maintenance Task | Recommended Frequency | Why It Matters |
|---|---|---|
| First roof inspection | After initial weather exposure | Confirms installation quality |
| General roof inspection | Once a year | Finds small problems early |
| Storm inspection | After severe weather | Detects wind, hail, or impact damage |
| Replace cracked slates | As soon as damage is found | Prevents leaks and further damage |
| Clean gutters and downpipes | 1–2 times per year | Keeps water flowing away from the roof |
| Check flashing | Every inspection | Prevents leaks around roof details |
| Check valleys | Every inspection | Ensures high-volume water channels stay clear |
Common Maintenance Mistakes to Avoid
❌ Waiting until a leak appears before inspecting the roof
❌ Walking directly on installed slate tiles
❌ Ignoring cracked or slipped slates
❌ Leaving leaves and debris in valleys
❌ Allowing gutters to remain blocked
❌ Using sealant as a long-term repair for broken slate
❌ Replacing slate with mismatched material
❌ Ignoring chimney, skylight, ridge, hip, and valley flashing
❌ Pressure washing natural slate aggressively
❌ Hiring non-specialist workers for slate roof repairs
Slate Roof Maintenance Checklist
✔ Inspect the roof at least once a year
✔ Check after major storms
✔ Replace cracked or broken slates quickly
✔ Keep valleys clear of leaves and debris
✔ Clean gutters and downpipes regularly
✔ Check flashing around chimneys, skylights, walls, ridges, hips, and valleys
✔ Look for water stains inside the building
✔ Avoid unnecessary foot traffic on the slate roof
✔ Use matching slate for repairs
✔ Keep a maintenance record for future reference
Small Maintenance Prevents Big Repairs
Most serious slate roof problems begin as small issues: one cracked slate, a blocked gutter, loose flashing, or debris in a valley.
Regular inspection and simple maintenance help protect the roof structure, reduce repair costs, and keep the natural slate roof looking beautiful for decades.
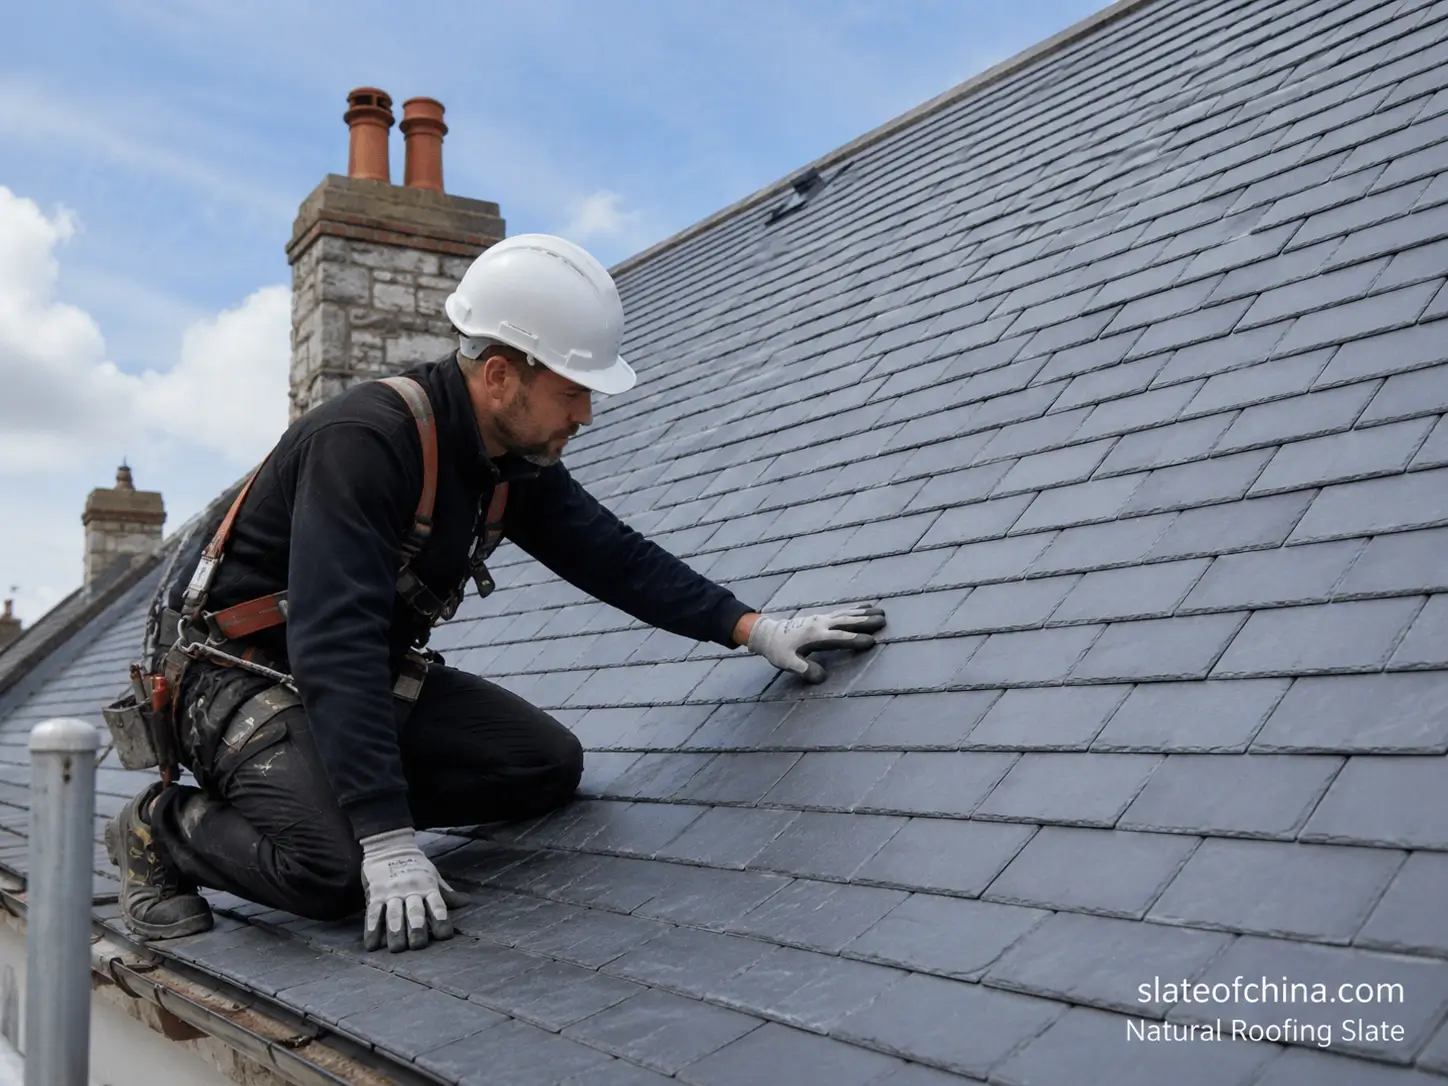
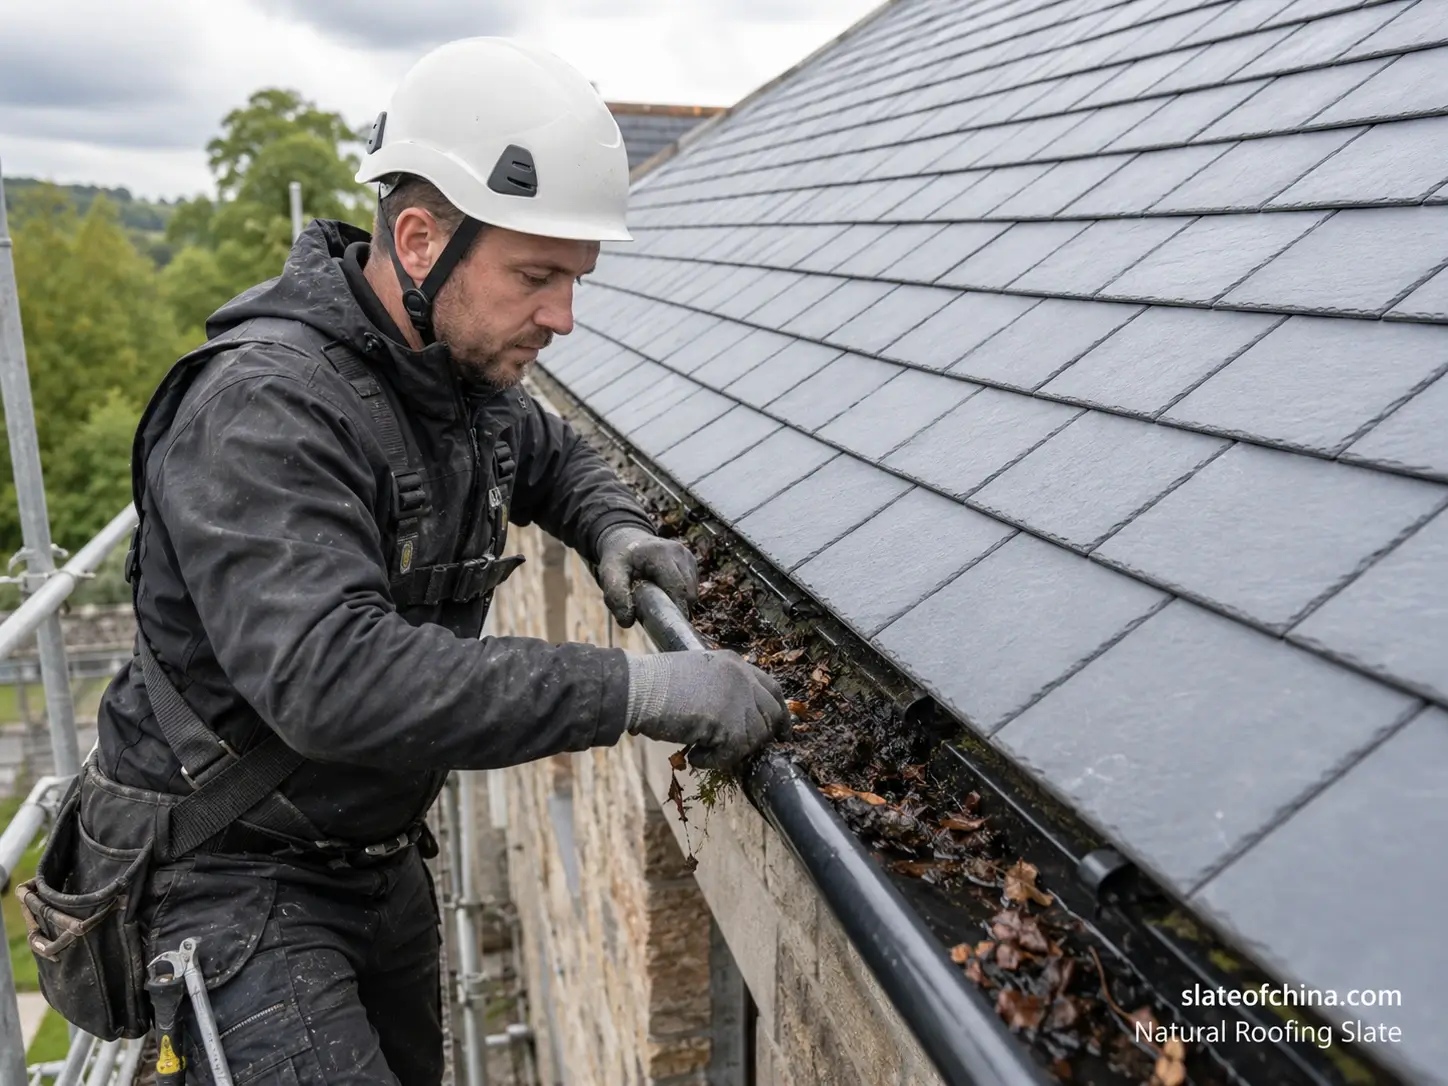
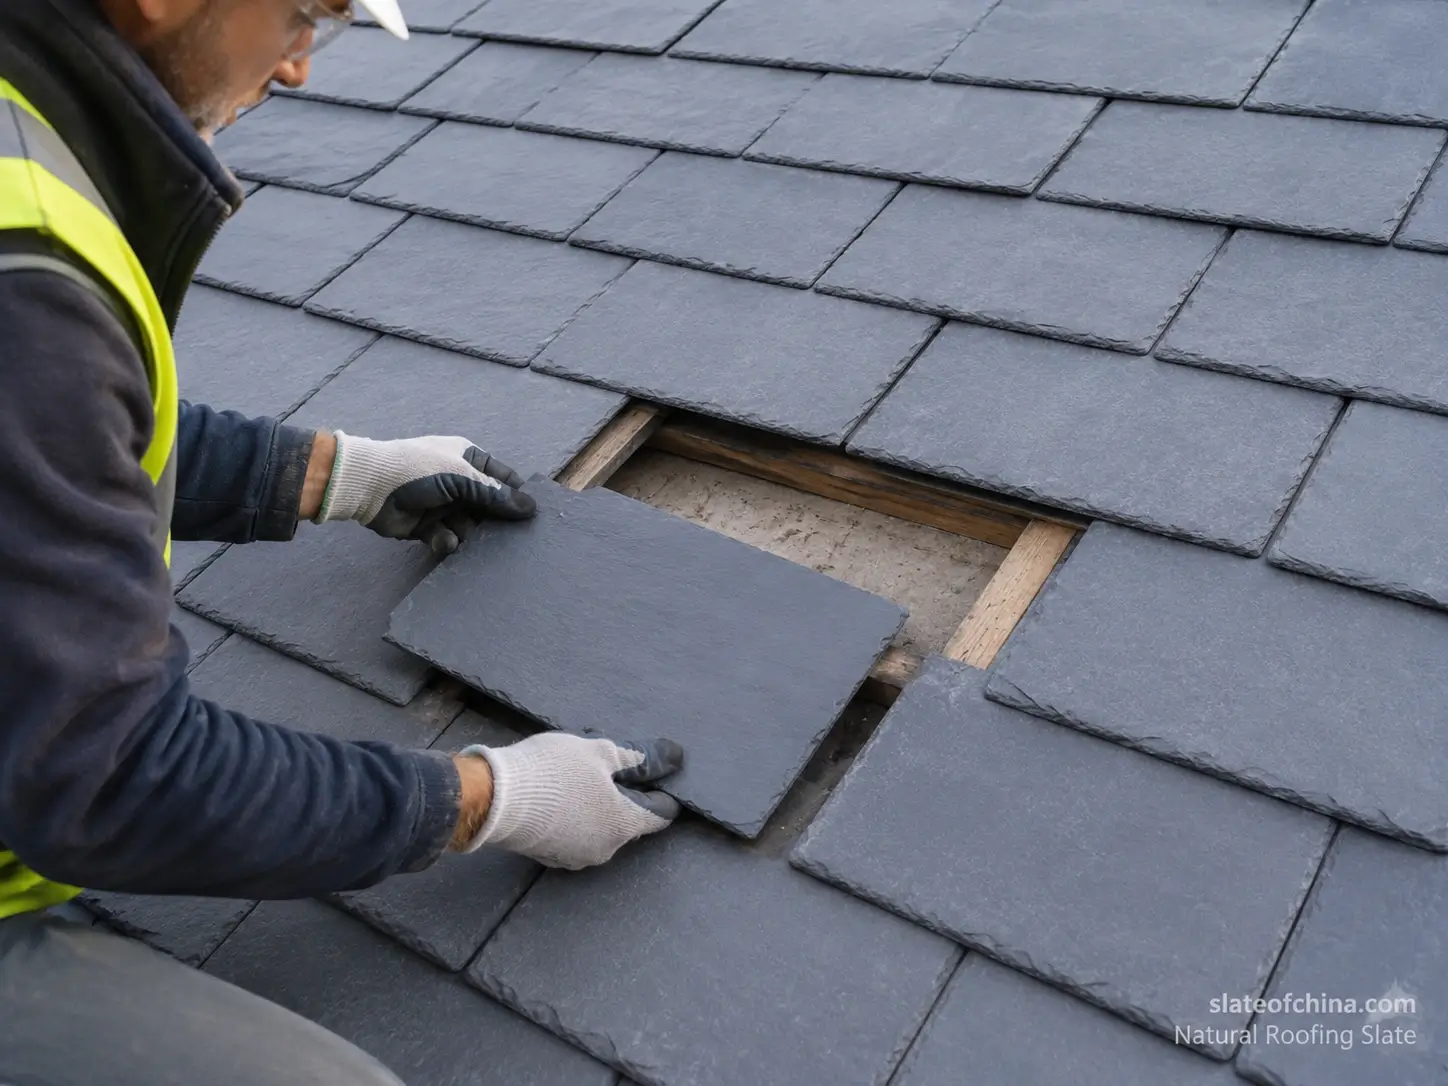
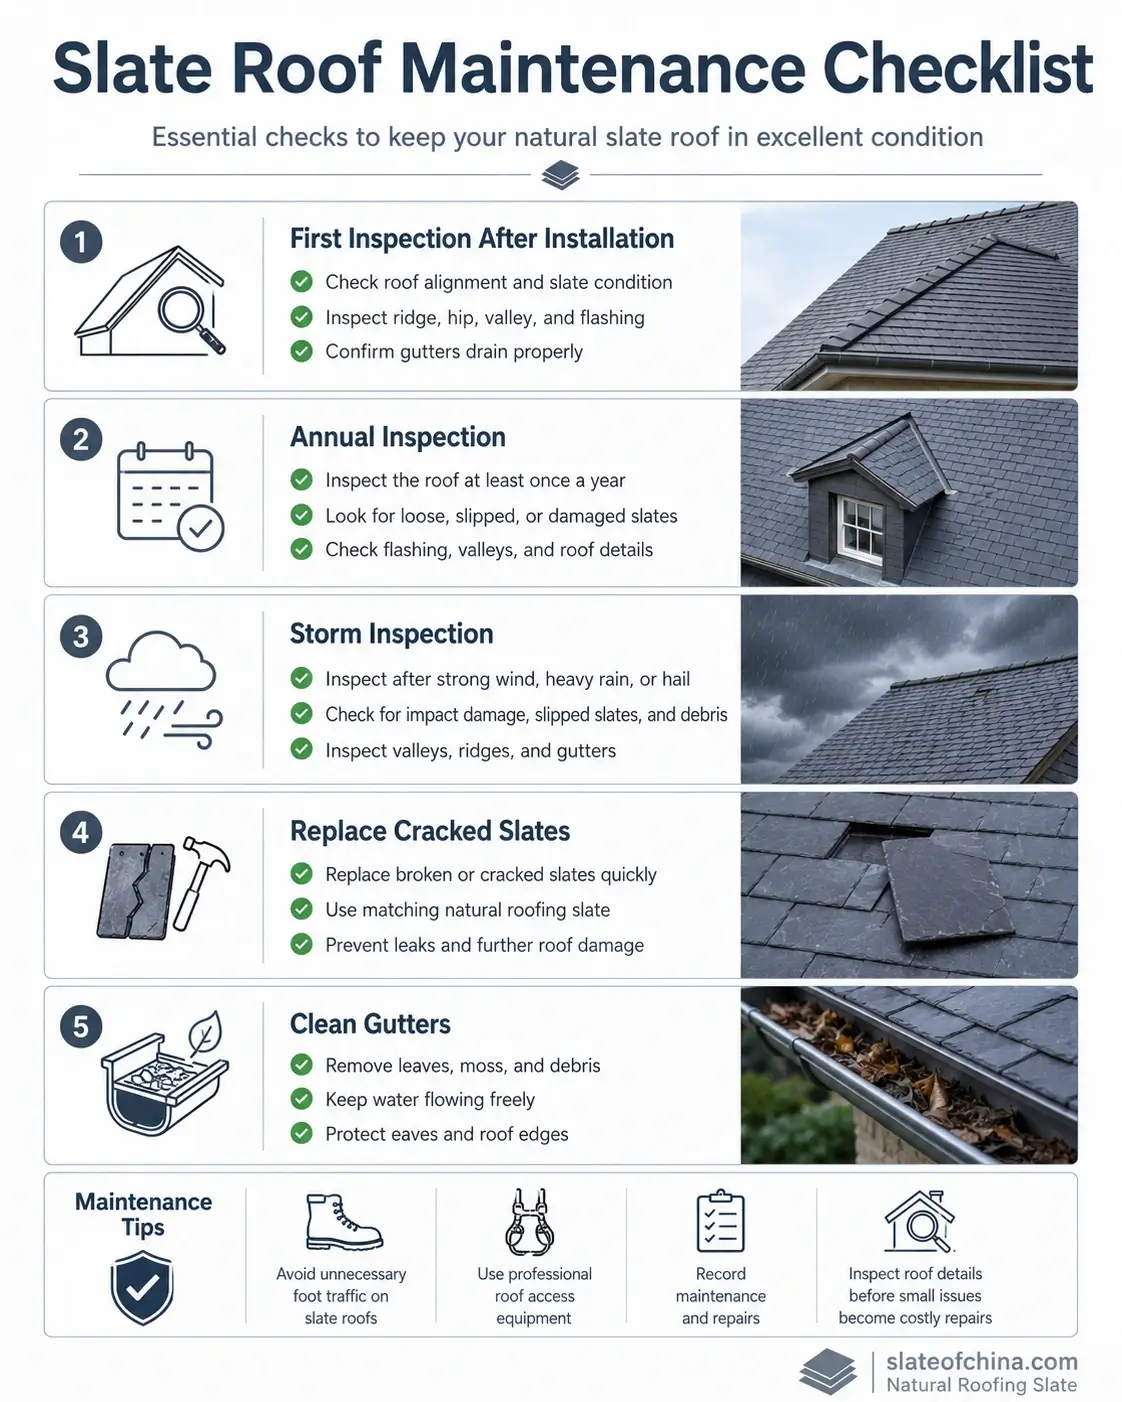
Frequently Asked Questions About Slate Roof Installation
Why Choose Jiujiang Roofing Slate
Natural Roofing Slate from Jiujiang, China
A successful slate roof starts with good installation, but it also depends on the quality and consistency of the roofing slate itself. For contractors, importers, distributors, and building owners, choosing the right slate can make installation easier, improve roof performance, and reduce long-term maintenance problems.
Jiujiang, located in Jiangxi Province, China, is a well-known natural slate production area with rich stone resources and long experience in slate processing. Jiujiang roofing slate is widely valued for its natural appearance, stable quality, practical installation performance, and reliable export supply.
For natural slate roof installation projects in Europe, North America, and other international markets, Jiujiang roofing slate offers a strong balance of durability, workability, and factory-direct value.
High Density Natural Slate
Jiujiang roofing slate is formed from natural stone with a dense structure and fine texture. High-density slate helps improve strength, weather resistance, and long-term roof durability.
Dense natural slate is especially important for roofing applications because the material must withstand rain, snow, wind, freeze-thaw cycles, and long-term outdoor exposure.
Why It Matters
High density helps provide:
- Better durability
- Stronger resistance to weathering
- More stable roof performance
- Reduced risk of premature deterioration
- A solid, premium natural stone appearance
For customers looking for a long-lasting slate roof, material density is one of the key quality indicators.
Stable Dimensions for Easier Installation
Consistent slate size is important for accurate layout, straight courses, correct exposure, and efficient installation. Jiujiang roofing slate can be processed into regular dimensions according to project requirements, helping roofers maintain a cleaner and more uniform roof appearance.
Stable dimensions also help reduce installation errors related to overlap, headlap, batten spacing, and alignment.
Installation Benefits
- Easier slate layout
- More consistent exposure
- Straighter roof courses
- Better visual appearance
- Less cutting and adjustment on site
- Improved installation efficiency
For large roofing projects, dimensional consistency can save both time and labor.
Consistent Thickness for Better Workmanship
Natural slate varies by nature, but good processing control can help maintain a more consistent thickness range. Consistent thickness makes it easier for installers to create a smooth roof surface and helps reduce unevenness between courses.
This is especially important for customers who want a professional roof finish with clean lines and balanced texture.
Why Consistent Thickness Helps
- Easier sorting on site
- Better course alignment
- Smoother roof surface
- Reduced rocking or uneven slate placement
- More predictable fixing performance
- Cleaner finished appearance
A consistent slate thickness does not remove the natural character of slate; it helps make that natural character easier to install and control.
Easy to Split, Trim, and Install
Good roofing slate should be strong, but it should also be workable. Jiujiang roofing slate is suitable for splitting, trimming, cutting, and shaping during installation.
Roofers often need to adjust slates around valleys, hips, ridges, chimneys, skylights, dormers, and roof edges. A slate that is easier to trim can improve installation speed and reduce waste.
Practical Advantages
- Easier cutting around roof details
- Cleaner trimming at valleys and hips
- Less breakage during handling
- Better adaptation to complex roof shapes
- Suitable for both nail fixing and hook fixing systems, depending on project design
This makes Jiujiang roofing slate a practical choice for both standard roof areas and detailed architectural roofing work.
Low Water Absorption
Low water absorption is important for natural roofing slate because the roof is constantly exposed to rain, snow, and moisture. Slate with low water absorption helps reduce the risk of water-related damage and supports long-term weather resistance.
This is especially important in cold climates where absorbed water may freeze and expand.
Benefits of Low Water Absorption
- Better resistance to rain exposure
- Reduced moisture penetration
- Improved freeze-thaw performance
- Lower risk of weather-related deterioration
- Better long-term roof reliability
For roofing projects in Europe and North America, water absorption performance is an important technical consideration.
Excellent Frost Resistance
In cold climates, roofing materials must resist freeze-thaw cycles. When water enters a material and freezes, expansion can cause damage over time. Natural roofing slate with good frost resistance is better suited for regions with snow, ice, and seasonal temperature changes.
Jiujiang roofing slate is suitable for many cold-weather roofing applications when selected and installed according to project requirements.
Why Frost Resistance Matters
- Helps protect the roof in winter climates
- Reduces risk of cracking or surface damage
- Supports long-term durability
- Important for Europe, North America, and high-altitude regions
- Works together with correct headlap, underlayment, ventilation, and flashing
Good material performance and correct installation must work together for the best result.
Suitable for Europe and North America
Jiujiang roofing slate is commonly supplied for international roofing and building material markets. Its natural appearance, practical sizing, and installation-friendly properties make it suitable for a wide range of residential, commercial, restoration, and architectural projects.
It can be used for:
- Residential slate roofs
- Villas and private houses
- Historic-style buildings
- Commercial projects
- Garden buildings and outbuildings
- Architectural roofing details
- Export distribution and wholesale supply
For European projects, slate can be prepared according to common market requirements, including nail holes, selected sizes, thickness ranges, and packaging standards.
CE Compliance and Project Standards
For European markets, compliance documentation may be required depending on the project, importer, and local regulations. If applicable, Jiujiang roofing slate can be supplied with relevant testing information or documentation according to customer requirements.
Because certification and compliance requirements may vary by product batch, destination country, and project specification, buyers should confirm the required standards before ordering.
Suggested Buyer Checkpoints
- Product size and thickness
- Water absorption
- Frost resistance
- Flexural strength
- Surface finish
- Hole punching requirements
- Packaging and pallet marking
- CE or other compliance documentation, if required
This helps ensure the slate matches both technical and market requirements.
Factory Direct Supply from Jiujiang
Working directly with a Jiujiang slate factory helps importers, distributors, contractors, and project buyers control product specifications, packaging, delivery schedules, and cost.
Factory direct supply is especially useful for customers who need stable quality and repeat orders.
Factory Direct Advantages
- Direct communication with the producer
- Custom sizes and thickness options
- Better control of sorting and packaging
- More stable supply for wholesale orders
- Competitive export pricing
- Technical support before shipment
- Flexible support for project-based requirements
For professional buyers, factory direct supply can reduce communication gaps and improve purchasing efficiency.
Why Jiujiang Roofing Slate Is Installation-Friendly
Jiujiang roofing slate is not only a natural roofing material; it is also practical for professional installation.
It helps roofers achieve:
✔ Consistent slate courses
✔ Accurate overlap and headlap
✔ Easier trimming at roof details
✔ Better sorting by thickness
✔ Cleaner alignment
✔ Reliable fixing with nails or hooks
✔ Durable performance in wet and cold climates
This combination of natural durability and installation practicality makes it suitable for both new roof construction and renovation projects.
Product Advantages at a Glance
| Advantage | Why It Matters for Slate Roofing |
|---|---|
| High density natural slate | Supports durability and long-term performance |
| Stable dimensions | Helps maintain straight courses and accurate exposure |
| Consistent thickness | Makes installation easier and roof appearance cleaner |
| Easy to split and trim | Useful around valleys, hips, ridges, and roof edges |
| Low water absorption | Helps improve weather resistance |
| Excellent frost resistance | Suitable for cold and freeze-thaw climates |
| Export-ready supply | Suitable for Europe, North America, and other markets |
| Factory direct from Jiujiang | Better control of quality, packaging, and cost |
A Better Slate Roof Starts with Better Slate
Correct installation is essential, but the material matters just as much.
Jiujiang roofing slate offers a strong combination of natural durability, stable dimensions, low water absorption, frost resistance, and installation-friendly processing.
For importers, contractors, and project buyers, this means easier installation, reliable roof performance, and more consistent supply.
Need Roofing Slate for Your Project?
We can supply Jiujiang natural roofing slate in different sizes, thickness ranges, finishes, and packaging options according to your project requirements.
Contact us to learn more about:
- Roofing slate specifications
- Available sizes and thickness
- Nail hole options
- Packaging and pallet loading
- Test reports or compliance documents, if required
- Technical support for installation and selection
Contact us today to request product specifications, samples, or a project quotation.
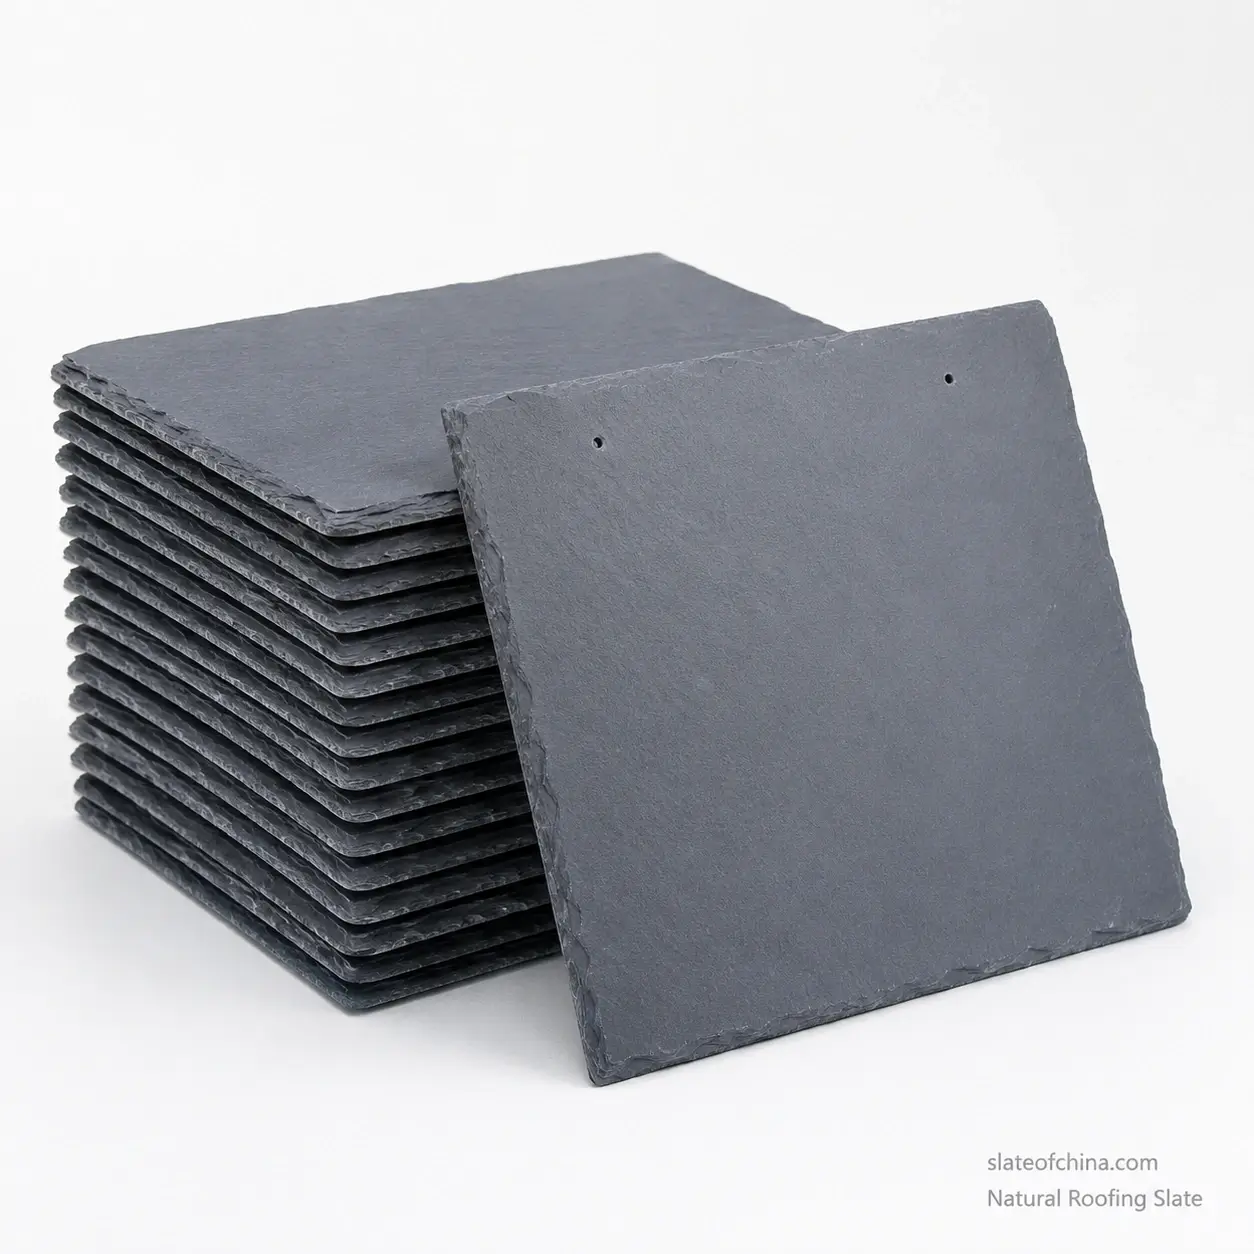
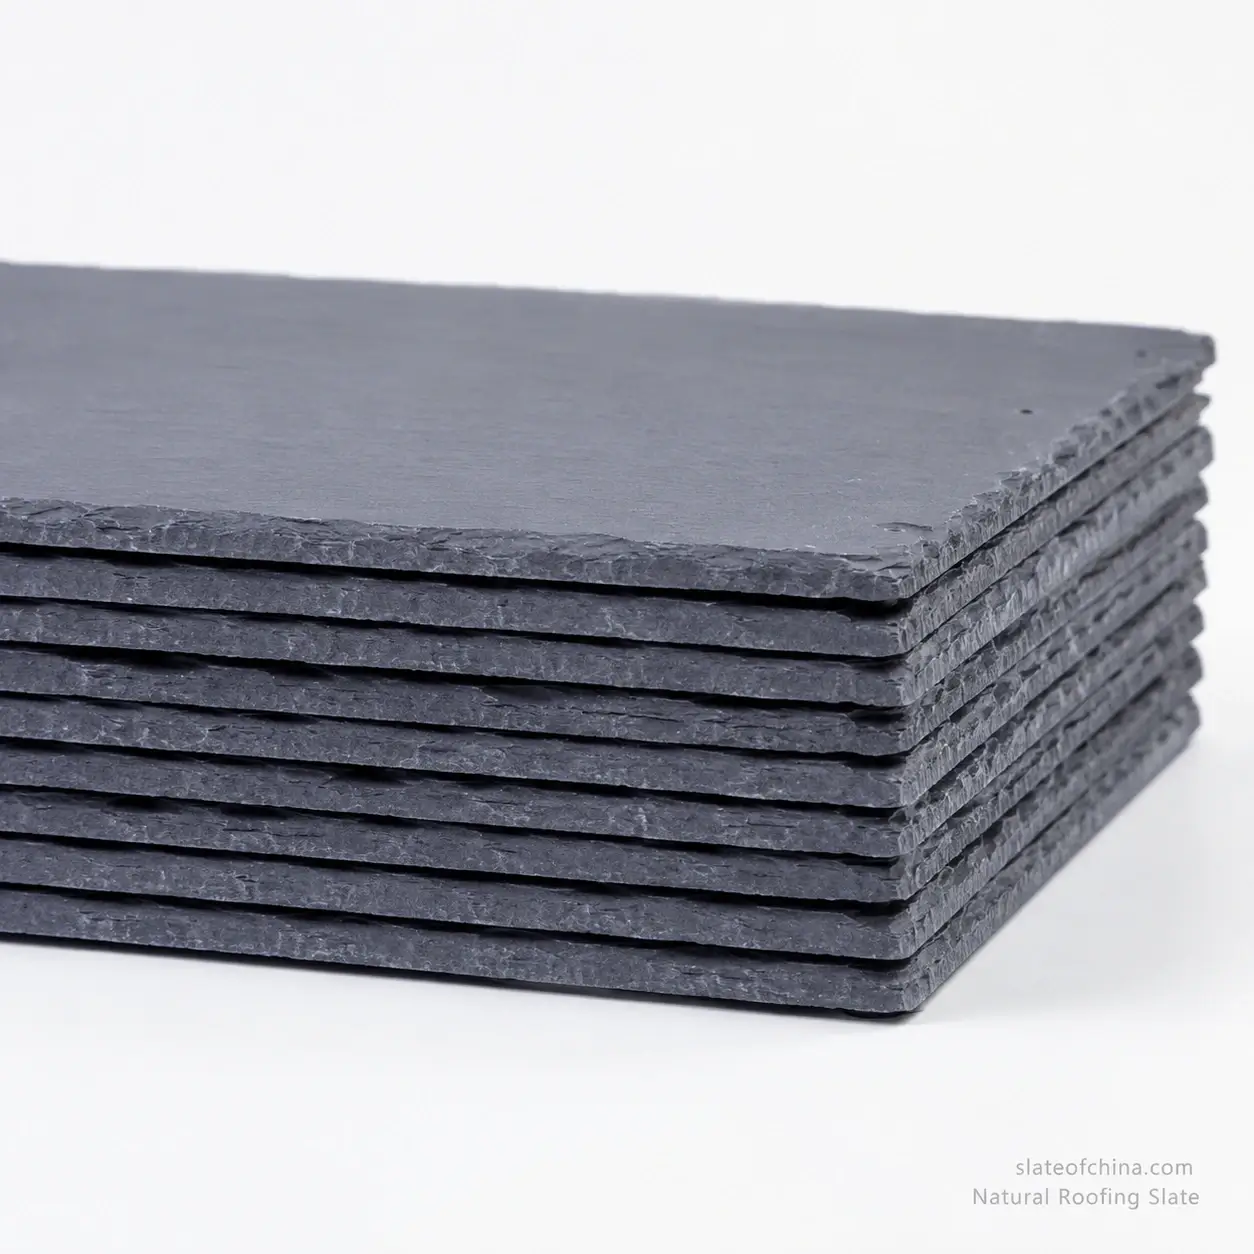
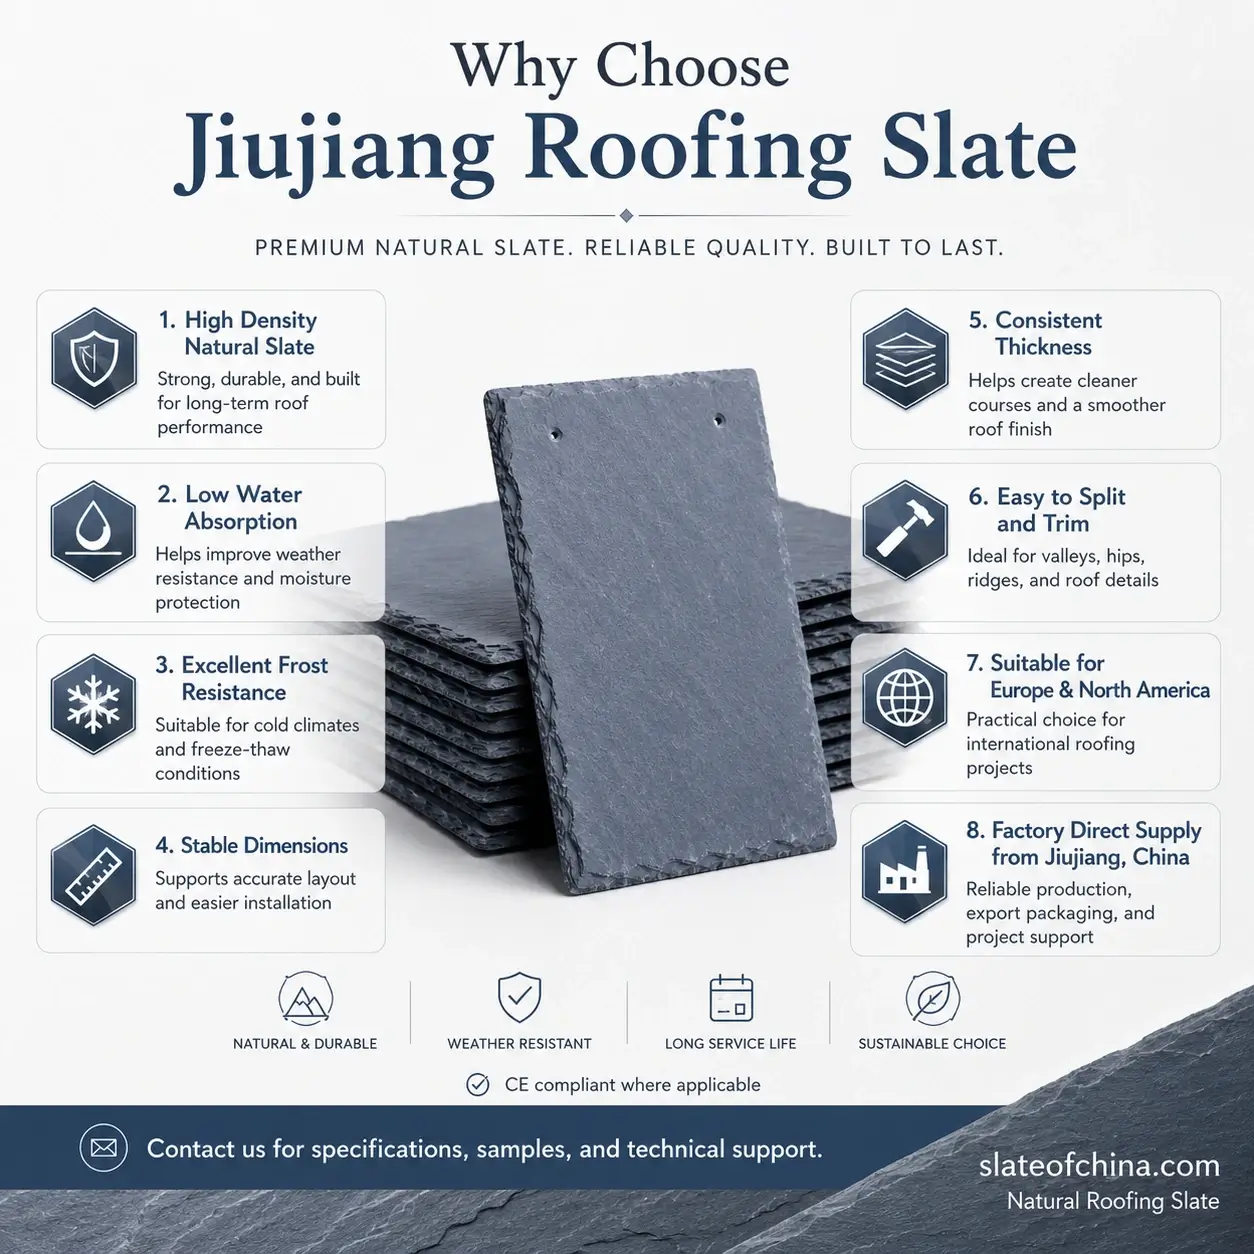
Written by
Slate of China Technical Team
Specialists in Natural Roofing Slate Manufacturing and Export
Over 30 years of experience in roofing slate production, processing, quality inspection, and international supply.